Expenses

Axis Expenses streamlines the management of expenses. After an employee logs and submits their expenses in Axis, expenses are reviewed by management and accounting teams. Once approved, payments can be processed and disbursed back to the employee for reimbursement.
See also
View expense categories
The first step to track expenses is configuring the different types of expenses for the company (managed as expense categories in Axis). Each category can be as specific or generalized as needed. Additionally, expense categories can be configured to repay expenses at either a set price or allow for specific prices to be reported.
To view the default expense categories, navigate to .
The default expense categories allow creating expenses for common expenses, including communication costs, meals, gifts, miles driven, and other travel expenses. For expenses outside these default categories, the general expenses category, EXP_GEN, is used. If a company has specific expenses it commonly reimburses, and wants to track them separately, new expense categories can be made or existing expense categories can be modified.

Create new expense categories
Some companies require more expense categories than the Expenses app includes. For these situations, new expense categories can be created.
Example
A company that trains car mechanics allows its technicians to purchase $500 worth of tools in a
year. In this situation, the company creates a new category called TOOLS to track all tool
expenses.
To create a new expense category, navigate to . Click New, and a new expense category form loads.
Note
Expense categories are managed like products in Axis. The expense category form follows the standard product form in Axis, and the information entered is similar. Expense products are referred to as expense categories throughout this document since the main menu refers to these as Expense Categories.
Enter the following fields on the form:
Product Name: Enter a name for the category that is short and informative.
Cost: If employees can report the actual cost of an expense, and are reimbursed the reported amount, leave the field set to
0.00. If the expense should always be reimbursed for a specific price, enter the amount in this field. If a price is entered, a per field appears with Unit populated by default. Unit covers most expense situations, but if the reimbursement is based on weight, length, volume, etc., choose the corresponding type of unit using the drop-down menu.Example
Here are some examples for when to set a specific Cost on a product vs. leaving the Cost at
0.00:Meals: If employees are reimbursed for their full meal cost, set the Cost to
0.00. When an employee logs an expense for a meal, they enter the actual amount of the bill and are reimbursed for that amount. An expense for a meal costing $95.23 would equal a reimbursement of $95.23.Mileage: If employees receive a flat rate for each mile they drive, set the Cost to
1.00. When an employee logs an expense for the miles driven, they enter the number of miles driven in the Quantity field, and are reimbursed $1.00 per mile they reported. An expense for 100 miles would equal a reimbursement of $100.00.Per Diem: If employees receive a daily flat rate of $125.00 when traveling, set the Cost to
125.00. An expense for three days of per diem costs (meals, incidentals, taxi fare, etc.) would equal a reimbursement of $375.00.
Note
The Cost field is always visible on the expense category form, but the Sales Price field is only visible if the Sales Price is selected under the Re-Invoice Expenses section. Otherwise, the Sales Price field is hidden.
Reference: Enter a short reference for the expense, such as
FOODorTRAVEL. This reference is used when emailing expenses.Category: Using the drop-down menu, select the category the expense falls under. It is recommended to use the default category
All / Expenses, but another category can be selected if the accounting department requires it.Company: If in a multi-company database, select the company the expense category applies to. If the expense category applies to all companies, leave this field blank.
Guideline: Enter some rules or important information for the expense category. This is visible in the Note column on the Expense Category dashboard.
Example
An expense category for expenses related to working from home may have a Name of
WFH, and the Guideline may sayMonitors, Chairs, & Other Home Working Costs.Expense Account: If using the Axis Accounting app, select the CoA the expense should be logged on.
Important
Check with the accounting department to determine the correct account to reference in this field as it affects various reports.
Purchase Taxes and Sales Taxes: Enter the default taxes that are applied when purchasing or selling this product, if applicable.
Note
The Sales Taxes field is only visible if the Sales app is installed, and either the At cost or Sales Price options are selected in the invoicing section.
Tip
It is considered good practice to use a tax that is configured with Tax Included in Price. Taxes are automatically configured if these are set.

Invoicing section
If the Sales app is installed, an invoicing section is visible. This section allows the expense to be reinvoiced to customers on sales orders.
If the expense cannot be reinvoiced, enable the No option. If the expense category can be reinvoiced, enable either of these options:
At cost: Select this option to have the expense item reinvoiced at the price set in the Cost field.
Sales Price: Select this option to have the expense item reinvoiced at the sales price. When enabled, a Sales Price field appears beneath the Product Name field. Enter the sales price in the new field.
Example
A heating and cooling company offers at-home repairs on the furnaces and central air units it sells. Their technicians are sub-contracted, and use their own vans, tools, and parts.
As part of their contracts, technicians are reimbursed for their travel. They receive $1.00 for every mile they drive. Additionally, the customer must pay for the travel as part of their service contract. The customer pays $1.50 for every mile the technician drives to their location.
To configure this expense, the Sales Price is set to
1.50and the Cost is set to1.00.

Before expenses can be reimbursed, each individual expense needs to be logged in the database. Expense records can be created in four different ways: manually enter an expense record, upload a receipt, drag and drop a receipt onto the Expenses app dashboard, or email a receipt to a preconfigured email address.
Manually enter expenses
To record a new expense, open the Expenses app, which displays the My Expenses page, by default.
Tip
This view can also be accessed at any time by navigating to .
Click the New button and fill out the following fields on the blank expense form that loads:
Description: Enter a short description for the expense. This should be concise and informative, such as
Lunch with clientorHotel for trade show.Category: Using the drop-down menu, select the expense category that most closely corresponds to the expense.
Total: Enter the total amount paid for the expense in one of two ways:
If the expense is for a single item/expense, and the category selected was for a single item, enter the cost in the Total field (the Quantity field is hidden).
If the expense is for multiples of the same item/expense with a fixed price, the Unit Price is displayed. Enter the number of units in the Quantity field, and the total cost is automatically updated with the correct total. The total cost appears below the Quantity.
Example
An employee received one dollar for each mile driven for work. The Category is [MIL] Mileage. The Unit Price is automatically populated with
$1.00, which is the cost per mile configured for the expense Category [MIL] Mileage. The Quantity is set to48, which is the number of miles driven, and the total is calculated to$48.00.
Included Taxes: If taxes were configured on the selected expense category, the tax percentage and amount appear automatically after entering either the Total or the Quantity.
Note
When a tax is configured on an expense category, the Included Taxes value updates in real time, as the Total or Quantity is updated.
Employee: Using the drop-down menu, select the employee associated with the expense.
Paid By: Click the radio button to indicate who paid for the expense and should be reimbursed. Select either Employee (to reimburse) or Company. Depending on the expense category selected, this field may not appear.
Expense Date: Using the calendar popover window that appears when this field is clicked, enter the date the expense was incurred.
Account: If the selected expense Category has a specific account linked to it, that account appears in the Account field. If no account is specified, the default
600000 Expensesaccount populates this field. If a different account is desired, select the account the expense should be logged in.Customer to Reinvoice: If the expense should be paid for by a customer and the selected Category allows for reinvoicing of expenses, select the SO and customer to be invoiced for the expense using the drop-down menu. All sales orders in the drop-down menu list both the SO, as well as the company the sales order is written for. After the expense is saved, the customer name disappears, and only the SO is visible on the expense.
Example
A customer wishes to have an on-site meeting for the design and installation of a custom building, and agrees to pay for all expenses associated with the meeting, including travel, hotel, and meals for the traveling employees. All expenses tied to that meeting would indicate the sales order for the custom building (which also references the customer) as the Customer to Reinvoice.
Analytic Distribution: Select the account the expense should be written against from the drop-down menu for either Projects, Departments, or both. Multiple accounts can be listed for each category, if needed. Adjust the percentage for each analytic account by typing in the percentage value next to each account.
Company: If in a multi-company database, select the company the expense should be filed for using the drop-down menu. The current company automatically populates this field.
Notes…: If any notes are needed to clarify the expense, enter them in the notes field.

Attach receipts
After the expense record is created, the next step is to attach a receipt. Click the Attach Receipt button, and a file explorer appears. Navigate to the receipt to be attached, and click Open.
The new receipt is recorded in the chatter, and the number of receipts appears next to the (paperclip) icon. Multiple receipts can be attached to an individual expense record, as needed.
Upload expenses
It is possible to have expense records created automatically by uploading a PDF receipt. To utilize this feature, a setting must be enabled, and IAP credits must be purchased.
Digitalization settings
To enable receipt scanning, navigate to , and tick the checkbox beside the Expense Digitization (OCR) option. Then, click Save. When enabled, additional options appear. Click on the corresponding radio button to select one of the following options:
Do not digitize: Disables receipt digitization but does not uninstall the related digitization module.
Digitize on demand only: Only digitizes receipts when requested. A Digitize document button appears on expense records. When clicked, the receipt is scanned and the expense record is updated.
Digitize automatically: Automatically digitizes all receipts when they are uploaded.
Beneath these options are two additional links. Click the Manage Service & Buy Credits link to view account details and settings, and purchase credits for receipt digitization. Click the View My Services link to view a list of all current services, and their remaining credit balances.
For more information on document digitization and IAPs, refer to the In-app purchase (IAP) documentation.
Note
When the Expense Digitization (OCR) option is enabled, a necessary module is installed, so receipts can be scanned. Disabling this option uninstalls the module.
If, at some point, there is a desire to temporarily stop digitizing receipts, select the Do not digitize option. The reason this option is available is so the module is not uninstalled, allowing for digitization to be enabled in the future by selecting one of the other two options.
Upload receipts
Open the Expenses app, and from the My Expenses dashboard, click Upload, and a file explorer appears. Navigate to the desired receipt, select it, then click Open.
The receipt is scanned, and a new expense record is created. The Expense Date field is populated with today’s date, along with any other fields based on the scanned data, such as the Total.
Click on the new entry to open the individual expense form, and make any changes, if needed. The scanned receipt appears in the chatter.
Drag and drop an expense
If digitalization is enabled, drag and drop a receipt onto the Expenses app dashboard. The receipt is scanned and appears by itself on the Generate Expenses dashboard.
Click on the expense record, and modify the details as needed. After changes are made, return to the My Expenses dashboard, and the expense now appears in the list.
Email expenses
Instead of individually creating each expense in the Expenses app, expenses can be automatically created by sending an email to an email alias.
Note
For security purposes, only authenticated employee emails are accepted by Axis when creating an expense from an email. To confirm an authenticated employee email address, go to the employee card in the , and refer to the Work Email field.

To do so, an email alias must first be configured. Navigate to . Ensure the checkbox beside Incoming Emails is ticked. The default email alias is expense@(domain).com. Change the email alias by entering the desired email in the field to the right of Alias. Then, click Save.
Note
If the domain alias needs to be set up, Setup your domain alias appears beneath the Incoming Emails checkbox, instead of the email address field.
Refer to the Domain names documentation for setup instructions and more information.
Once the domain alias is configured, the email address field is visible beneath the Incoming Emails feature on the Settings page in the Expenses app.
Once the email address has been entered, emails can be sent to that alias to create new expenses, without having to be in the Axis database.
To submit an expense via email, create a new email, and enter the product’s reference code (if available) and the amount of the expense as the subject of the email. Next, attach the receipt to the email. Axis creates the expense by taking the information in the email subject, and combining it with the receipt.
Tip
To check an expense category’s reference code, go to . Reference codes are listed in the Reference column.
To add a reference code to an expense category, click on the category to open the expense category form. Enter the reference code in the Reference field.

Example
If submitting an expense, via email, for a $25.00 meal during a work trip, the email subject
would be FOOD $25.00.
Explanation:
The Reference for the expense category
MealsisFOODThe Cost for the expense is
$25.00
When expenses have been logged the next step is to submit them for approval, so the expenses can then be reimbursed.
My expenses dashboard
Open the Expenses app, which displays the My Expenses dashboard, by default. Alternatively, navigate to .
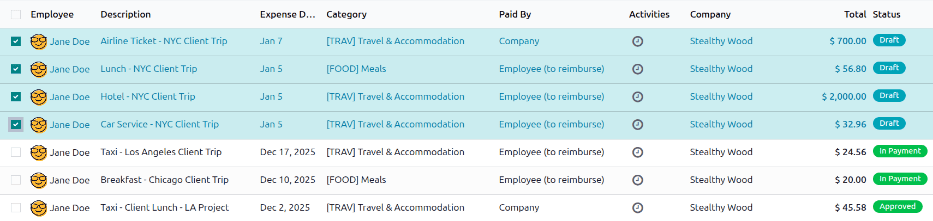
All expenses are color-coded by status. Any expense with a status of Draft (expenses that have been created but not submitted) appears in blue text. For all other statuses (Submitted, Approved, and Refused), the text appears in black.
Above the list of expenses is the total monetary value of all expenses waiting to be submitted, waiting for approval, or waiting for reimbursement. Expenses with a status of Draft are used to calculate the amount in the To Submit field, expenses with a status of Submitted are used to calculate the Waiting Approval amount, and expenses with a status of Approved are used to calculate the Waiting Reimbursement total.

Important
While any expense can be selected from the My Expenses list, the Submit button is only visible when expenses with a status of Draft are selected. If any other status of expense is selected, the Submit button does not appear.
Tip
Another way to select all expenses with a Draft status is to click into the search bar and select To Submit in the Filters column, then click the checkbox next to Employee.
Submit expense records
On the My Expenses dashboard, select the desired expenses to be submitted on the My Expenses dashboard by clicking the checkbox next to each entry.
Once the expenses have been selected, click the Submit button.
In Axis, most users cannot approve expenses; only users with the necessary access rights or permissions can. This means that a user must have at least Team Approver rights for the Expenses app. Employees with the necessary rights can review expenses, approve or refuse them, and provide feedback with an integrated Refuse Expense communication tool.
Please refer to the access rights documentation to learn more about managing users and their access rights.
View expense reports
Users who are able to approve expense reports (typically managers) have an Expense Reports main navigation button at the top of the Expenses app. This allows managers to view all expense reports they have access rights for. Navigate to , to view the All Reports dashboard.
A list of all expense reports with a status of either To Submit, Submitted, Approved, Posted, or Done appears. Expense reports with a status of Refused are hidden, by default.

Approve expense reports
Expense reports can be approved in two ways: individually or in bulk.
Important
Only reports with a status of Submitted can be approved.
It is recommended to display only Submitted reports by ticking the checkbox beside the Submitted filter, in the left column, under the Status section.
If a report is not able to be approved, the Approve Report button does not appear on the All Reports page.
Approve individual reports
To approve an individual report, navigate to , and click on an individual report to view the detailed report form.
From here, several options are presented: Approve, Refuse, and Reset to draft. Click Approve to approve the report.

Approve multiple reports
To approve multiple expense reports at once, first navigate to to view a list of expense reports. Next, select the reports to approve by ticking the checkbox next to each report being approved, or tick the checkbox next to the Employee column title to select all the reports in the list.
Next, click the Approve Report button.

Tip
Team managers can view all the expense reports for their team members only. While on the All Reports page, click the (down arrow) to the right of the search bar, then click My Team in the Filters section. This presents all the reports for only the manager’s team.
Refuse expense reports
Expense reports can only be refused on the individual expense report, and not from the All Reports dashboard. To open an individual expense report, navigate to , then click on an individual expense report to view the detailed expense report form.
If more information is needed, such as a missing receipt, communicate any necessary information requests in the chatter of the report form. On the individual expense report, click either Send message or Log note to open a message text box.
Type in a message, tagging the proper people, and post it to the chatter by clicking Send or Log, depending on the method of communication. The message is posted in the chatter, and the tagged people are notified via email.
Note
The only people that can be tagged in a message are followers of the specific report. To see who is a follower, click the (Show Followers) icon to display the followers of the expense report.

To refuse an expense report, click Refuse, and a Refuse Expense pop-up window loads. Enter a brief explanation for the refusal on the Reason line, then click Refuse.

Once the expense report is refused, the status changes to Refused, and the only button that appears is Reset to Draft.
Once an expense report is approved, the next step is to post the expenses to the proper accounting journal.
Important
To post expense reports to an accounting journal, the user must have the following access rights:
Accounting: Accountant or Adviser
Expenses: Manager
Only expense reports with an Approved status can post the expenses to a journal. To view all expense reports, navigate to . Next, to view only approved expense reports that need to be posted, adjust the filters on the left side so only the Approved checkbox is ticked.

Note
The default All Reports dashboard displays all expense reports that are not Refused.
Expense reports can be posted to accounting journals in two ways: individually or in bulk.
Post individual reports
To post an individual report, navigate to , and click on an individual report with a Status of Approved, to view the report form. In this view, several options are presented: Post Journal Entries, Report In Next Payslip, Refuse, or Reset to Draft.
Click Post Journal Entries to post the report. The accounting journal the expenses are posted to is listed in the Journal field of the expense report.
After posting the expenses to an accounting journal, a Journal Entry smart button appears at the top of the screen. Click the Journal Entry smart button, and the details for the journal entry appear, with a status of Posted.

Post multiple reports
To post multiple expense reports at once, navigate to to view a list of expense reports. Next, select the reports to approve by ticking the checkbox next to each report being approved.
Note
Only expense reports with a status of Approved are able to post the expenses to an accounting journal. If an expense report is selected that cannot be posted, such as an unapproved report, or the report has already been posted to a journal, the Post Entries button is not visible.
Tip
To select only approved expense reports, adjust the filters on the left side, so that only the Approved checkbox is ticked. Next, tick the checkbox next to the Employee column title to select all the Approved reports in the list at once.
Next, click the Post Entries button.

After an expense report is posted to an accounting journal, the next step is to reimburse the employee. Employees can be reimbursed via cash, check, or direct deposit in three ways:
Individually: Each individual expense report is reimbursed separately.
In bulk: Multiple expense reports are reimbursed in a single payment.
In the employee’s payslip: Expense reports are reimbursed directly in the employee’s payslip.
Reimbursement settings
Reimbursements can be paid via a paycheck, check, cash, or bank transfer (usually referred to as direct deposit). To set up payment options, first configure the various settings by navigating to .
To reimburse employees for expenses in their paychecks, tick the checkbox beside the Reimburse in Payslip option in the Expenses section.
Next, set how payments are made in the Accounting section. Click the drop-down menu under Payment Methods, and select the desired payment option. The default options include paying by Manual Payment (Cash), Manual Payment (Bank), Batch Deposit (Bank), and Checks (Bank).
Leaving this field blank allows for all available payment options to be used.
When all desired configurations are complete, click Save to activate the settings.
Reimburse in payslips
If the Reimburse in Payslip option is activated on the settings page, payments can be added to the employee’s next payslip, instead of issuing separate payments.
Important
Reimbursing expenses on payslips can only be done individually for an approved expense report. Once an expense report has a status of Posted, the option to reimburse in the following payslip is not available.
Navigate to , and click on the individual expense report to reimburse on the following paycheck. Click the Report in Next Payslip button, and the expenses are added to the next payslip issued for that employee.

Once the expense report is added to the following payslip, a message is logged in the chatter
stating Expense report (expense report name) will be added to the next payslip. The status for the
expense report remains Approved. The status only changes to Posted (and then
Done), when the related payslip is processed.
See also
Refer to the Payslips documentation for more information about processing paychecks.
Reimburse individually
To reimburse an individual expense report, first navigate to . All expense reports are presented in a default list view. Click on the expense report being reimbursed to view the report details.
Important
Only expense reports with a status of Posted can be reimbursed directly to the employee (not via a payslip).
Click the Pay button in the top-left corner of the expense report, and a Pay pop-up window loads. Enter the following information in the pop-up window:
Journal: Select the accounting journal to post the payment using the drop-down menu. The default options are Bank or Cash.
Payment Method: Select how the payment is made using the drop-down menu. If Cash is selected for the Journal, the only option available is Manual Payment. If Bank is selected for the Journal, the default options are Manual Payment or Checks.
Recipient Bank Account: This field only appears if the Journal is set to Bank. The employee’s bank account populates this field, by default. If the employee has more than one trusted bank account on their employee profile, use the drop-down menu to select the desired bank account.
Amount: The total amount being reimbursed populates this field, by default.
Payment Date: Enter the date the payment is issued in this field. The current date populates this field, by default.
Memo: The text entered in the Expense Report Summary field of the expense report populates this field, by default.

When the fields of the pop-up window are completed, click the Create Payment button to register the payment, and reimburse the employee. A green In Payment banner now appears on the expense report.
Reimburse in bulk
To reimburse multiple expense reports at once, navigate to to view all expense reports in a list view. Next, select the expense reports to be reimbursed.
Important
Only expense reports with a status of Posted can be reimbursed directly to the employee (not via a payslip).
Tip
Adjust the STATUS filter on the left side to only show Posted expense reports. This displays only expense reports that are able to be reimbursed.
Tick the checkbox next to the expense reports being reimbursed, then click the Pay button, and a Pay pop-up window loads. Enter the following information in the pop-up window:
Journal: Select the accounting journal to post the payment using the drop-down menu. The default options are Bank or Cash.
Payment Method: Select how the payment is made using the drop-down menu. If Cash is selected for the Journal, the only option available is Manual Payment. If Bank is selected for the Journal, the default options are Manual Payment or Checks.
Group Payments: When multiple expense reports are selected for the same employee, this option appears. Tick the checkbox to have only one payment made per employee, rather than issuing multiple payments to the same employee.
Amount: The total amount being reimbursed for all the expense reports populates this field, by default.
Payment Date: Enter the date the payments are issued. The current date populates this field, by default.
When the fields on the Pay pop-up window are completed, click the Create Payments button to register the payments, and reimburse the employees.

If expenses are tracked on customer projects, they can be automatically charged back to the customer. This is done by logging an expense, referencing the corresponding sales order, and then creating an expense report.
Next, managers approve the expense report, then the accounting department post the journal entries.
Finally, once the expense report is posted to a journal, the expenses appear on the specified SO. When the SO is invoiced, the customer is charged for the expenses.
Important
Approving expenses, posting expenses to accounting, and reinvoicing expenses on SOs is only possible for users with the appropriate access rights.
See also
This document provides lower-level instructions for the creation, submission, approval, and posting of expenses. For fully-detailed instructions for any of these steps, refer to the following documentation:
Setup
First, specify the invoicing policy for each expense category. Navigate to . Click on an expense category to view the expense category form. Under the INVOICING section, click the radio button next to the desired selection for Re-Invoice costs:
No: The expense category cannot be reinvoiced.
At cost: The expense category invoices expenses at the Cost set on the expense category form.
Sales price: The expense category invoices at the Sales Price set on the expense form.
Log an expense
First, when creating a new expense, the correct information needs to be entered to reinvoice the expense to a customer. Using the drop-down menu, select the SO to add the expense to in the Customer to Reinvoice field.
Next, select the Analytic Distribution the expense is posted to. The options available are pulled from the Projects app.
Multiple projects can be selected, if desired. To add another Analytic Distribution, click on the line to reveal the Analytic pop-over window. Click Add a line, then select the desired Analytic Distribution from the drop-down menu.

Important
If selecting more than one Analytic Distribution, the Percentage fields
must be modified. Both fields are populated with 100%, by default. Adjust the percentages
for all the fields, so the total of all selected accounts equals 100%.
Example
A furniture company is building seating for two different locations for one client. The client agrees to pay for all travel expenses for site visits related to these two projects. The furniture company plans one trip to visit both locations.
When creating the expenses for travel expenses, both projects are listed in the Analytic Distribution line, for 50% each.
Create an expense report
After the expenses are created, the expense report must be created and submitted, in the same manner as all other expenses.
Once the expense report is submitted, a Sales Orders smart button appears at the top-center of both the expense report, and each individual expense record being reinvoiced.
Important
Selecting the proper SO in the Customer to Reinvoice field is critical, since this is how expenses are automatically invoiced after an expense report is approved.
The Customer to Reinvoice field can be modified only until an expense report is approved. After an expense report is approved, the Customer to Reinvoice field is no longer able to be modified.

Approve and post expenses
Before approving an expense report, ensure the Analytic Distribution section is populated for every relevant expense line.
If an Analytic Distribution entry is missing, assign the correct accounts from the drop-down menu, then click Approve.
Note
The Approve button only appears after an expense report has been submitted.
The accounting department is typically responsible for posting journal entries. To post expenses to an accounting journal, click Post Journal Entries. Once an expense report is approved, it can then be posted.
The SO is only updated after the journal entries are posted. Once the journal entries are posted, the expenses now appear on the referenced SO.
Invoice expenses
After the expense report has been approved, and the journal entries have been posted, the SO is updated, and the customer can be invoiced.
Navigate to the expense report, and click the Sales Orders smart button to open the SO. The expenses to be reinvoiced now appear on the SO.
Note
More than one SO can be referenced on an expense report. If more than one SO is referenced, clicking the Sales Orders smart button opens a list displaying all the SOs associated with that expense report. Click on a SO to open the individual SO details.
The expenses are listed in the SO Order Lines tab.
Next, click Create Invoice, and a Create invoices pop-up window appears. Select if the invoice is a Regular invoice, a Down payment (percentage), or a Down payment (fixed amount). Then, click Create Draft. Doing so creates a draft invoice for the customer. Click Confirm to confirm the invoice, and the customer is invoiced for the expenses.

See also
It is important for companies to track expenses so they have an understanding of their expenses and can identify trends. Expense reporting allows for detailed information, such as which expense categories are reimbursed the most, which employees incur the most expenses, and if there are any periods of time that tend to incur more expenses than others.
View expense analysis report
To view the default Expenses Analysis report, navigate to . The Expenses Analysis report displays all expenses for the current year, in a stacked bar chart, grouped by month.

View expenses by employee
It is possible to view the data so that the total cost of expenses by employee is visible. To view the report in this way, navigate to . Next, click the (Pivot) icon to view the data in a pivot table.
This presents the data with the employees populating the rows, and the total monthly expenses populate the columns. Next, click Total at the top of the monthly columns to hide the individual monthly totals, and present only the total amount for the year.
To present the data in either ascending or descending total, click the Total In Currency box, and the information is organized first in ascending order, starting with the smallest amount. Click Total In Currency again to reverse the order, and present the highest amount first.
Example
In this example it can be determined that Mike Smith has the highest amount of expenses, totaling 4,216.44. This is almost seven times higher than Ronnie Hart, who has the second highest expenses, with a total of 644.74.

View expenses by category
It is possible to view the data so that the total cost of expenses by category is visible. To view the report in this way, navigate to . Next, click the (Pivot) icon to view the data in a pivot table.
This presents the data with the employees populating the rows, and the total monthly expenses populate the columns. Next, click Total at the top of the employees column. Click Total that appears in place of Total, revealing a drop-down menu of options. Click Category, and the expense categories now populate the rows.
Next, click Total at the top of the months column to hide the individual months, and only show the annual total for each category.
To present the data in either ascending or descending total, click the Total In Currency box, and the information is organized first in ascending order, starting with the smallest amount. Click Total In Currency again to reverse the order, and present the highest amount first.
Example
In this example, it can be determined that the company spent the most on travel expenses, with the expense category [TRANS & ACC] Travel & Accommodation incurring 2,940.00 of expenses for the year. The company reimbursed mileage the least, with only 229.69 in [MIL] Mileage expenses.
