Fleet

Axis’s Fleet app categorizes each vehicle by manufacturer and model (e.g. BMW, X2).
Before a vehicle can be added to the Axis database, its manufacturer
and model record must already exist in the database.
Manufacturers
Axis’s Fleet app comes preconfigured with sixty-seven commonly used car and bicycle manufacturers in the database, along with their logos. To view the pre-loaded manufacturers, go to , and the Manufacturers dashboard loads.
The default filter, With Models, displays only manufacturers that already have vehicle models. Remove the default filter to view all manufacturers.
Manufacturers are listed alphabetically, and each card shows how many specific models are configured for each particular manufacturer.

Add a manufacturer
To add a new manufacturer to the database, click New in the upper-left corner of the Manufacturers dashboard, and a blank manufacturers form loads. Type the name of the manufacturer in the Name field, and select an image to upload for the Logo.
Models
When adding a vehicle to the fleet, specify the vehicle model to maintain updated records, which keeps track of specific details, like vehicle capacity and parts compatibility.
Unlike manufacturers, models do not come preconfigured in the Fleet app. When a new vehicle model joins the fleet, the model (and, if necessary, the manufacturer) must be added to the database.
Add a model
To add a new vehicle model, navigate to . Click New in the upper-left corner, and enter the following information on the new model form.
Note
Depending on the installed localization, some fields or sections may not appear.
Model name: Enter the model name in the field.
Manufacturer: Using the drop-down menu, select the manufacturer. If it is not configured, add the manufacturer
Vehicle Type: Using the drop-down menu, select one of two preconfigured vehicle types, either Car or Bike.
Important
Additional vehicle types can not be added. Fleet keeps them fixed to preserve its Payroll integration, where vehicles may count as employee benefits.
Category: Using the drop-down menu, select a category for the vehicle or create a new one.
Note
No categories come preconfigured in Axis’s Fleet app. All categories must be added to the database.

Information tab
In the Information tab, specify details about the car model, such as the car size, passenger capacity, and engine information.
Model
Model Year: Enter the year the vehicle was manufactured.
Seating Capacity: Enter how many passengers the vehicle can accommodate.
Number of Doors: Enter the number of doors the vehicle has.
Color: Enter the color of the vehicle.
Trailer Hitch: Tick this checkbox if the vehicle has a trailer hitch installed.
Salary
The Salary section only appears if the company has their localization setting set to Belgium. The cost values are all monthly, with the exception of the Catalog Value (VAT Incl.).
Can be requested: Enable this checkbox if employees can request this model vehicle, if a vehicle is part of their employee contract.
Catalog Value (VAT Incl.): Enter the MSRP for the vehicle at the time of purchase or lease.
C02 fee: Represents the carbon dioxide emission fee paid to the Belgian government. This value is automatically calculated, based on Belgian laws and regulations, and cannot be modified. The value is based on the figure entered in the CO2 Emissions field (in the Engine section of the Information tab) on the vehicle form.
Important
Modifying the CO2 Emissions field adjusts the value in the CO2 fee field.
Cost (Depreciated): Enter the monthly vehicle cost, which appears in the salary configurator for future employees. This value impacts the gross and net salary of the employee assigned to the vehicle. This figure is depreciated over time, according to local tax laws. The Cost (Depreciated) does not depreciate automatically on the vehicle model, it only depreciates based on the contract linked to a specific vehicle.
Total Cost (Depreciated): This value is the combination of the Cost (Depreciated) and the C02 fee fields. It also depreciated over time.
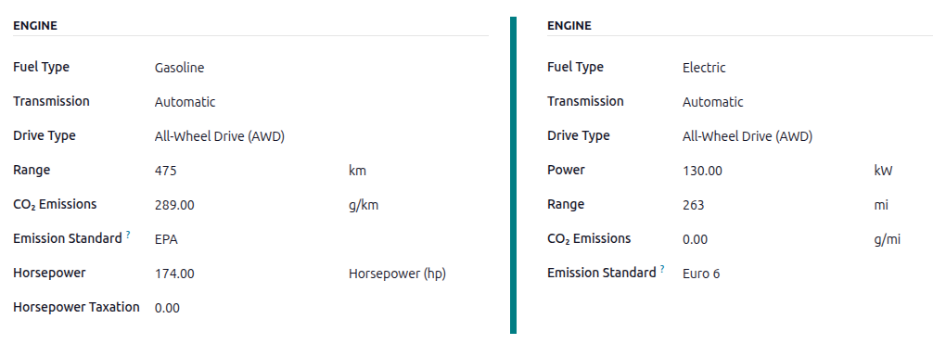
Engine
Fuel Type: Using the drop-down menu, select the type of fuel the vehicle uses. The default options are Diesel, Gasoline, Full Hybrid Plug-in Hybrid Diesel, Plug-in Hybrid Gasoline, CNG, LPG, Hydrogen, or Electric.
Range: Enter the distance the vehicle can travel on one tank of gas, or one battery charge, in miles (mi) or kilometers (km). To change the unit of distance, click the drop-down next to the km or mi field, and select the desired unit of distance.
CO2 Emissions: Enter the average carbon dioxide emissions the vehicle produces in grams per kilometer (g/km) or miles (g/mi). This information is provided by the car manufacturer.
Emission Standard: Enter the regulatory test procedure or guideline used to determine the CO2 Emissions, such as the EPA or Euro 6.
Transmission: Using the drop-down menu, select the type of transmission, either Manual or Automatic.
Power Unit: Using the drop-down menu, select how the vehicle’s power is measured, either in kilowatts or horsepower.
Power: If the vehicle is electric or hybrid, enter the power the vehicle uses in kilowatts (kW). This field only appears if kW is selected for the Power field.
Horsepower: Enter the vehicle’s horsepower (hp) in this field. This field only appears if Horsepower is selected for the Power field.
Horsepower Taxation: Enter the amount of taxes incurred according to the engine specifications. The number is dependent on the local tax laws, therefore it is recommended to check with the accounting department to ensure the correct taxation amount is entered. This field only appears if the Power field is set to Horsepower (which changes the Power field to Range) .
Tax Deduction: The percentage that can be deducted from taxes is populated based on the localization, and cannot be modified. This field only appears for certain localizations.
Vendors tab
Specify the vendors a vehicle can be purchased from in this tab. With proper setup, requests for quotations for vehicles can be created through Axis’s Purchase app.
To add a vendor, click the Add Vendors block in the Vendors tab. This opens an Add: Vendors pop-up window, with a list of all the vendors currently in the database. Add any preexisting vendors by clicking the checkbox next to the vendor name, then click Select. No limitations exist on the number of vendors that can be added to this list.
If a vendor is not already in the database, add a new vendor by clicking New in the bottom-left of the Add: Vendors pop-up window. In the Create Vendors form that appears, enter the necessary information, then click Save & Close to add the vendor, or click Save & New to add the current vendor and create another new vendor.
Tip
Vendors are stored in the Contacts application.

Model category
To aid with fleet organization, it is recommended to have vehicle models housed under a specific category. Model categories are set on the vehicle model form.
Axis does not come with any categories preconfigured; all categories must be added.
To view any categories currently set up in the database, navigate to . All categories are displayed in a list view.
Add a new model category
To add a new category, click the New button in the top-left corner of the Categories dashboard. A new entry line appears at the bottom of the list. Type in the new category, then either click Save, or click anywhere on the screen, to save the entry.
To reorganize how the categories appear in the list, click on the (draggable) icon to the left of any desired category name, and drag the line to the desired position.
The order of the list does not affect the database in any way. However, it may be preferable to view the vehicle categories in a specific order, for example, by size, or the number of passengers the vehicle can carry.
Note
When used with the Inventory app, the Max Weight and Max Volume fields track a vehicle’s capacity. This helps manage in-house deliveries by showing how much space and weight remain for loading products.
Axis’s Fleet app manages all vehicles, and the accompanying documentation that comes with vehicle maintenance and driver records.
Upon opening the application, all vehicles are organized within the Vehicles dashboard, which is the default dashboard. Each vehicle is displayed in its corresponding Kanban stage, based on its status. The default stages are New Request, To Order, Registered, and Downgraded.
Settings
Before registering any vehicles, review two Fleet settings that directly affect day-to-day operations and employee benefits:
End Date Contract Alert: Emails the contract’s Responsible person a set number of days before the vehicle agreement expires, so renewals or returns are not missed.
New Vehicle Request: (Only for the Belgian payroll localization) Blocks employees from requesting a new company car through the salary configurator, once the available vehicles already exceed the defined limit, helping control benefits costs.
To access the settings menu, go to .
End Date Contract Alert
The End Date Contract Alert field shows how many days before the end of a vehicle contract an alert should be sent. The responsible parties receive an email informing them that a vehicle contract is about to expire in the number of days defined in this field.

Responsible parties
To determine the responsible person for a contract, open an individual contract. The person listed as Responsible under the Contract Information section of the contract receives the alert.
To open a contract from a list of all contracts, navigate to , and all contracts appear in the list. Click on a Contract to open it. In the Information section of the contract, look under Responsible to see who receives expiration alerts.
An individual contract can also be opened from a specific vehicle by navigating to and clicking on an individual vehicle. On the vehicle form, click the Contracts smart button at the top of the page. Only contracts associated with the vehicle appear in the list. Click on an individual contract to open it. The Responsible person is listed on the contract.
New vehicle request
Enter the maximum fleet size that may be reached through the salary-configurator flow. When the total number of available vehicles (vehicles without an assigned driver) is equal to or below this limit, employees can request a new company car. Once the available vehicles exceed the limit, the request option is hidden.
Example
If the New Vehicle Request limit is set to 20 vehicles, and there are 25 vehicles available, employees cannot request a new car and must select from the 25 already available. If there are only 10 cars available, then the employee would be able to request a new vehicle.
Note
This settings option only appears if the Belgian-Payroll-Fleet module is installed for the Belgian localization.
Add a vehicle
To add a new vehicle to the fleet from the Vehicles dashboard, click the New button in the top-left corner, and a blank vehicle form loads. Then, proceed to enter the vehicle information on the vehicle form.
Vehicle form fields
Model: Using the drop-down menu, select the vehicle’s model. Once a model is selected, additional fields may appear on the form. If the model is not listed, type in the model name, and click either Create “model”, or Create and edit… to create a new model and edit the model details.
License Plate: Enter the vehicle’s license plate number.
Tags: Select any tags from the drop-down menu, or type in a new tag. There is no limit on the amount of tags that can be selected.

Note
The Model is the only required field on the new vehicle form. When a model is selected, other fields appear on the vehicle form, and relevant information auto-populates the fields that apply to the model. If some of the fields do not appear, this may indicate there is no model selected.
Driver
This section of the vehicle form relates to the person who is currently driving the car, as well as any plans for a change in the driver in the future, and when.
Driver: Using the drop-down menu, select the driver for the vehicle. If the driver is not listed, create the new driver and edit the driver details.
Important
A driver does not have to be an employee. When creating a new driver, the driver is added to the Fleet app and the Contacts app (if installed), not in the Employees app.
Mobility Card: If the selected driver has a mobility card (such as a gas card) listed on their employee record in the Employees application, the mobility card number automatically appears in this field. If there is no mobility card listed, and one should be added, edit the employee record in the Employees application.
Future Driver: If the next driver for the vehicle is known, select the next driver from the drop-down menu. Or, type in the next driver and click either Create “future driver” or Create and edit… to create a new future driver, and edit the driver details.
Note
If this field is populated, an Apply New Driver button appears on the vehicle form. Click the Apply New Driver button to change the driver information.
Assignment Date: Using the calendar selector, select when the vehicle is available for another driver. If this field is left blank, that indicates the vehicle is currently available, and can be assigned to another driver. If it is populated, the vehicle is not available for another driver until the selected date.
Company: Select the company from the drop-down menu. This field only appears in a multi-company database.
Create a new driver
If a driver is not already in the system, the new driver should first be configured and added to the database. A new driver can be added either from the Driver or Future Driver fields on the vehicle form.
First, type in the name of the new driver in either the Driver or Future Driver field, then click Create and edit…. A Create Driver or Create Future Driver form appears, depending on which field initiated the form.
Both the Create Driver and Create Future Driver forms are identical, and are stored in the Contacts app. Configure the new contact, then click Save.
Note
Depending on the installed applications, different tabs or fields may be visible on the Create Driver and Create Future Driver forms.
Vehicle
This section captures key physical details of a vehicle. Selecting an existing Model may auto-fill some fields.
Fill in the following fields on the form:
Category: Using the drop-down menu, select the vehicle category from the available options. If the Inventory app is installed, the category affects any configured dispatch management system.
Order Date: Using the calendar selector, select the date the vehicle was ordered. Keeping track of how long vehicles have been in the fleet can help when making decisions on expensive repairs, or help decide when to surrender a vehicle.
Registration Date: Using the calendar selector, select the date the vehicle was registered. Many regions require proper registration, so keeping track of registration dates is important.
Cancellation Date: Using the calendar selector, select the date the vehicle lease expires, or when the vehicle is no longer part of the fleet (e.g., sold, plates surrendered).
Chassis Number: Enter the chassis number in the field. This is known in some countries as the VIN number. Every vehicle has a unique number, so in the event of a theft or accident, a vehicle can be identified with this unique number.
Last Odometer: Enter the last known odometer reading in the number field. Using the drop-down menu next to the number field, select whether the odometer reading is in kilometers (km) or miles (mi). Keeping track of a vehicle’s mileage is crucial when determining the value of the vehicle for both tax purposes and resale value.
Fleet Manager: Select the fleet manager from the drop-down menu, or type in a new fleet manager, and click either Create or Create and edit….
Location: Type in the specific location where the vehicle is typically located in this field. The entry should clearly explain where the vehicle can be found, such as
Main GarageorBuilding 2 Parking Lot. This is crucial information for companies with many locations where vehicles are stored.Make Vehicle Available: Click the checkbox if the vehicle can be selected when an employee fills out the salary configurator.

Tax Info tab
Depending on the localization setting for the database, and what additional applications are installed, other fields may be present on the form.
The sections below are default and appear for all vehicles, regardless of other installed applications or localization settings.
Fiscality
Horsepower Taxation: Enter the amount that is taxed based on the size of the vehicle’s engine. This is determined by local taxes and regulations, and varies depending on the location. It is recommended to check with the accounting department to ensure this value is correct.
Deductibility Rates: Configure the dates and percentages of the vehicle-related costs (fuel, maintenance, depreciation, etc.) that can be deducted from the company’s taxable income. The Start Date field indicates when the deduction begins, and the Deductibility (%) field indicates the percentage to be deducted.
Contract
First Contract Date: Select the start date for the vehicle’s first contract using the calendar selector. Typically this is the day the vehicle is purchased or leased.
Catalog Value (VAT Incl.): Enter the MSRP for the vehicle at the time of purchase or lease.
Purchase Value: Enter the purchase price or the original value of the lease for the vehicle.
Residual Value: Enter the current value of the vehicle.
Note
The values listed above affect the accounting department. It is recommended to check with the accounting department for more information and/or assistance with these values.

Model tab
If the model for the new vehicle is already configured in the database, the Model and Engine sections are populated with the corresponding information. If the model is not already in the database and the Model tab needs to be configured, configure the new vehicle model.
Check the information in the Model tab to ensure it is accurate. For example, the color of the vehicle or whether a trailer hitch is installed are examples of common information that may need updating.

Note tab
Enter any notes for the vehicle in this section.
See also
To properly maintain a fleet of vehicles, regular maintenance as well as periodic repairs are needed. Scheduling repairs and managing services for an entire fleet is necessary to ensure all vehicles are in good working order when they are needed.
Services, such as regular maintenance, like oil changes or tire rotations, can be logged in advance. Other repairs are logged as they occur.
Create service records
To log a service for a vehicle, go to the main Services dashboard by navigating to . Open a new service form by clicking the New button in the top-left corner.
Fill out the information on the form. The only two fields that are required to be populated are Service Type and Vehicle.
The fields on the form are:
Description: Enter a brief description of the service in this field.
Service Type: Using the drop-down menu, select the type of service performed. If the desired service does not exist, enter a new type of service, and click either Create “(service type)” or Create and edit… to add the service type and configure it.
Important
Only one Service Type comes preconfigured in Axis: Vendor Bill.
Date: Using the calendar selector, select the date the service was provided, or is scheduled to be performed. Navigate to the desired month using the (arrow) icons, then click on the date to select it.
Cost: Enter the estimated cost of the service, if available. If the service is for a future repair, this field should be left blank. This field is updated as estimates are received, and again, when the final repair cost is known.
Vendor: Using the drop-down menu, select the vendor who is performing the service. If the vendor has not already been entered in the system, add and configure the vendor.
Vehicle: Using the drop-down menu, select the vehicle that was serviced. When the vehicle is selected, the Driver field is populated, and the unit of measure for the Odometer Value field appears.
Driver: The vehicle’s current driver automatically populates this field when the Vehicle is selected. If the driver needs to be changed, another driver can be selected using the drop-down menu.
Odometer Value: Enter the odometer reading from when the service was done. The units of measure are either in kilometers (km) or miles (mi), depending on how the selected vehicle was configured.
Tip
To change from kilometers to miles, or vice versa, click the (Internal Link) icon to the right of the vehicle selected in the Vehicle field.
Change the unit of measure, then navigate back to the service form, via the breadcrumb links. The unit of measure is then updated in the Odometer Value field.
NOTES: Enter any notes for the repair at the bottom of the service form. For example, this can include estimate details or parts being replaced.

Create service type
The only method to create service types is from a service form.
On the service form, type in the name of the new Service Type in the corresponding field. Then, click Create and edit…, and a Create Service Type pop-up form appears.
The service type entered on the service form automatically populates the Name field, which can be modified, if desired.
Then, select the Category for the new service type from the drop-down menu in that field. The two default options to choose from are Contract or Service. Additional categories cannot be created.
If the service applies to only contracts or services, select the corresponding Category. If the service applies to both contracts and services, leave this field blank.
When done, click Save & Close.
Create vendor
When a service is performed for the first time, typically, the vendor’s record has not yet been added to the database. It is best practice to add the full details for a vendor in the database, so that any necessary information can be retrieved.
Vendors are added with the Contacts app. Refer to the documentation for more details.
Note
Different tabs or fields may be visible on the Create Vendor form, depending on what other applications are installed.
View services
To view all services logged in the database, including old and new requests, navigate to . All services appear in a list view, including all the details for each service.
The service records are grouped by service type. The number of repairs for each service type appears in parentheses after the name of the service type.
Each service listed displays the following information:
Date: the date that the service, or repair, was performed (or requested to be performed).
Description: a short description of the specific type of service, or repair, performed to clarify the specific service.
Service Type: the type of service, or repair, performed. This is selected from a list of services that must be configured.
Vehicle: the specific vehicle the service was performed on.
Driver: the current driver for the vehicle.
Vendor: the specific vendor who performed the service, or repair.
Notes: any information associated with the service, or repair, that is documented to add clarification.
Cost: the total cost of the service, or repair.
Stage: the status of the service, or repair. Options are New, Running, Done, or Cancelled.
At the bottom of the Cost column, the total cost of all services and repairs are listed.

When managing a fleet, accidents are inevitable. Tracking accidents is crucial for understanding vehicle maintenance costs and identifying safe drivers.
Axis’s Fleet app offers multiple ways of tracking accidents. Below are step-by-step instructions for one possible method to monitor accidents and repair costs.
Structure
For this use case, go to . On the service
form, two service types are created: Accident -
Driver's Fault and Accident - No Fault.
This setup records repairs associated with accidents and organizes them by fault.
When an accident occurs, a service record is created. The specific repairs needed for the accident are logged in the Description of the service record, and the details about the accident are logged in the Notes section.
With this organizational structure, it is possible to view all accidents organized by fault, car, driver, or cost.
Note
To manage accidents, the creation of service records is required.
Refer to the Services documentation for detailed instructions on creating service records in Axis’s Fleet app.
Log accidents and repairs
To log an accident and initiate the repair process, the first step is to create a service record detailing the specific repairs needed.
Note
Some accidents require multiple repairs with several different vendors. For these scenarios, a separate service record is needed for each vendor performing repairs. To keep records organized, it is recommended to keep the Notes field identical, and attach the same important documentation, such as a police report.
Navigate to to view the main Services dashboard. Click New in the top-left corner, and a blank service form loads.
Enter the following information on the form:
Description: enter the description of repairs needed to fully repair the vehicle, such as
Bodywork,Windshield Replacement, orReplacement Bumper, Tires, and Windows.Service Type: for this example, select either
Accident - Driver's FaultorAccident - No Fault, depending on the situation.When entering either of these two Service Types for the first time, type in the new service type, then click Create (new service type). A Create Service Type pop-up window appears, with the new service type populating the Name field. In the Category field, select Service from the drop-down menu, then click the Save & Close button.
Once an accident service type has been added to the database, it is available to select from the drop-down menu in the Service Type field.
Date: using the calendar popover window, select the date the accident occurred. Navigate to the desired month using the (arrow) icons, then click the date to select it.
Cost: leave this field blank, as the repair cost is not yet known.
Vendor: select the vendor performing the repairs using the drop-down menu. If the vendor has not already been entered in the system, type in the vendor name, and click either Create to add them, or Create and edit… to add and configure the vendor.
Vehicle: select the vehicle that was in the accident from the drop-down menu. When the vehicle is selected, the Driver field is populated, and the unit of measure for the Odometer Value field appears.
Driver: the current driver listed for the selected vehicle populates this field when the Vehicle is selected. If a different driver was operating the vehicle when the accident occurred, select the correct driver from the drop-down menu.
Odometer Value: enter the odometer reading when the accident occurred. The units of measure are either in kilometers (km) or miles (mi), depending on how the selected vehicle was configured.
NOTES: enter the specific details of the accident at the bottom of the service form, such as
Hit a deerorRear-ended at an intersection while stopped.
Axis provides the ability to attach any important paperwork, such as repair estimates and police reports, to the service record. To do so, click the (paperclip) icon, located in the chatter of the form, and a file explorer pop-up window appears. Navigate to the desired record, and click Open to upload the file.
Note
Once a file is added to a service record, a Files section appears in the chatter. To attach more records, click Attach files to add more documents.

Service stages
In Axis’s Fleet app, there are four default service stages:
The default stage when a service record is created. The service has been requested, but repairs have not begun. The Cost field for this stage remains zero.
The repair is in-process, but not yet complete. The estimate for repairs is listed in the Cost field.
All repairs listed on the service form have been completed. The Cost field is updated to reflect the final total cost charged for the repairs.
The service request has been cancelled.
During the repair process, change the service status to reflect the vehicle’s current state in one of two ways: on the individual service record, or in the Kanban service view.
Service record
Open the main Services dashboard, by navigating to . Next, click on the individual service record to open the detailed service form. Click the desired stage in the top-right corner, above the service form, to change the status.

Kanban view
Open the main Services dashboard, by navigating to . First, click the Kanban icon in the top-right of the screen, which organizes all repairs by vehicle.
Next, remove the default Service Type filter in the search bar. Upon doing so, all services appear in a Kanban view, organized by their respective Status.
Drag-and-drop the service record to the desired stage.

Accident reporting
One of the main reasons to track accidents using the method outlined in this document is the ability to view the total accident cost, determine the safest drivers, and calculate the actual total cost for specific vehicles.
The main Services dashboard displays all the various accident information, while the Reporting dashboard displays the total cost for specific vehicles.
Services dashboard
Navigate to to view the Services dashboard. All service records are displayed in a (List) view, grouped alphabetically, by Service Type.
The two service types created for accident tracking appear in the list: Accident - Driver Fault and Accident - No Fault.
Each grouping displays the number of records within each type, and lists the individual records beneath each grouping title.
Example
In this example, there are three accidents where the driver was at fault, and one accident that was not the driver’s fault. This dashboard also displays the estimated total Cost for all the accidents in each group.
An estimated $3,284.00 dollars are costs from driver-caused accident repairs. The no-fault
accident has no cost associated with it, since the repair has not been completed, and no estimate
exists yet.

Note
The total Cost calculates all costs on the repair form, including estimated costs, as well as final repair costs. This number may not be accurate, if there are any repairs in the Running stage, and the final bill has not yet been calculated.
Reporting dashboard
Navigate to to view the report. This report displays a (Bar Chart) of all Contract and Service costs for the current year, organized by month (Date : (year)), by default. The Sum, represented by a gray dotted line, is the combined total of both the Contract and Service costs.
To view the total cost by vehicle, click the (Toggle Search Bar) icon at the right of the search bar, revealing a drop-down menu. Click Vehicle in the Group By column, and the data is organized by vehicle.
This displays the true cost for each vehicle, including both the contract cost (such as the monthly vehicle lease cost) and all service costs, including all accidents. Hover over a column to reveal a data popover window, which displays the vehicle name and the total cost. This allows for a more complete view of the vehicle cost.

To view the individual cost details for both contract costs and repairs, click the (Pivot) icon in the top-right corner of the Cost Analysis dashboard. This displays each vehicle on a separate line, and displays the Contract cost and Service cost, as well as the Total cost.

Note
The (Pivot) view organizes the data by vehicle, by default, therefore grouping the data by Vehicle is not required. If this filer is already activated, it does not affect the presented data.
Manage accident repairs
For companies with multiple employees, who manage a large fleet of vehicles, displaying only service records in the New and Running stages can be time-saving, if there are a large number of records in the Services dashboard.
Navigate to , where all service requests are organized by Service Type. Next, click the (Toggle Search Panel) icon at the right of the search bar, revealing a drop-down menu. Click Add Custom Filter in the Filters column, and a Add Custom Filter pop-up window appears.
Three drop-down fields need to be configured on the pop-up window.
In the first field, scroll down, and select Stage.
Leave the second field set to =.
Select Running from the drop-down menu in the last field.
Next, click the (plus) icon to the right of the last field, and an identical rule appears beneath the current rule.
Then, change Running to New in the third field of the second rule, leaving the other fields as-is.
Click the Add button at the bottom to add the new custom filter.

This slight modification only presents services in the New and Running stages. This is a helpful report for a company managing a high number of repairs at any given time.
To have this report appear as the default report when opening the Services dashboard, click the (Toggle Search Panel) icon at the far-right of the search bar. Next, click Save current search, beneath the Favorites column, which reveals another drop-down column beneath it. Tick the checkbox beside Default Filter, then click Save. Then, this customized Services dashboard appears, by default, any time the Services dashboard is accessed.
The Fleet app allows for analysis on total vehicle costs, including both contract costs and service and repair charges. Data can be adjusted to view total costs by vehicle or driver. Additionally, costs can be compared with the previous year, quarter, or month, to view changes in fleet costs over time.
Total costs
To view the Cost Analysis Report, navigate to . The default report shows a bar chart of service and contract costs for the current year, organized by month.
Example
In this report, it is possible to determine that June had the highest total costs, with almost $14,000 dollars in contract and repair costs, while January had the lowest costs, with less than $2,000 of contract costs and no repairs.

Cost by vehicle
Some companies want to view costs not by month, but by vehicle. This allows fleet managers to determine which vehicles cost the most to keep on the road, aiding in decision making for future purchases and repairs.
To view these metrics, open the default cost analysis report. Next, click into the search bar, and click Vehicle under the Group By column.
Example
From this report, it can be determined the Toyota Corolla with the license plate STU-1718
cost the most, with almost $14,000 in costs for the year. Additionally, the both Nissan Micro
vehicles and the Ford Focus cost the least, with under $5,000 in total costs each.

Cost by driver
Another useful metric is to determine which drivers incur the most repair costs, allowing fleet managers to determine which vehicles to assign which drivers. To view this configuration, open the default cost analysis report. Next, click into the search bar, and click Driver under the Group By column. Finally, click the (Pivot) icon.
The report now shows the totals for both Contract and Service costs for each driver in the database. This allows fleet managers to see which drivers incur the most repair costs.
Example
This report shows that Sandra Elvis had no service costs for the year, while both Doris Cole
and David Armstrong had almost $9,000 in repairs. While this does not explain why those two
drivers incurred the most costs, it is possible for the fleet manager to investigate the
service records for those two drivers, to determine why there were such
high costs for the year.

Detailed comparison
All reports in the Fleet app are able to compare costs from previous time periods, either year, quarter, or month. To view a detailed cost comparison between the third and fourth quarter, open the default cost analysis report, then click the (Pivot) icon. Next, click into the search bar and click Q4 in the Filters column, then Date: Previous Period in the Comparison column.
The report now shows detailed contract and service costs for each vehicle, with a Variation column, showing increases or decreases in costs from the third and fourth quarter of the current year.
Example
In this example, it can be determined that the Ford Focus had the greatest change in terms of
lowered total costs, with a 75.25% reduction in costs. Additionally, the Nissan Micro with the
license plate of DEF-456 was the only vehicle with an overall increase in total costs, with an
increase of 41.78%.
