Pack-in-pack
In more complex warehouse operations, it is sometimes necessary to handle groups of containers (for example, grouping pallets together). These containers may be physically combined or logically grouped at the database level, allowing them to be treated as a single unit for certain stock movements while still retaining visibility into their internal structure. This makes it possible to move the entire group with a single scan, rather than scanning each pallet individually.
Enable settings
Before working with the pack-in-pack settings, open . Enable the Packages setting. Be sure to click Save before exiting this page.

Set package type
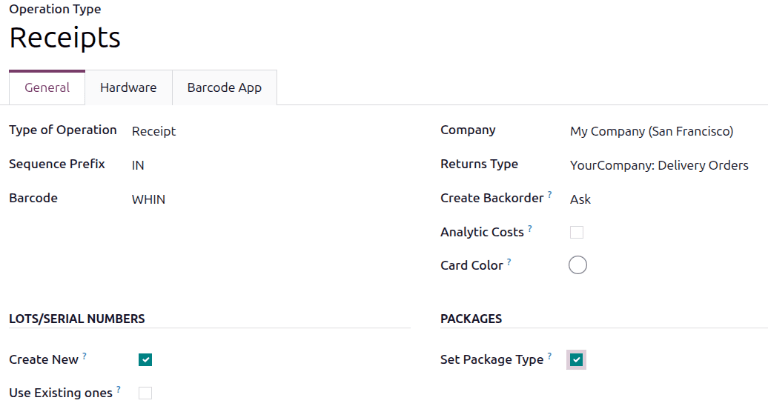
The Set Package Type setting must be enabled for all operations that require pack-in-pack functionality.
Open . The Operation Types page opens. Open an operation type.
On the operation type form, in the Packages section, select Set Package Type.
Example
Set Package Type is enabled for the Receipts operation type.
Create package types
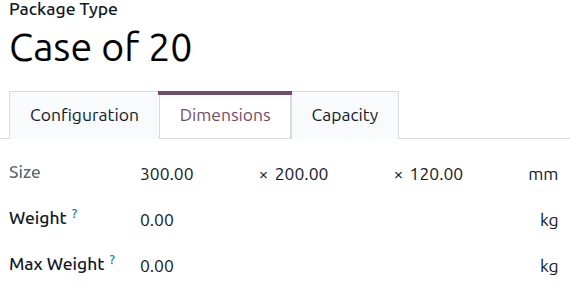
Create package types by navigating to , in order to set custom dimensions and weight limits. This feature is mainly used to calculate package weights for shipping costs.
On the Package Types list, clicking New opens a blank package type form. The fields of the form are as follows:
Package Type (required): Define the package type’s name.
Size: Define the package dimensions in millimeters (mm). The fields, from left to right, define the Length, Width, and Height.
Weight: weight of an empty package (e.g., an empty box, pallet).
Note
Axis calculates the package’s weight by adding the weight of the empty package plus the weight of the items, which can be found in the Weight field, in the Inventory tab, of each product form.
Max Weight: maximum shipping weight allowed in the package.
Barcode: Define a barcode to identify the package type from a scan.
Sequence Prefix: Specify a prefix to use when a new package name is created by Axis.
Example
Use
PALfor thePalletpackage type. When the first package of thePallettype is created, it is namedPAL0000001.Company: Specify a company to make the package type available only within that company. Leave the field blank if it is available at all companies.
Carrier: Specify the intended shipping carrier for this package type.
Carrier Code: Define a code that is linked to the package type.
Pack-in-pack process
After Set Package Type is enabled in the operation type form, pack-in-pack can be used from that operation type.
Open the operation type from the Operations menu. The list of operations for that operation type displays. Open an operation from that list.
To put the contents of a line into a single package, click the Details link on the far right of the product line.

The Detailed Operations window opens. In this window, specify a Store to location, the name of the Destination Package, and the Quantity of items to be put in that package. To break the inventory into multiple packages, click the Add a line link; be sure that the Quantity of each line adds up to the total Demand. Click Save to create the package in Axis.
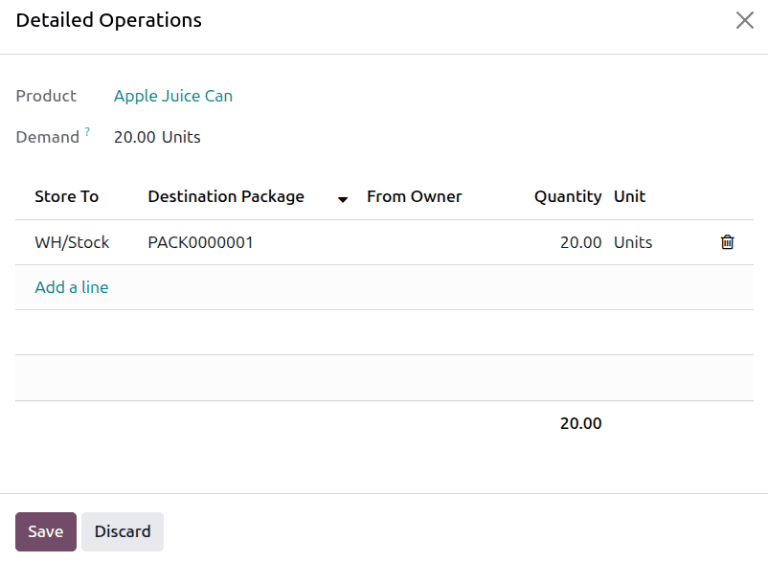
Repeat this process for all product lines on the operation form.
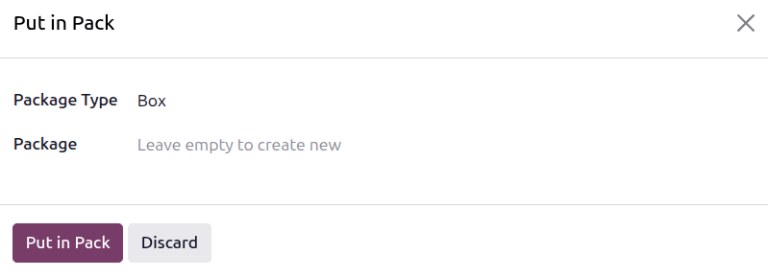
Alternatively, click the Put in Pack button on the operation form to put all items with
a Quantity greater than 0.00 into a package. The Put in Pack pop-up window opens.
In the Put in Pack window, specify a Package Type and Package, or leave the Package field blank to create a new package. Then click the Put in Pack button. The package name appears in the product line’s Packages field.
Example
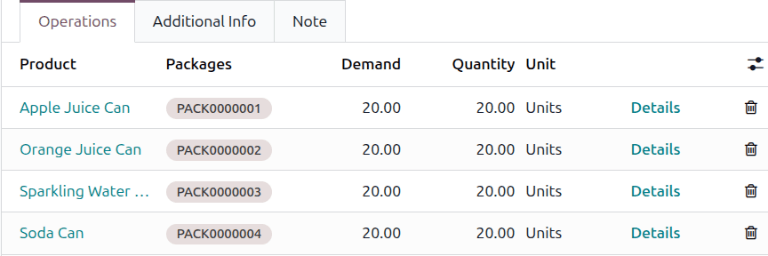
A business has placed an order for 20 units each of Apple Juice Cans, Orange Juice Cans,
Sparkling Water Cans, and Soda Cans. When the order arrives, each product arrives in its own
box of 20 cans.
The warehouse manager specifies a separate package for each product line on the receipt.
Then, to organize all packages into a single larger unit (for example, to package multiple cases of soda into a pallet), click the Put in Pack button. After closing the Put in Pack window, the Packages field for the product lines in the greater package updates with the new package name.
Example
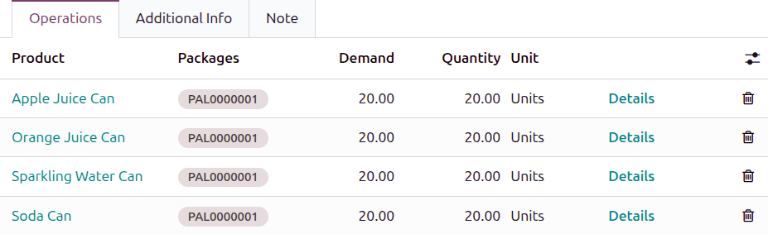
Continuing the example from above, the warehouse manager wants to package all of the products
onto a single pallet for storage in the warehouse. They click the Put in Pack
button, then in the Put in Pack window, they specify Pallet as the Package Type.
The Packages field for all product lines updates to show the pallet package name,
PAL0000001.
Be sure to Validate the operation to process its move in inventory.
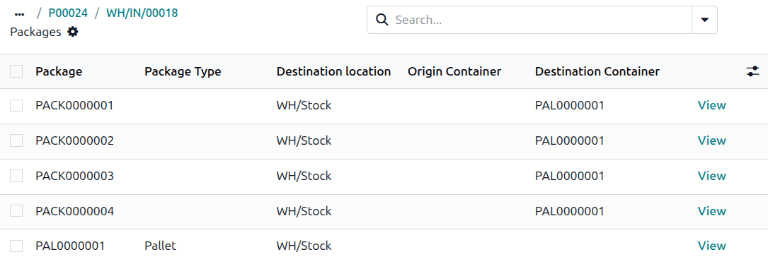
Viewing the packages in an operation
To view the packages created from an operation, click the Packages smart button at the top of the operation form. By default, this list is filtered by the Main Packages, or the largest package assigned to the operation. To view all packages, remove the Main Packages filter.
Removing packages from parent packages
To remove packages from parent packages, click the Packages smart button at the top of the operation form. By default, this list is filtered by the Main Packages, or the largest package assigned to the operation. To view all packages, remove the Main Packages filter.
Select the check boxes next to the packages that you want to remove, then click the Remove button.
Viewing packages in inventory
Open . All packages in inventory are listed here.
To view the contents of a package, open the package from the list of packages. The products in the package, including the child packages they are stored in, are listed on the package form.
