Manufacturing

Axis Manufacturing helps manufacturers schedule, plan, and process manufacturing orders. With the work center control panel, put tablets on the shop floor to control work orders in real-time and allow workers to trigger maintenance operations, feedback loops, quality issues, etc.
See also
Axis Manufacturing helps manufacturers schedule, plan, and process manufacturing orders. With the work center control panel, put tablets on the shop floor to control work orders in real-time and allow workers to trigger maintenance operations, feedback loops, quality issues, etc.
See also
Axis Manufacturing helps manufacturers schedule, plan, and process manufacturing orders. With the work center control panel, put tablets on the shop floor to control work orders in real-time and allow workers to trigger maintenance operations, feedback loops, quality issues, etc.
By using Axis Manufacturing, users can manage their manufacturing processes, including bills of materials, routings, work orders, and more.
A bill of materials (or BoM for short) documents specific components, along with their respective quantities, that are needed to produce or repair a product. In Axis, BoMs serve as blueprints for manufactured goods and kits, and often include production operations and step-by-step guidelines, as well.
BoM setup
To create a BoM, go to and click New.
Next, set the BoM Type to Manufacture this Product.
Then, specify required components and, if necessary, define any manufacturing operations.
Tip
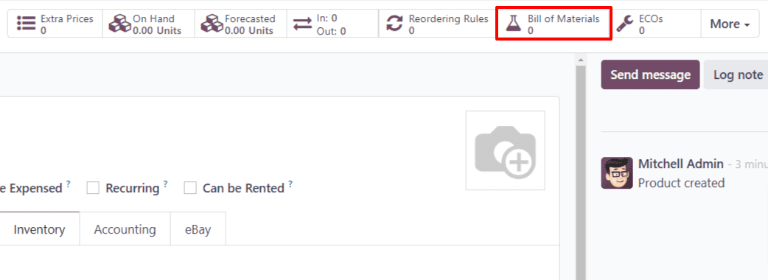
Individual BoMs can also be quickly accessed or created by clicking the Bill of Materials smart button on any product form, as accessible through the Sales, Inventory, and Manufacturing apps, as well as through any internal links where a product is referenced (such as in a field or a line item).

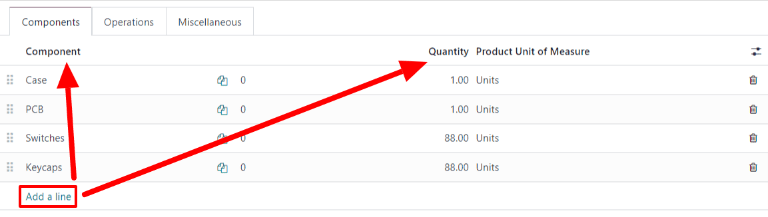
BoM for Drawer, displaying the Components tab.
See also
Components
In the Components tab of a BoM, specify components used to manufacture the product by clicking Add a line. From the Components drop-down menu, select from existing products or create a new product by typing the name and selecting either the Create ” “ option to quickly add the line item, or the Create and edit… option to add the component and continue to its configuration form.

Optionally, access additional fields by clicking the (settings adjust) icon to the far-right of the Components tab. Tick the checkboxes for the following features to enable these columns:
Apply on Variants: specify which product variant each component is used in. When the field is left blank, the component is used in all product variants.
Consumed in Operation: specify the operation using the component. Useful for determining manufacturing readiness.
Manual Consumption: tick the checkbox to force operators to check the Consumed checkbox on a manufacturing order (MO).

Not doing so triggers the Consumption Warning error message, where the consumed component quantity must be manually inputted. Otherwise, the operation cannot be completed.

Operations
Add an operation to a BoM to specify instructions for production and register time spent on an operation. To use this feature, first enable the Work Orders feature by going to . In the Operations section, tick the Work Orders checkbox to enable the feature.
See also

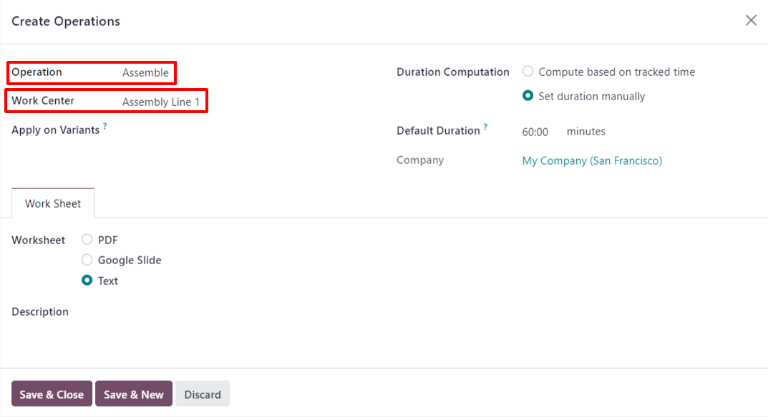
Next, navigate to the BoM by going to and selecting the desired BoM. To add a new operation, go to the Operations tab, and click Add a line.
Doing so opens the Create Operations pop-up window, where the various fields of the operation are configured:
Operation: name of the operation.
Work Center: select existing locations to perform the operation, or create a new work center by typing the name and selecting the Create ” “ option.
Apply on Variants: specify if this operation is only available for certain product variants. If the operation applies to all product variants, leave this field blank.
Duration Computation: choose how time spent on the operation is tracked. Opt for Compute based on tracked time to use the operation’s time tracker or Set duration manually if operators can record and modify time themselves.
Choosing the Compute based on tracked time option enables the Based on last __ work orders option, which automatically estimates the time to complete this operation based on the last few operations. Choosing Set duration manually enables the Default Duration field instead.
Default Duration: estimated amount of time to complete the operation; used for planning manufacturing orders and determining work center availability.
Company: specify the company the BoM is available in.
Include operation details in the Work Sheet tab. Choose PDF to attach a file or Google Slide with public access to share a link. Select Text to type instructions in the Description text field.
Tip
Type / for a list of formatting options and features, including ChatGPT.


Finally, click Save & Close to close the pop-up window. To add more operations, click Save & New and repeat the same steps above to configure another operation.
Note
Each operation is unique, as it is always exclusively linked to one BoM.
Tip
After creating an operation, click the Copy Existing Operations button to choose an operation to duplicate.

Instructions
Important
To add detailed instructions to operations, the Quality app must be installed.
Add specific instructions to an existing operation by clicking the operation’s (list) icon in the Instructions column. The number in the Instructions column shows the number of existing detailed instructions there are for the operation.

On the Steps dashboard, click New to open a blank quality control point form where the new manufacturing step can be created. Here, give the specific instruction a Title and set the Type to Instructions. In the Instructions tab of the form, write out the directions for the step in the operation.
Note
Further customizations can be made here on this form, beyond ordinary instructions, to also include specific types of quality control points that carry specific (or complex) conditions. For more details about quality control points refer the Instruction check documentation.

Miscellaneous
The Miscellaneous tab contains more BoM configurations to customize procurement, calculate costs, and define how components are consumed.
Manufacturing Readiness: choosing When components for the 1st operation are available shows the Component Status as a green Not Available, when only the components that are consumed in the first operation are in stock. This indicates that although not all components are available, operators can at least begin with the first operation. Choosing When all components are available displays a red Not Available component status unless all components are in available.
Tip
Specify which operation consumes each component on the BoM in the Manual Consumption field.

Version: displays the current BoM version, visible with the Axis PLM app installed for managing BoM changes.
Flexible Consumption: specifies if components used can deviate from the quantity defined on the BoM. Choose Blocked if operators must adhere strictly to the BoM quantity. Otherwise, choose Allowed or Allowed with Warning.
Routing: select the preferred warehouse’s manufacturing operation type for products produced in multiple warehouses. If left blank, this warehouse’s
Manufacturingoperation type is used by default.Analytic Distribution: select pre-created analytic distribution models from the list to automatically record the cost of manufacturing products in the chosen journal.
Manuf Lead Time: define the number of days needed to complete a MO from the date of confirmation.
Days to prepare Manufacturing Order: number of days needed to replenish components, or manufacture sub-assemblies of the product.
See also

Add by-products to BoMs
A by-product is a residual product that is created during production in addition to the main product of a BoM. Unlike the primary product, there can be more than one by-product on a BoM.
To add by-products to a BoM, first enable the By-Products feature in . In the Operations section, tick the checkbox for By-Products to enable the feature.

Once the feature is enabled, add by-products to a BoM by clicking the By-products tab. Click Add a line, and fill in the By-product, Quantity, and Unit of Measure. Optionally, specify a Produced in Operation for the by-product.
Example
The by-product, Mush, is created in the Grind grapes operation when producing Red Wine.

In order to manufacture a product in Axis Manufacturing, the product must be properly configured. Doing so consists of enabling the Manufacturing route and configuring a bill of materials (BoM) for the product. Once these steps are completed, the product is selectable when creating a new manufacturing order.
Activate the Manufacture route
The Manufacture route is activated for each product on its own product page. To do so, begin by navigating to . Then, select an existing product, or create a new one by clicking New.
On the product page, select the Inventory tab, then enable the Manufacture checkbox in the Routes section. This tells Axis the product can be manufactured.

Lot/serial number tracking
The assignment of lots or serial numbers to newly manufactured products is optional. To optionally assign lots or serial numbers to newly manufactured products, go to the Traceability section in the Inventory tab. In the Tracking field, select By Unique Serial Number or By Lots.
Doing so enables the Lot/Serial Number field on a manufacturing order, or the Register Production instruction on a work order card in the Shop Floor app.

Lot/Serial Number field on the MO.

Register Production option to generate lot/serial number on a work order card.
Configure a bill of materials (BoM)
Next, a BoM must be configured for the product so Axis knows how it is manufactured. A BoM is a list of the components and operations required to manufacture a product.
To create a BoM for a specific product, navigate to , then select the product. On the product page, click the Bill of Materials smart button at the top of the page, then select New to configure a new BoM.
On the BoM, the Product field auto-populates with the product. In the Quantity field, specify the number of units that the BoM produces.
Add a component to the BoM by selecting the Components tab and clicking Add a line. Select a component from the Component drop-down menu, then enter the quantity in the Quantity field. Continue adding components on new lines until all components have been added.
Next, select the Operations tab. Click Add a line and a Create Operations pop-up window appears. In the Operation field, specify the name of the operation being added (e.g. Assemble, Cut, etc.). Select the work center where the operation will be carried out from the Work Center drop-down menu. Finally, click Save & Close to finish adding operations, or Save & New to add more.
Important
The Operations tab only appears if the Work Orders setting is enabled. To do so, navigate to , then enable the Work Orders checkbox.
Learn more
The section above provides instructions for creating a basic BoM that allows a product to be manufactured in Axis. However, it is by no means an exhaustive summary of all the options available when configuring a BoM. For more information about bills of materials, see the documentation on how to create a bill of materials.
Axis Manufacturing allows users to manufacture products using one, two, or three steps. When using one-step manufacturing, Axis creates a manufacturing order (MO), but does not generate transfers for the movement of components out of inventory or finished products into stock. Inventory counts still update based on the number of components used and products manufactured, but the act of transferring them to and from inventory is not tracked.
Tip
The number of steps used in manufacturing is set at the warehouse level, allowing for each warehouse to use a different number of steps. To change the number of steps used for a specific warehouse, begin by navigating to , and then select a warehouse from the Warehouses screen.
On the Warehouse Configuration tab, find the Manufacture radio input field, and select one of the three options: Manufacture (1 step), Pick components and then manufacture (2 steps), or Pick components, manufacture and then store products (3 steps).

Important
Products must be properly configured before they can be manufactured in Axis. For details on how to do so, see the documentation on how to configure a product for manufacturing.
Create manufacturing order
To manufacture a product in Axis Manufacturing, begin by navigating to , and then click New to create a new MO.
On the new MO, select the product to be produced from the Product drop-down menu. The Bill of Material field auto-populates with the associated bill of materials (BoM).
If a product has more than one BoM configured for it, the specific BoM can be selected in the Bill of Material field, and the Product field auto-populates with the associated product.
After a BoM has been selected, the Components and Work Orders tabs auto-populate with the components and operations specified on the BoM. If additional components or operations are required for the MO being configured, add them to the Components and Work Orders tabs by clicking Add a line.
Finally, click Confirm to confirm the MO.
Process manufacturing order
An MO is processed by completing all of the work orders listed under its Work Orders tab. This can be done on the MO itself, or from the work order tablet view.
Basic workflow
To complete work orders from the MO itself, begin by navigating to , and then select an MO.
On the MO page, select the Work Orders tab. Once work begins on the first work order that needs to be completed, click the Start button for that work order. Axis Manufacturing then starts a timer that keeps track of how long the work order takes to complete.

When the work order is completed, click the Done button for that work order. Repeat the same process for each work order listed on the Work Orders tab.

After completing all of the work orders, click Produce All at the top of the screen to mark the MO as Done, and register the manufactured product(s) into inventory.
Shop Floor workflow
To complete the work orders for an MO using the Shop Floor module, begin by navigating to , and then select an MO.
On the MO, click on the Work Orders tab, and then select the ↗️ (square with arrow coming out of it) button on the line of the first work order to be processed. Doing so opens a Work Orders pop-up window, with details and processing options for the work order.
On the pop-up window, select the Open Shop Floor button at the top-left of the window to open the Shop Floor module.

When accessed directly from a specific work order within an MO, Shop Floor defaults to the page for the work center where the work order is configured to be carried out. The page shows a card for the work order that displays the MO number, the product and number of units to be produced, and the steps required to complete the work order.

A work order is processed by completing each step listed on its card. This can be done by clicking on a step and following the instructions listed on the pop-up window that appears. Once the step is completed, click Next to move on to the next step, if any are required.
Alternatively, work order steps can be completed by clicking the checkbox that appears on the right side of the step’s line on the work order card. When using this method, the step is automatically marked as completed, without a pop-up window appearing.
The final step on a work order card is titled Register Production. This step is used to register the number of product units that were produced. If the number produced is equal to the number that the MO was created for, click the # Units button on the right side of the line to automatically register that number as the quantity produced.
If a different number must be entered, click the Register Production step to open a pop-up window. Enter the number of units produced in the Units field, and then click Validate to register that number.
Note
The Register Production step appears on every work order card. It must be completed for the first work order that is processed. After doing so, the step appears as already completed for each remaining work order in the MO.
After completing all of the steps for a work order, a button appears on the footer of the work order card. If any other work orders must be completed before the MO can be closed, the button is titled Mark as Done. If there are no additional work orders to complete, the button is titled Close Production.
Clicking Mark as Done causes the work order card to fade away. Once it disappears completely, the work order’s status is marked as Finished on the MO, and the next work order appears in the Shop Floor module, on the page of the work center where it is configured to be carried out. Any additional work orders can be processed using the instructions detailed in this section.
Clicking Close Production causes the work order card to fade away. Once it disappears, the MO is marked as Done, and the units of the product that were produced are entered into inventory.
After clicking Mark as Done or Close Production, each button is replaced by an Undo button. Click the Undo button before the work order card fades away to keep the work order open.
Tip
This section details the basic workflow for processing an MO in the Shop Floor module. For a more in-depth explanation of the module and all of its features, please see the Shop Floor overview documentation.
Axis Manufacturing allows users to manufacture products using one, two, or three steps. When using two-step manufacturing, Axis creates a manufacturing order (MO) and a pick components transfer, but does not generate a transfer for the movement of finished products into stock. Inventory counts still update based on the number of products manufactured, but the act of transferring them to and from inventory is not tracked.
Tip
The number of steps used in manufacturing is set at the warehouse level, allowing for each warehouse to use a different number of steps. To change the number of steps used for a specific warehouse, begin by navigating to , and then select a warehouse from the Warehouses screen.
On the Warehouse Configuration tab, find the Manufacture radio input field, and select one of the three options: Manufacture (1 step), Pick components and then manufacture (2 steps), or Pick components, manufacture and then store products (3 steps).

Important
Products must be properly configured before they can be manufactured in Axis. For details on how to do so, see the documentation on how to configure a product for manufacturing.
Create manufacturing order
To manufacture a product in Axis Manufacturing, begin by navigating to , and then click New to create a new MO.
On the new MO, select the product to be produced from the Product drop-down menu. The Bill of Material field auto-populates with the associated Bill of Materials (BoM).
If a product has more than one BoM configured for it, the specific BoM can be selected in the Bill of Material field, and the Product field auto-populates with the associated product.
After a BoM has been selected, the Components and Work Orders tabs auto-populate with the components and operations specified on the BoM. If additional components or operations are required for the MO being configured, add them to the Components and Work Orders tabs by clicking Add a line.
Finally, click Confirm to confirm the MO.
Process pick components transfer
After confirming a two-step MO, a Transfers smart button appears at the top of the page. Click it to open the pick components transfer for the MO. This transfer is used to track the movement of components from the locations where they are stored to the location where they are used to manufacture the product.
After transferring the components out of their storage location, click Validate at the top of the transfer, followed by Apply on the Immediate Transfer? pop-up window that appears. Doing so marks the transfer as Done, and updates inventory counts to reflect the quantity of components transferred.
Finally, return to the MO by clicking the WH/MO/XXXXX breadcrumb at the top of the page.

Process manufacturing order
An MO is processed by completing all of the work orders listed under its Work Orders tab. This can be done on the MO itself, or from the work order tablet view.
Basic workflow
To complete work orders from the MO itself, begin by navigating to , and then select an MO.
On the MO page, select the Work Orders tab. Once work begins on the first work order that needs to be completed, click the Start button for that operation. Axis Manufacturing then starts a timer that keeps track of how long the work order takes to complete.

When the work order is completed, click the Done button for that work order. Repeat the same process for each work order listed on the Work Orders tab.

After completing all of the work orders, click Produce All at the top of the screen to mark the MO as Done, and register the manufactured product(s) into inventory.
Shop Floor workflow
To complete the work orders for an MO using the Shop Floor module, begin by navigating to , and then select an MO.
On the MO, click on the Work Orders tab, and then select the ↗️ (square with arrow coming out of it) button on the line of the first work order to be processed. Doing so opens a Work Orders pop-up window, with details and processing options for the work order.
On the pop-up window, select the Open Shop Floor button at the top-left of the window to open the Shop Floor module.

When accessed directly from a specific work order within an MO, Shop Floor defaults to the page for the work center where the work order is configured to be carried out. The page shows a card for the work order that displays the MO number, the product and number of units to be produced, and the steps required to complete the work order.

A work order is processed by completing each step listed on its card. This can be done by clicking on a step and following the instructions listed on the pop-up window that appears. Once the step is completed, click Next to move on to the next step, if any are required.
Alternatively, work order steps can be completed by clicking the checkbox that appears on the right side of the step’s line on the work order card. When using this method, the step is automatically marked as completed, without a pop-up window appearing.
The final step on a work order card is titled Register Production. This step is used to register the number of product units that were produced. If the number produced is equal to the number that the MO was created for, click the # Units button on the right side of the line to automatically register that number as the quantity produced.
If a different number must be entered, click the Register Production step to open a pop-up window. Enter the number of units produced in the Units field, and then click Validate to register that number.
Note
The Register Production step appears on every work order card. It must be completed for the first work order that is processed. After doing so, the step appears as already completed for each remaining work order in the MO.
After completing all of the steps for a work order, a button appears on the footer of the work order card. If any other work orders must be completed before the MO can be closed, the button is titled Mark as Done. If there are no additional work orders to complete, the button is titled Close Production.
Clicking Mark as Done causes the work order card to fade away. Once it disappears completely, the work order’s status is marked as Finished on the MO, and the next work order appears in the Shop Floor module, on the page of the work center where it is configured to be carried out. Any additional work orders can be processed using the instructions detailed in this section.
Clicking Close Production causes the work order card to fade away. Once it disappears, the MO is marked as Done, and the units of the product that were produced are entered into inventory.
After clicking Mark as Done or Close Production, each button is replaced by an Undo button. Click the Undo button before the work order card fades away to keep the work order open.
Tip
This section details the basic workflow for processing an MO in the Shop Floor module. For a more in-depth explanation of the module and all of its features, please see the Shop Floor overview documentation.
Axis Manufacturing allows users to manufacture products using one, two, or three steps. When using three-step manufacturing, Axis creates a pick components transfer, a manufacturing order (MO), and a store finished products transfer, and updates inventory counts based on the number of components removed, and finished products created.
Tip
The number of steps used in manufacturing is set at the warehouse level, allowing for each warehouse to use a different number of steps. To change the number of steps used for a specific warehouse, begin by navigating to , and then select a warehouse from the Warehouses screen.
On the Warehouse Configuration tab, find the Manufacture radio input field, and select one of the three options: Manufacture (1 step), Pick components and then manufacture (2 steps), or Pick components, manufacture and then store products (3 steps).

Important
Products must be properly configured before they can be manufactured in Axis. For details on how to do so, see the documentation on how to configure a product for manufacturing.
Create manufacturing order
To manufacture a product in Axis Manufacturing, begin by navigating to , and then click New to create a new MO.
On the new MO, select the product to be produced from the Product drop-down menu. The Bill of Material field auto-populates with the associated Bill of Materials (BoM).
If a product has more than one BoM configured for it, the specific BoM can be selected in the Bill of Material field, and the Product field auto-populates with the associated product.
After a BoM has been selected, the Components and Work Orders tabs auto-populate with the components and operations specified on the BoM. If additional components or operations are required for the MO being configured, add them to the Components and Work Orders tabs by clicking Add a line.
Finally, click Confirm to confirm the MO.
Process pick components transfer
After confirming a three-step MO, a Transfers smart button appears at the top of the page. Click it to be taken to the Transfers page for the MO. The page lists two transfers: WH/PC/XXXXX (the pick components transfer), and WH/SFP/XXXXX (the store finished products transfer).
Select WH/PC/XXXXX to open the pick components transfer for the MO. This transfer is used to track the movement of components from the locations where they are stored to the location where they are used to manufacture the product.
After transferring the components out of their storage location, click Validate at the top of the transfer, followed by Apply on the Immediate Transfer? pop-up window that appears. Doing so marks the transfer as Done, and updates inventory counts to reflect the quantity of components transferred.
Finally, return to the MO by clicking the WH/MO/XXXXX breadcrumb at the top of the page.

Process manufacturing order
An MO is processed by completing all of the work orders listed under its Work Orders tab. This can be done on the MO itself, or from the work order tablet view.
Basic workflow
To complete work orders from the MO itself, begin by navigating to , and then select a manufacturing order.
On the MO page, select the Work Orders tab. Once work begins on the first work order that needs to be completed, click the Start button for that work order. Axis Manufacturing then starts a timer that keeps track of how long the work order takes to complete.

When the work order is completed, click the Done button for that work order. Repeat the same process for each work order listed on the Work Orders tab.

After completing all of the work orders, click Produce All at the top of the screen to mark the MO as Done, and register the manufactured product(s) into inventory.
Shop Floor workflow
To complete the work orders for an MO using the Shop Floor module, begin by navigating to , and then select an MO.
On the MO, click on the Work Orders tab, and then select the ↗️ (square with arrow coming out of it) button on the line of the first work order to be processed. Doing so opens a Work Orders pop-up window, with details and processing options for the work order.
On the pop-up window, select the Open Shop Floor button at the top-left of the window to open the Shop Floor module.

When accessed directly from a specific work order within an MO, Shop Floor defaults to the page for the work center where the work order is configured to be carried out. The page shows a card for the work order that displays the MO number, the product and number of units to be produced, and the steps required to complete the work order.

A work order is processed by completing each step listed on its card. This can be done by clicking on a step, and following the instructions listed on the pop-up window that appears. Once the step is completed, click Next to move on to the next step, if any are required.
Alternatively, work order steps can be completed by clicking the checkbox that appears on the right side of the step’s line on the work order card. When using this method, the step is automatically marked as completed, without a pop-up window appearing.
The final step on a work order card is titled Register Production. This step is used to register the number of product units that were produced. If the number produced is equal to the number that the MO was created for, click the # Units button on the right side of the line to automatically register that number as the quantity produced.
If a different number must be entered, click the Register Production step to open a pop-up window. Enter the number of units produced in the Units field, and then click Validate to register that number.
Note
The Register Production step appears on every work order card. It must be completed for the first work order that is processed. After doing so, the step appears as already completed for each remaining work order in the MO.
After completing all of the steps for a work order, a button appears on the footer of the work order card. If any other work orders must be completed before the MO can be closed, the button is titled Mark as Done. If there are no additional work orders to complete, the button is titled Close Production.
Clicking Mark as Done causes the work order card to fade away. Once it disappears completely, the work order’s status is marked as Finished on the MO, and the next work order appears in the Shop Floor module, on the page of the work center where it is configured to be carried out. Any additional work orders can be processed using the instructions detailed in this section.
Clicking Close Production causes the work order card to fade away. Once it disappears, the MO is marked as Done, and the units of the product that were produced are entered into inventory.
After clicking Mark as Done or Close Production, each button is replaced by an Undo button. Click the Undo button before the work order card fades away to keep the work order open.
Tip
This section details the basic workflow for processing an MO in the Shop Floor module. For a more in-depth explanation of the module and all of its features, please see the Shop Floor overview documentation.
Process finished product transfer
After completing the MO, return to the order’s Transfers page by clicking the Transfers button at the top of the order. This time, select WH/SFP/XXXXX to open the store finished products transfer. This transfer is used to track the movement of finished products from the location where they were manufactured to the location where they are stored.
After transferring the finished products to their storage location, click Validate at the top of the transfer, followed by Apply on the Immediate Transfer? pop-up window that appears. Doing so marks the transfer as Done, and updates inventory counts to reflect the quantity of finished products transferred.
The ability to accurately calculate the cost of manufacturing a product is critical when determining product profitability. Axis’s Manufacturing app simplifies this calculation by automatically calculating the cost to complete each manufacturing order (MO), as well as the average production cost of a product, based on all completed MOs.
Important
Axis’s Manufacturing app distinguishes between the MO cost and the real cost of an MO.
The MO cost represents how much it should cost to complete an MO, based on the configuration of the product’s bill of materials (BoM). This takes into account the cost and quantity of components, as well as the cost of completing the necessary operations.
The real cost represents how much it actually costs to complete the MO. A few factors can cause the real cost to differ from the MO cost. For example, an operation may take longer to complete than estimated, a greater component quantity might be needed than was specified on the BoM, or the price of components may change during manufacturing.
Cost configuration
Axis computes MO costs based on the configuration of the BoM used to manufacture a product. This calculation includes the cost and quantity of components and operations listed on the BoM, in addition to the operating costs of the work centers where those operations are carried out, and the amount paid to each employee who works on an operation.
Component cost
Component cost is calculated automatically, based on the average purchase cost of a component across all purchase orders (POs). To view a component’s cost, navigate to Inventory app –> Products –> Products, and select a component product. The cost is displayed in the Cost field of the General Information tab, on the component’s product form.
It is possible to set the cost of a component manually, by clicking the Cost field on the component’s product form and entering a value. However, any future POs for the component override a manually entered value, resetting the Cost field back to an automatically computed value.
Work center cost
To set the operating cost for a specific work center, navigate to , and select a work center.
To set the cost of operating the work center for one hour, enter a value in the per workcenter field, located beside the Cost per hour section on the work center’s General Information tab.
To set the hourly cost of each employee that operates the work center, enter a value in the
per employee field, located beside the Cost per hour section on the work
center’s General Information tab. For example, if 25.00 is entered in the
per employee field, it costs $25.00 per hour for each employee working at the work
center.
Important
The value entered in the per employee field is only used to calculate the MO cost, which is the estimated cost of completing the MO.
The actual cost of completing the MO is represented by the real cost. Instead of using the value entered in the per employee field, the real cost is calculated using the hourly cost specific to each employee.
For example, if the per employee cost of a work center is ‘$50.00’, and an employee with an hourly cost of ‘$60.00’ completes a work order there, the MO cost (estimated) is calculated using the $50/hr cost, while the real cost is calculated using the $60/hr cost.
See the employee cost section below for information on how to set the cost for specific employees.
Employee cost
To set the hourly cost for a specific employee, navigate to the app, and select an employee. On the employee’s form, select the Settings tab, and enter the employee’s rate in the Hourly Cost field of the Application Settings section.
Important
As detailed in the work center cost section above, the value entered in the Hourly Cost field on the employee’s form is used to calculate the real cost of an MO. The estimated cost of an MO, referred to as the MO cost, uses the per employee cost set on each work center’s form.
BoM configuration
Configuring a BoM so Axis can accurately calculate the cost of MOs that use it requires two steps. First, components must be added, and the required quantity specified. Second, operations must be added, along with the work centers where they are carried out.
Begin by navigating to . Select a BoM, or create a new one by clicking New.
In the Components tab of the BoM form, add each component by clicking Add a line, selecting the component from the drop-down menu in the Component column, and entering the quantity in the Quantity column.
In the Operations tab, add an operation by clicking Add a line to open the Create Operations pop-up window. Enter a title for the operation in the Operation field.
Select the Work Center where the operation is carried out. Then, add a Default Duration, which is the estimated amount of time the operation takes to complete.
By default, the Duration Computation field is set to Set duration manually, which means that the number entered in Default Duration field is always used as the expected duration of the operation.
Selecting Compute based on tracked time causes Axis to automatically compute the Default Duration based on a certain number of work orders, which is set in the Based on field. Before there are work orders to compute this duration, the value in the Default Duration field is used instead.
The hourly cost of operating the work center, and the duration of the operation, are used to calculate the operation’s cost.
Finally, click Save & Close to add the operation to the BoM, and close the Create Operations pop-up window. Alternatively, click Save & New to add the operation to the BoM, and open a blank Create Operations pop-up window to add another operation.
See also
For a full overview of BoM configuration, see the documentation on bills of materials.
MO overview
Each MO has an overview page, which lists a variety of information about the MO, including MO cost and real cost. To view the overview for an MO, navigate to , and select an MO. Then, click the Overview smart button at the top of the MO.
Both the MO cost and real cost take into account the cost and quantity of components, as well as the cost of completing each work order. The overview page lists a row for each of these values, with the sum of them listed at the bottom of the MO Cost and Real Cost columns.
Before work begins on an MO, the MO Cost and Real Cost columns display the same costs. This is the estimated cost of completing the MO.
However, once work commences, the values in the Real Cost column may begin to diverge from the values in the MO Cost column. This happens if a different component quantity is used than was listed on the MO, the duration of a work order is different than expected, or the hourly cost of the employee performing a work order differs from the employee cost set on the work center.
Once the MO has been completed by clicking Produce All, the values in the MO Cost column update to match those displayed in the Real Cost column.

Average manufacturing cost
In addition to the cost of each individual MO for a product, Axis also tracks the average cost of manufacturing the product, taking into account the cost of every completed MO. To view this, navigate to , and select a product.
The manufacturing cost of the product is displayed per unit of measure in the Cost field, located in the General Information tab. The value continues to update as the costs of additional MOs are factored into the average cost.
To the right of the Cost field is a Compute Price from BoM button, which only appears for products with at least one BoM. Click this button to reset the cost of the product to the expected cost, which only takes into account the components and operations listed on the BoM.
Important
Be aware that clicking Compute Price from BoM does not set the price permanently. The cost continues to update based on the average of the BoM price and the real cost of any future MOs.
Example workflow: manufacturing cost
Golf product manufacturer Fairway Fields produces a variety of golf products, including an indoor putting green. They have configured a BoM for the putting green, so Axis automatically calculates the manufacturing cost of each putting green MO.
The BoM lists two components:
One unit of green felt, which costs $20.00.
One unit of a rubber pad, which costs $30.00.
The BoM also lists four operations, all of which are carried out at Assembly Station 1, which has an hourly operating cost of $30.00. Those operations are as follows:
Cut felt: default duration of seven minutes, for a total cost of $3.50.
Cut rubber pad: default duration of five minutes, for a total cost of $2.50.
Attach pad to felt: default duration of 15 minutes, for a total cost of $7.50.
Cut holes: default duration of three minutes, for a total cost of $1.50.
Altogether, the components required to produce one putting green cost $50.00, and the operations required cost $15.00, for a total manufacturing cost of $65.00. This cost is reflected in the Cost field on the putting green’s product form.
Fairway Fields confirms an MO for one putting green. Before manufacturing starts, the MO
overview lists a cost of $65.00 in both the MO Cost and Real Cost
fields.

Manufacturing begins, and the operations take ten minutes longer than expected, for a total
manufacturing time of 40 minutes. This deviation from the BoM is reflected on the MO
overview, which now lists a Real Cost of $70.00.

Once manufacturing is finished, and the MO is marked as Done, the MO overview updates
again, so the values in the MO Cost and Real Cost columns match, each
displaying a value of $70.00.
On the putting green’s product page, the Cost field now displays a cost of $67.50,
the average of the original cost of $65.00 and the real cost of $70.00 from the MO.
In Axis, lot numbers and serial numbers are used to identify and track products in Axis. Serial numbers are used to assign unique numbers to individual products, while lot numbers are used to assign a single number to multiple units of a specific product.
When manufacturing products tracked using lots or serial numbers, Axis requires the lot or serial number to be assigned to each product before manufacturing can be completed. This ensures that each product is properly tracked from the moment it enters inventory.
Configure products for tracking
By default, Axis tracks the quantity of each product on hand, but does not track individual units of a product. Lot or serial number tracking must be enabled for each product individually.
To track a product using lots or serial numbers, begin by navigating to , then scroll down to the Traceability section, and tick the Lots & Serial Numbers checkbox. Finally, click Save to save the change.
Next, click on , and select a product to track. Make sure the Track Inventory checkbox is ticked in the General Information tab. Since lot and serial number functionality is enabled, a drop-down menu appears next to the ticked checkbox.
Click on the Track Inventory drop-down menu. By default, By Quantity is selected, which only tracks the quantity on hand. Select By Lots to track the product using lot numbers, or By Unique Serial Number to track the product using serial numbers.
See also
Lot number manufacturing
To manufacture a product tracked with lots, begin by navigating to . Click New to create a new manufacturing order (MO).
In the Product field, select a product tracked using lots, and enter the desired Quantity. Click Confirm to confirm the MO.
Once the MO is confirmed, a Lot/Serial Number field appears in the top section of the MO form. By default, this field is empty.
To populate the Lot/Serial Number field with a lot number, click the (plus) icon to the right of the field. Doing so automatically generates a lot, using the next available number, and enters it in the field.
Alternatively, click on the Lot/Serial Number field and select an existing lot number, or manually enter a new lot number and click Create “#” in the drop-down menu.

Either of these methods assign the product(s) in the MO a lot number before production is finished. It is also possible to complete production and close the MO by clicking Produce All, without assigning a lot number. Doing so automatically generates and assigns a lot, using the next available number.
Serial number manufacturing
To manufacture a product tracked with serial numbers, begin by navigating to . Click New to create a new MO.
In the Product field, select a product tracked using serial numbers, and enter the desired Quantity. Click Confirm to confirm the MO.
Once the MO is confirmed, a Lot/Serial Number field appears in the top section of the MO form. By default, this field is empty.
The rest of the manufacturing process depends on how many units the MO contains.
Manufacture single unit
If a single unit of the product is being manufactured, clicking Produce All closes the MO, and automatically generates and assigns the next available serial number, which appears in the Lot/Serial Number field.
To assign a serial number without closing the MO, enter a number manually in the Lot/Serial Number field, and click Create “#”, or click the (plus) icon to the right of the field to auto-fill it with the next available number.
Manufacture multiple units
Important
When manufacturing a product tracked using serial numbers, an MO can be created for multiple units. However, when serial numbers are assigned to each unit, either at the end of production or before, the MO is split into multiple MOs, each containing one unit of the product.
Each of the split MOs is identified by a numerical tag added to the end of the original MO number.
Example
MO WH/MO/00109 contains two units of a Chair, a product tracked using serial numbers. A
serial number is assigned to each unit of the chair. This causes the MO to be split into two
MOs, each containing one unit of the chair. The MOs are titled WH/MO/00109-001 and
WH/MO/00109-002.
To assign serial numbers to each unit of an MO, click Produce All to open the Batch Production pop-up window.
The First Lot/SN field of the pop-up window is auto-filled with the next available serial number. The Number of SN field defaults to the number of units being manufactured. The values of either field can be changed manually.
Click Generate to generate the specified number of serial numbers, beginning with the number entered in the First Lot/SN field. The serial numbers are displayed in the text box at the bottom of the pop-up window, and can be manually changed after generation.
To assign serial numbers without completing production, click the Prepare MO button. Doing so splits the MO into individual MOs, one for each unit in the original MO. Each MO is left open, and can be closed individually.
To assign serial numbers and complete production, click the Produce button. Doing so splits the MO into individual MOs, one for each unit in the original MO. All of the MOs are closed, since production is complete.

After clicking Prepare MO or Produce, the app
automatically shows the first of the split MOs (ex. WH/MO/00109-001). To view and access the
rest the split MOs, click the Backorders smart button at the top of the screen.
In Axis’s Manufacturing app, the master production schedule (MPS) is used to manually plan manufacturing orders (MOs) and purchase orders (POs), based on forecasted quantities of products and components.
By considering the impact of confirmed MOs and POs, along with manually adjusted demand forecasts, the MPS can be used to manage long-term product replenishment. This ensures the continued availability of the necessary products and components.
Since the MPS allows for manual intervention, it is useful for replenishing products where the demand of existing sales orders (SOs) does not reflect probable future demand.
Example
A retail store sells artificial Christmas trees during the holiday season. It is currently September, and the store has less than ten Christmas tree MOs confirmed for the month of December.
Despite the number of confirmed MOs, the procurement manager knows that the demand for Christmas trees in December is going to be much higher, once the holiday season starts. As a result, they manually enter a greater demand in the MPS, so they can properly replenish the product in time for the increase in customer demand.
Important
It is essential to remember that the MPS is a MANUAL tool. Adding a product to the MPS does not cause it to be manufactured or purchased automatically. The MPS simply suggests the amount of the product that should be replenished, but requires user input to create the MOs or POs that are used to replenish it.
For this reason, it is recommended that the MPS NOT be used alongside reordering rules for the same product. Because reordering rules are an automated workflow, they conflict with the manual replenishment method of MPS. Using both, in unison, can lead to inaccurate forecasts and the creation of unnecessary replenishment orders.
Enable and configure MPS
To use the MPS feature, navigate to , and tick the Master Production Schedule checkbox in the Planning section. Finally, click Save.
After enabling the Master Production Schedule feature, two new fields appear under it on the Settings page: Time Range and Number of Columns.
The Time Range field is used to select the period of time over which planning takes place, and offers three options: Monthly, Weekly, and Daily. For example, if Monthly is selected, the MPS plans the production requirements of products and components on a monthly basis.
The Number of Columns field is used to specify the quantity of the selected
Time Range units shown on the MPS page. For example, if the Time Range
field is set to Monthly, and 12 is entered in the Number of Columns field,
the MPS shows one column for the next 12 months, starting with the current month.
If the values of the Time Range or Number of Columns fields are altered, click Save again to save the changes.

MPS dashboard
To open the MPS, navigate to . The MPS view appears as follows:

The grey column on the left side of the screen shows a section for every product added to the MPS, with each product section being broken down into smaller rows. The information shown in the rows depends on the filters selected in the Search… bar drop-down menu at the top of the page. The default categories that appear in the rows are:
[Product] by [unit] : the forecasted stock quantity at the beginning of each time period. [Product] and are selectable buttons which open the product’s page, or the forecast report for the product, respectively.
- Forecasted Demand: the demand forecast, which is entered manually. This represents an estimate of the demand for the product during each time period.
- Indirect Demand Forecast: while this is a default category, it only appears for products that are components of other products. It represents the demand for the component from existing MOs.
+ Suggested Replenishment: the quantity of the product that is suggested to be replenished through MOs or POs. To the right of the category title is a Replenish button, which is used to manually replenish the product, based on the quantity suggested to be replenished.

The “Replenish” button on the “+ Suggested Replenishment” row.
= Forecasted Stock: the quantity of the product forecasted to be in stock at the end of each time period, assuming that suggested replenishment numbers are fulfilled.
Altogether, these default categories form an equation:
In the case of components, the Indirect Demand Forecast is taken into account as well.
The - Forecasted Demand and + Suggested Replenishment fields can be edited for any of the time periods to the right of the product column. Doing so changes the equation, and updates the value displayed in the Forecasted Stock field.
Changing the value in the + Suggested Replenishment field also makes an (reset) button appear to the left of the field. Click the (reset) button next to the field to reset its value back to the one calculated by the MPS.
Important
While the MPS can be used with only the default categories enabled, it is advisable to also enable the Actual Demand category. This is done by clicking the (down arrow) on the right side of the Search… bar, and enabling the Actual Demand option under the Rows header.
With the Actual Demand option enabled, the - Forecasted Demand category changes to the - Actual / Forecasted Demand category. In addition to the manually entered forecasted demand, this category also displays the confirmed demand for the product, which is based on confirmed SOs.
Each column to the right of the products column lists one unit of the time period selected in the Time Range field on the Manufacturing app Settings page (ex. months). The number of time period columns corresponds to the value entered in the Number of Columns field.
The first time period column represents the current time period. For example, if the MPS is configured to use months, the first column displays data for the current month. On this first column, the + Suggested Replenishment field appears in one of five colors:
Green: a replenishment order must be generated to keep stock at the Safety Stock Target.
Gray: a replenishment order has already been generated to keep stock at the Safety Stock Target.
Orange: a replenishment order has already been generated, but the quantity it was created for is not enough to keep stock at the Safety Stock Target.
Red: a replenishment order has already been generated, but the quantity it was created for puts the amount of stock above the Safety Stock Target.
The + Suggested Replenishment field appears white, if no replenishment order has been generated, and it is not necessary to generate one at the current moment.
Add a product
To use MPS to manage the replenishment of a product, navigate to . At the top of the MPS page, click Add a Product to open the Add a Product pop-up window.
Important
Products must be properly configured to be replenished through the MPS.
In the case of manufactured products, the Manufacture route must be selected in the Routes section of the Inventory tab, on the product’s form.
In the case of products that are purchased, the Buy route must be selected in the Routes section of the Inventory tab, on the product’s form. Additionally, a vendor and the price they sell the product for must also be specified on the Purchase tab.
On the pop-up window, select the product to add in the Product drop-down menu. If the product is replenished through manufacturing, select the product’s BoM in the Bill of Materials field.
Note
Selecting a BoM when adding a product to the MPS also adds any components listed on the BoM. If it is not necessary to manage the replenishment of components through the MPS, simply leave the Bill of Materials field blank.
If the database is configured with multiple warehouses, a Production Warehouse field appears on the Add a Product pop-up window. Use this field to specify which warehouse the product is replenished to.
In the Safety Stock Target field, specify the minimum quantity of the product that
should be kept available for orders at all times. For example, if there should always be 20 units of
the product available for order fulfillment, enter 20 in the Safety Stock Target
field.
In the Minimum to Replenish field, enter the minimum product quantity for orders created
to replenish the product. For example, if 5 is entered in this field, replenishment orders for the
product include a minimum of five units.
In the Maximum to Replenish field, enter the maximum product quantity for orders created
to replenish the product. For example, if 100 is entered in this field, replenishment orders for
the product include a maximum of 100 units.
Finally, click Save to add the product to the MPS. The product now appears on the MPS page each time it is opened. If a BoM was selected in the Bill of Materials field of the Add a Product pop-up window, any components listed on the BoM appear on the page, as well.

Edit a product
After adding a product to the MPS, it may be necessary to change the replenishment values entered on the Add a Product pop-up window. To do so, click the # ≤…≤ # button to the immediate right of the Replenish button, on the + Suggested Replenishment row, below the product’s name.
Note
The first and second number displayed on the # ≤…≤ # button correspond to the values entered in the Minimum to Replenish and Maximum to Replenish fields when adding the product to the MPS.
For example, if 5 was entered in the Minimum to Replenish field, and 100 was
entered in the Maximum to Replenish field, the button appears as 5 ≤…≤
100.
Clicking the # ≤…≤ # button opens the Edit Production Schedule pop-up window. This pop-up window is the same as the Add a Product pop-up window, except that the Product and Bill of Materials fields cannot be edited.
On the Edit Production Schedule pop-up window, enter the desired values in the Safety Stock Target, Minimum to Replenish, and Maximum to Replenish fields. Then, click Save to save the changes.
Remove a product
To remove a product from the MPS, tick the checkbox to the left of its name. Then, click the Actions button at the top of the screen, and select Delete from the resulting drop-down menu. Finally, click Ok on the Confirmation pop-up window.
Deleting a product from the MPS removes it, along with all of its data. If the product is re-added, its replenishment values must be reconfigured.
MPS replenishment
Products in the MPS can be replenished in one of three ways:
Click the Replenish button at the top of the screen to generate replenishment orders for every product below its Safety Stock Target for the current month.
Click the Replenish button on the right side of the + Suggested Replenishment row of a specific product, to generate a replenishment order for that specific product.
Tick the checkbox to the left of the product name of one or more products. Then, click the Actions button at the top of the screen, and select Replenish from the resulting drop-down menu. Doing so generates a replenishment order for each selected product.
The type of replenishment order generated corresponds to the route selected on the Inventory tab of the product’s form:
If the Buy route is selected, an RfQ is generated to replenish the product. RfQs can be selected by navigating to the app. Any RfQ generated by the MPS lists MPS in its Source Document field.
If the Manufacture route is selected, an MO is generated to replenish the product. MOs can be selected by navigating to . Any MO generated by the MPS lists MPS in its Source Document field.
When manufacturing certain products, it is common to be left with residual materials, in addition to the finished product. These materials are known as by-products. By specifying the by-products created during manufacturing on a product’s bill of materials (BoM), the quantity of by-products on-hand is tracked by Axis.
Example
Manufacturing a rocking chair requires ten pieces of wood. During production, five pieces of scrap wood are created, in addition to the rocking chair. By designating the scrap wood as a by-product on the rocking chair’s BoM, Axis tracks the on-hand count of scrap wood, as well as the quantity of rocking chairs produced.
Configuration
To specify by-products on a product’s BoM, the By-Products setting must be enabled. To do so, navigate to , and tick the By-Products checkbox, located under the Operations heading. Then, click Save to apply the change.

With the By-Products setting enabled, a By-products tab appears on product BoMs.
Add byproduct to BoM
To add by-products to a BoM, navigate to , and select a BoM.
On the BoM, select the By-products tab. Click Add a line, and select the by-product in the By-product drop-down field. In the Quantity field, enter the quantity of the by-product produced during manufacturing.
If the by-product is produced during a specific operation of a manufacturing order (MO), select the operation in the Produced in Operation field. For example, if a scrap wood by-product is produced during an Assemble operation, select that operation in the Produced in Operation field.

Manufacture by-product
When an MO is completed and marked as Done, Axis registers the quantity of by-products created during the manufacturing process. To create a new MO, navigate to , and click New.
In the Bill of Material field, select a BoM on which by-products have been specified. After doing so, the Product field auto-populates with the corresponding product. Click Confirm to confirm the MO.
When manufacturing is completed, click the Produce All button at the top of the MO. After doing so, inventory counts update to reflect the quantity of by-product(s) produced, as well as the quantity of the product.
Click the Product Moves smart button at the top of the MO page to see the movements of components and products. Each by-product is listed on the resulting Inventory Moves page, with the From column displaying the virtual production location, and the To column displaying the location where the by-product is stored.

During the manufacturing process, scrapping components or finished products may be necessary when items are damaged, defective, or no longer usable.
Tracking scrapped materials helps manufacturers monitor waste, identify process issues, and account for production costs.
In Axis, scrapped items are removed from physical inventory and moved to a virtual location called Virtual Locations/Scrap. This location is not a physical space—it is a way to log and track losses without affecting real stock levels.
See also
Tip
Scrap orders can be viewed by navigating to . Each scrap order shows the date and time the order was created, along with the product and quantity that was scrapped.
To view the total quantity of each item scrapped, navigate to , then remove the Internal filter from the Search… bar to display all virtual locations. From the list, select the Virtual Locations/Scrap location.
Manufacturing app
To scrap a product from the Manufacturing app, go to and select the desired MO.
On the MO, click the (Actions) icon, then choose Scrap from the drop-down menu.

Shop Floor
In Shop Floor, only components can be scrapped. Navigate to the desired MO card, and then tap the (Actions) icon and in the What do you want to do? pop-up window, select Scrap.

Scrap pop-up window
After opening the Scrap Products pop-up window using one of the methods detailed above, select the component or finished product being scrapped, from the Product drop-down menu.
In the Quantity field, enter the quantity being scrapped.
By default, the Source Location field is set to the warehouse’s pre-production location, while the Scrap Location field is set to the Virtual Locations/Scrap location. If either the source or scrap location should be changed, select a different location from their respective drop-down menus.
Enable the Replenish Scrapped Quantities checkbox if a picking order should be created to replace the scrapped component upon confirmation of the scrap order. This option should only be enabled for warehouses with two-step or three-step manufacturing enabled, since components are not picked as part of the one-step manufacturing process.

After filling out the Scrap Products pop-up window, click the Scrap Products button. After one or more scrap orders have been created, a Scraps smart button appears at the top of the screen. Click it to view a list of all scrap orders for the MO.
In some cases, it is necessary to dismantle manufactured products into their individual components. This may be required if too many units of a product were built, or if the components of one product must be reclaimed to use in the manufacturing of another.
In Axis Manufacturing, products can be dismantled, and their components returned to inventory, using unbuild orders. By using unbuild orders to accomplish this task, inventory counts for the finished product and its components remain accurate, based on the quantity of products dismantled, and the quantity of components reclaimed.
Create unbuild order
A new unbuild order can be created by navigating to , and clicking New.
Begin filling out the new unbuild order by selecting a Product to unbuild. After doing so, the Bill of Material field auto-populates with the corresponding bill of materials (BoM). If a different BoM should be used, click on the Bill of Material field, and select it from the drop-down menu.
Alternatively, a specific BoM can be selected in the Bill of Material field before selecting a product, which causes the corresponding product to auto-populate in the Product field.
Next, specify the Quantity of the product that is being unbuilt.
If the product being unbuilt was originally manufactured in a specific manufacturing order (MO), select it in the Manufacturing Order field.
In the Source Location field, select the location where the product being unbuilt is currently stored.
In the Destination Location field, select the location where the reclaimed components are stored after the unbuild order is completed.
If the Lots & Serial Numbers feature is enabled in the settings of the Inventory app, a Lot/Serial Number field appears on the unbuild order, which can be used to specify the lot(s) or serial number(s) of the product being unbuilt, if any are assigned.
If the Axis database has been configured with multiple companies, a Company field appears on the unbuild order, which can be used to specify the company that owns the product being unbuilt.
Finally, once the product has been unbuilt, click the Unbuild button at the top of the order to confirm that it has been completed.

Warning
While it is possible to create unbuild orders for products that have zero (or fewer) units on-hand, this is not advised, since it can lead to inventory inconsistencies.
If an unbuild order is created for a product with zero (or fewer) units on-hand, a pop-up window appears, warning the user that there is an insufficient quantity to unbuild.
To ignore the warning, and proceed with the unbuild order, click Confirm at the bottom of the pop-up window. To return to the unconfirmed unbuild order, click Discard, instead.

After completing an unbuild order, inventory counts automatically update, based on the quantity of products unbuilt, and the quantity of components reclaimed.
Example
A Coat Rack product is comprised of one Wooden Pole component and six Wooden Dowel
components.
An unbuild order is created for one unit of the Coat Rack. Once the order is completed, the
on-hand quantity of Coat Racks decreases by one, while the on-hand quantities of Wooden Poles
and Wooden Dowels increase by one and six, respectively.
Scrap unusable components
In some cases, components may be unusable after the unbuilding process is completed. To ensure that inventory counts accurately reflect the quantity of usable components on-hand, any component that can no longer be used should be removed from inventory using a scrap order.
In some cases, the full quantity of a manufacturing order cannot be produced immediately. When this happens, Axis Manufacturing allows for the manufacturing of partial quantities of the order and creates a backorder for the remaining amount.
In the Manufacturing app, creating a backorder splits the original manufacturing order into two orders. The reference tag for each order is the tag used for the original order, followed by a hyphen and then an additional number to indicate that it’s a backorder.
Example
A company creates a manufacturing order with the reference tag WH/MO/00175, for 10 units of Product X. After starting work on the manufacturing order, the employee working the production line realizes there are only enough components in stock to produce five units of the product.
Instead of waiting for additional stock of the components, they manufacture five units and create a backorder for the remaining five. This splits the manufacturing order into two separate orders: WH/MO/00175-001 and WH/MO/00175-002.
Order 001 contains the five units that have been manufactured, and is immediately marked as Done. Order 002 contains the five units that still need to be manufactured and is marked as In Progress. Once the remaining components are available, the employee returns to order 002 and manufactures the remaining units before closing the order.
Create a manufacturing backorder
To create a backorder for part of a manufacturing order, begin by navigating to . Select a manufacturing order with a quantity of two or more or create one by clicking Create.
If a new manufacturing order is created, select a product from the Product drop-down menu and enter a quantity of two or more in the Quantity field, then click Confirm to confirm the order.
After manufacturing the quantity that is being produced immediately, enter that number in the Quantity field at the top of the manufacturing order.

Next, click Validate, and a You produced less than initial demand pop-up window appears, from which a backorder can be created. Click Create Backorder to split the manufacturing order into two separate orders, with the reference tags WH/MO/XXXXX-001 and WH/MO/XXXXX-002.

Order 001 contains the items that have been manufactured, and is closed immediately. Order 002 is the backorder that contains the items that have yet to be manufactured, and remains open, to be completed at a later date.
Once the remaining units can be manufactured, navigate to , and then select the backorder manufacturing order. If all of the remaining units are manufactured immediately, simply click Validate to close the order.
If only some of the remaining units are manufactured immediately, create another backorder for the remainder by following the steps detailed in this section.
Create a backorder in Shop Floor
Backorders for manufacturing orders can also be created from the Shop Floor module.
Note
In order to use the Shop Floor module, the Work Orders setting must be enabled. To do so, navigate to , enable the Work Orders checkbox, and then click Save.
To create a backorder from the Shop Floor module, begin by navigating to . Select an MO for multiple units of a product, for which a backorder needs to be created.
On the MO, select the Work Orders tab, and then click the Open Work Order (external link icon) button on the line of the work order to be processed. On the resulting Work Orders pop-up window, click the Open Shop Floor button to open the Shop Floor module.
When accessed from a specific work order, the Shop Floor module opens to the page for the work center where the order is configured to be processed, and isolates the work order’s card so that no other cards are shown.
Complete the steps on the work order’s card until the Register Production step is reached, and then click on it to open the Register Production pop-up window.
Important
Do not click the # Units button on the right side of the step. Doing so automatically registers the full amount of units as having been produced.
On the Register Production pop-up window, enter the number of units produced in the Quantity field. Make sure the number entered is less than the number of units listed to the right of the field. Then, click Validate.

The pop-up window disappears and the # Units button on the work order’s card updates to reflect the number of units produced, as a fraction of the number of units for which the MO was originally created.
Next, click the Mark as Done button at the bottom-right of the work order’s card. The
work order card begins to fade away. Once it disappears completely, a new work order card appears,
titled with the original MO’s reference number with a -002 tag added to the end of it.
This new reference number represents the backorder MO. The original MO’s reference number now
appears with a -001 tag added to the end of it to distinguish it from the backorder MO.
If the original MO has no remaining work orders, it can be closed by selecting the All filter in the top navigation of the Shop Floor module, and then clicking Close Production at the bottom of the MO’s card.
If the original MO has remaining work orders that must be completed before it can be closed, cards for these work orders appear on the Shop Floor pages for the work centers where they are configured to be carried out. They can be processed as normal, and additional backorders can be created from their work order cards using the instructions detailed in this section.
Once the current work order for the backorder MO is ready to be processed, this can also be completed as normal, and an additional backorder can be created from its work order card by following the instructions detailed in this section.
After the final work order for the backorder MO has been completed, the MO can be closed by clicking the Close Production button at the bottom of the work order’s card.
In Axis Manufacturing, it is possible to create manufacturing orders for a single unit of an item, or multiple units of the same item. In some cases, it may be necessary to split a manufacturing order that contains multiple units into two or more orders, or to merge two or more orders into a single order.
Important
A manufacturing order can only contain one unit of a product, or multiple units of a single product that all use the same Bill of Materials (BoM). As a result, it is only possible to merge manufacturing orders when every order contains the same product being manufactured with the same BoM.
Split manufacturing orders
To split a manufacturing order into multiple orders, begin by navigating to , then select a manufacturing order. At the top of the page, next to the New button, the manufacturing order’s reference number appears with a ⚙️ (settings) button next to it.
Click the ⚙️ (settings) button to open the general settings for the manufacturing order, then select Split.

After selecting Split, a Split production pop-up window appears. In the Split # field, enter the number of manufacturing orders that the original order should be split into, then click outside of the field. A table appears below, with a line for each new manufacturing order that will be created by the split. In the Quantity To Produce column, enter the number of units that will be assigned to each new manufacturing order. Finally, click Split to split the manufacturing order.

After clicking Split, the original manufacturing order is split into the number of orders that was specified in the Split # field. The reference numbers for the new manufacturing orders are the reference number for the original order with -### tags added to the end.
Example
Manufacturing order WH/MO/00012 is split into three separate orders. The reference numbers for the new orders are WH/MO/00012-001, WH/MO/00012-002, and WH/MO/00012-003.
Merge manufacturing orders
To merge two or more manufacturing orders into a single order, begin by navigating to . Select the manufacturing orders that will be merged by activating the checkbox to the left of the name of each order.

Once all manufacturing orders have been selected, click the Actions button at the top of the page, then select Merge from the drop-down menu.

The selected manufacturing orders are merged into a single order. The reference number for the new manufacturing order is the next sequential number that has not already been assigned to an order.
Example
The last reference number used for a manufacturing order was WH/MO/00012. Two manufacturing orders, WH/MO/00008 and WH/MO/00009, are merged into a single order. The reference number for the manufacturing order created by the merger is WH/MO/00013.
In the Source field for the manufacturing order created by the merger, the reference numbers of the manufacturing orders that were merged are listed.
Example
Manufacturing orders WH/MO/00009 and WH/MO/00010 are merged to create WH/MO/00011. The source field for WH/MO/00011 lists both WH/MO/00009 and WH/MO/00010.
Continuous improvement is a general philosophy intended to help individuals and organizations constantly improve themselves and the work they produce.
There are a variety of different methodologies that fall under the umbrella of continuous improvement. These include kaizen, six sigma, and lean, among others. While the specific steps of each method differ, their goal remains the same: implement a process by which improvement is a perpetual goal, rather than a one-time accomplishment.
The sections below contain details about how Axis can be used to implement four general steps common to many of the most popular continuous improvement strategies, with links to documentation about configuring the necessary features. The final section details how a specific company might configure these Axis implementations within their organization.
Important
Continuous improvement is not a one-size-fits-all methodology. While most strategies include between four and six steps, proper implementation requires developing a system tailored to the specific needs of each company.
This is not a limitation, but rather a benefit, as it makes the methodology flexible enough to adapt to almost any use case. Axis, in particular, adapts well to this flexibility, as it can be configured to meet the needs of almost any workflow.
As such, it is important to remember the content below only provides examples of how Axis might be used. They should be viewed as more of a starting point, rather than a concrete outline that every organization must follow.
Identify problems
Before improvement can begin, it is necessary to determine where improvement is necessary. This is where identifying problems comes into play. Two of the best Axis apps for identifying problems with products or processes are Helpdesk and Quality.
Helpdesk
The Helpdesk app is useful for receiving feedback from outside of the organization, like from clients or customers. This is accomplished by implementing one (or more) of the methods for receiving tickets, including email aliases, live chat conversations, and website forms.
Using these methods, customers can submit feedback about problems, which is then reviewed by a member of a helpdesk team. Depending on the outcome of the review, the team member may decide to take further action to ensure the issue is addressed. This can include creating a quality alert.
Quality
The Quality app is useful for receiving feedback from within the organization, like from employees.
One method for accomplishing this is to set up a quality control point (QCP). A QCP is used to automatically create quality checks at regular intervals, prompting employees to inspect, and confirm, the quality of a product.
If an issue is found, an employee can then create a quality alert to notify a quality team. Quality alerts can also be created independent of a QCP, in the event that an employee discovers an issue without being prompted to check for one. This is a great way for customer support employees to notify a quality team of an issue brought to their attention by a customer ticket.
Suggest improvements
Once a problem is identified, the next step is to put forward ideas for how to address the problem. As with identifying problems, the Quality app is also useful for suggesting improvements. In addition, the PLM (Product Lifecycle Management) app can be used for this purpose, as well.
Quality
When creating a quality alert to bring an issue to the attention of a quality team, the Corrective Actions and Preventive Actions tabs can be used to provide feedback about how the issue can be addressed.
The Corrective Actions tab is used to suggest a method for fixing items affected by the
issue. For example, Screw the bolts on tighter, so the seat stays in place.
The Preventive Actions tab is used to suggest a method for preventing the issue from
occurring in the future. For example, Do not tighten the screws too much, or they will be
stripped.
The quality team that reviews the alert sees these suggested actions, and can take them into account when deciding how to address the issue.
PLM
The PLM app is used to manage the lifecycle of a product from its introduction through each successive version. As such, it is useful for testing ideas for product improvements.
Using engineering change orders, product management teams can create new iterations of product BoMs, adding or removing specific components or operations, as needed. The products created using these BoMs are put through a review process to confirm the effectiveness of the changes.
Implement strategies
Implementing strategies involves putting the proposed solutions from the suggest improvements step into action. The PLM app continues to be useful during this step, as it can be configured to make BoM updates. The Field Service app can also be used by certain companies to make improvements to products that have already been sold to customers.
PLM
Once BoM changes have gone through the proper review process, they can be approved, and the updated BoM put into use. This is accomplished by configuring one of the ECO review stages to apply the changes made to the BoM, at which point the updated BoM becomes available for new MOs.
Product BoMs can continue to be updated, as needed. The version control features of the PLM app allow for easy management of all versions of a given BoM.
Field Service
The PLM app is a great way to make changes to product BoMs. However, these changes only affect products produced using the new BoM. If a defective product has already been sold to a customer, it may be necessary to repair (or update) that product.
In such a case, the Field Service app can be used to schedule onsite interventions. These interventions allow service technicians (or other employees) to be sent to a customer’s location to address an issue with a product.
Review actions
Reviewing actions is where the “continuous” part of continuous improvement comes into play, as it allows an organization to evaluate the decisions made in the previous steps. As such, this step is, essentially, returning to the beginning of the process, so that additional problems can be identified and addressed.
This means that the Helpdesk and Quality apps should be used again to receive customer and employee feedback. Another app that may be useful at this stage is the Surveys app.
Surveys
After implementing changes to a product or process, it may be wise to solicit customers for their feedback directly, rather than waiting to hear from them of their own volition. This may bring to light feedback that customers may have otherwise neglected to share.
One of the best ways to accomplish this is through the Surveys app. Creating a survey, and sending it to customers who receive an updated product, increases the likelihood of receiving relevant feedback about the product.
Example workflow: coat rack product improvement
Wood Hut is a manufacturer of fine wood products. They are committed to manufacturing products of the highest-possible quality, and are always looking for ways to improve the products they sell, along with the processes used to create them.
Wood Hut uses the Axis platform to manage every element of their production, fulfillment, and customer satisfaction processes. They have developed a custom product improvement workflow that incorporates the Helpdesk, Quality, PLM, and Manufacturing apps.
One of Wood Hut’s most popular products is their coat rack. It’s made entirely of oak, and customers describe it as “sleek and elegant.” However, recent customer feedback about the coat rack has brought attention to quality issues that necessitate revising the current manufacturing process.
The product revision workflow begins when the customer service team receives a ticket in the Helpdesk app from a customer having problems with the coat rack she purchased. The customer, Abigail Peterson, has found that her coat rack falls over when more than five coats are hanging from it. This is a major issue, as the coat rack has enough dowels for six coats.

Marc, the customer service employee assigned to the helpdesk ticket, opens the Quality app, and creates a new quality alert. He tags the Production Quality Team and assigns Julie Andreson as the quality employee responsible for the alert.
Julie reviews the alert, and consults with her team about the best course of action. They decide that it is necessary to revise the product’s BoM to prevent the issue from occurring in the future, which Julie notes in the Corrective Actions tab of the quality alert.

Then, Julie messages product engineer, Joe Kazan in the chatter of the quality alert to bring it to his attention. Joe opens the PLM app and creates a new ECO, noting the problem with the coat rack, and suggesting that a change to the product’s BoM may be necessary.

Joe clicks Start Revision, and then the Revision smart button to open version two of the coat rack’s BoM. This BoM was created alongside the ECO, and remains archived until it is approved.
After some testing, Joe discovers that adding a metal support rod to the coat rack strengthens it, allowing the rack to hold six or more coats without falling over. He updates the BoM to include the support rod as one of the components, and adds an extra operation to make sure it is installed during the manufacturing process. Finally, he leaves a message in the chatter of the ECO, letting his manager, Jose, know that it is ready for review.

Jose reviews the changes, and confirms they are an effective method for addressing the problem with the coat rack. He moves the ECO to the Approved stage, which makes version two of the coat rack BoM the current version.
Now, each time an MO is created to produce a coat rack, the updated BoM is automatically selected. Wood Hut begins producing the improved coat rack, and customer feedback confirms that the new version has addressed the problem with its predecessor.
Using the Axis platform, Wood Hut has implemented an end-to-end product improvement process. Since the essential elements of this process (customer feedback, quality control, etc.) are always functioning, it can be reused to continuously update products and processes.
In Axis, work centers are used to carry out manufacturing operations at specific locations. However, if a work center cannot be used for some reason, work orders begin to pile up at the work center until it is operational again.
As a result, it is necessary to make the work center unavailable in Axis so new work orders are routed to alternative work centers that are operational. Using Axis’s Time Off app, it is possible to designate a work center as being unavailable for a set period of time. Doing so ensures manufacturing operations can continue until the impacted work center is available again.
Configuration
Before a work center can be designated as unavailable, the Axis platform must be properly configured. First, it is necessary to enable developer mode. This allows the Time Off smart button to appear on each work center’s Working Hours page.
Next, install the Time Off app. This is the app used for managing time off for all resources within Axis, including employees and work centers.
To do so, navigate to the app, then search Time Off in the search bar. The
card for the Time Off app should be the only one that appears on the page. Click the
Install button on the card to install the app.
The last step is to properly configure work centers. For this workflow, it is necessary to have at least two work centers: one that is made unavailable, and a second that receives the work orders that the other cannot accept. If no second work center is configured, Axis cannot route work orders away from the unavailable work center, and they pile up in its queue.
To create a work center, navigate to .
See also
For a full guide to work center creation, refer to the documentation on work centers.
Make sure both work centers have the same equipment listed under the Equipment tab. This ensures operations carried out at one work center can also be performed at the other.
On the work center that is made unavailable, select the second work center from the Alternative Workcenters drop-down menu. Now, Axis knows to send work orders to the second work center when the first is unavailable for any reason.
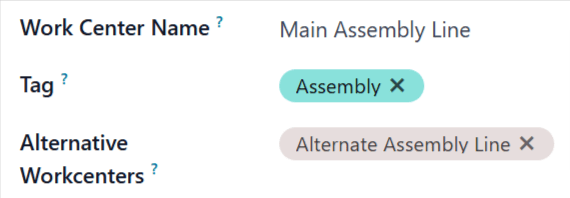
Add time off for a work center
With configuration completed, time off can now be assigned to a work center. Begin by navigating to , and selecting the affected work center. Click the (Internal link) button on the right side of the Working Hours drop-down menu, to open the working hours page for the work center.
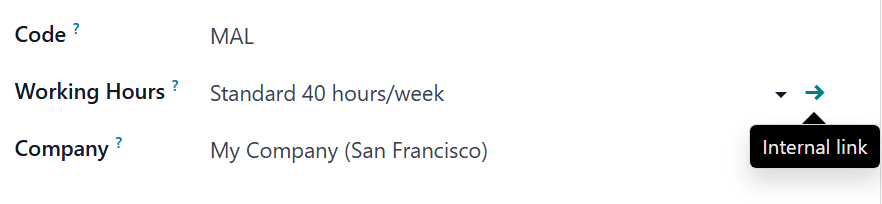
The working hours page displays the standard working hours for the work center. With developer mode activated, a Time Off smart button appears at the top of the page. Click it to open the Resource Time Off page.
On this page, click New to configure a new time-off entry. On the time-off form, note the Reason for the work center closure (e.g. broken equipment, maintenance, etc.), select the affected work center as the Resource, and choose a Start Date and End Date to specify the period during which the work center is unavailable.
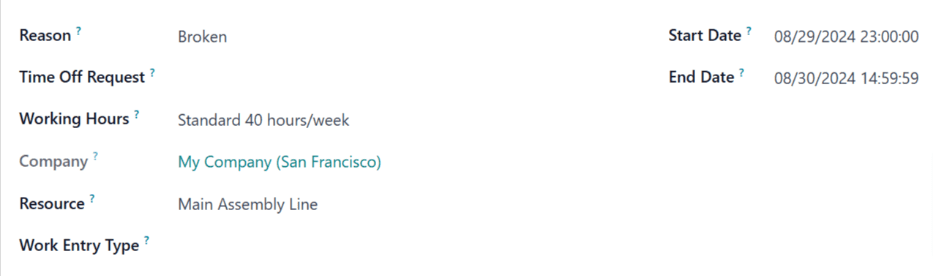
Alternative work center planning
Once a work center is within its specified time-off period, work orders sent to it can be automatically routed to an alternative work center using the Plan button.
Begin by creating a new manufacturing order (MO), by navigating to . On the MO form, specify a Product that uses the unavailable work center for one of its operations. Click Confirm to confirm the MO.
On the confirmed MO, select the Work Orders tab. By default, the unavailable work center is specified in the Work Center column. There is also a Plan button at the top left of the page.
Click Plan, and the work center listed in the Work Center column of the Work Orders tab is automatically changed to the alternative work center.
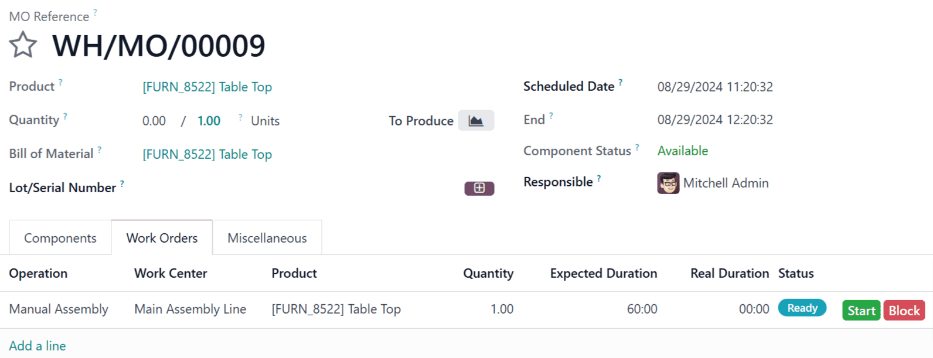
Before clicking Plan, the work order is scheduled at Main Assembly Line.
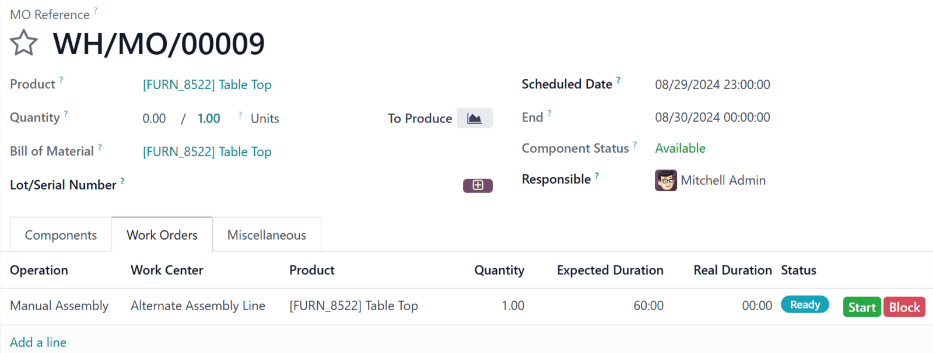
After clicking Plan, the work order is rescheduled at Alternative Assembly Line.
Once the time-off period for the unavailable work center ends, Axis recognizes the work center is available again. At this point, clicking the Plan button does not route work orders to an alternative work center unless the first one is at capacity.
Work centers are where Manufacturing work orders are processed, and can be used to track costs, make schedules, plan capacity, organize equipment, and track efficiency. Specifying a work center is required when a work order is defined in the Operations tab of a bill of materials (BoM) for a product.
Important
Work centers only appear if the Work Orders setting is enabled. To do so, navigate to , then tick the Work Orders checkbox. Work orders can be managed in the Manufacturing app by selecting .
See also
Work center configuration
Create a new work center
In the Manufacturing app, select and click the New button to open a new work center form.

Work Center Name: the label for the work center used to select it on a work order or on the reporting dashboards
Tag: reusable labels that can be used to sort work centers in list view
Alternative Workcenters: where a work order should be carried out if this work center is not available
Code: reference id for the work center that is displayed in the list view
Working Hours: the hours that work center can be used during the week
Working hours
Working hours define when a work center should operate, based on a one- or two-week schedule. These hours also form the basis for calculating overall equipment efficiency (OEE).
Note
By default, Axis uses the Standard 40 hours/week working hours, which expects work centers to
operate between 8:00 AM and 5:00 PM on Monday through Friday.
To change the working hours, hover over the current Working Hours value and click the (Internal link) icon to open the working hours form.

To create a new set of working hours, click the New button and give it a name. From here, edit any Work from or Work to value to adjust the time range. Remove a line by clicking click the (trash) icon. To create a new time range, click Add a line at the bottom of the list.
Set productivity standards and allowed employees
The General Information tab on the work center form allows for productivity goals to be assigned to a work center. These are used as the basis for calculating how much of the potential time the work center is being used and its operating costs.

Time Efficiency: a multiplier for how using this work center affects the normal speed of execution of a work order
Example
If a work center has older equipment and work orders take twice as long to produce, the
Time Efficiencywould be50.00%.Capacity: the number of products that can be processed at the work center simultaneously
OEE Target: the target for efficiency at the work center
Example
If a work center is available for
8 hours per daybut is only expected to be used for7 hours per day, the OEE would be87.50%. \(7/8*100=87.5\)See also
Setup Time: the time required before work can commence on a work order
Cleanup Time: breakdown or cleanup time required after a work order is finished
Cost per hour: the operating expense of that workstation. The per employee value is for estimating the average cost per employee.
See also
Allowed Employees: the employees who can perform work at the work center. If blank, all employees are allowed.
Example
If equipment at a work center requires a certification to operate, Allowed Employees could list only those employees who have the certification.
Set production capacities
The Capacity setting on a work center creates a default value for how many units can be produced at one time in a work center. To specify that a work center can produce different quantities of different products, select the Specific Capacities tab.

Tip
To specify production capacities in different measurements from a count of units, enable the Units of Measure feature in the Inventory app.
See also
Integrate IoT devices
The IoT Triggers tab enables the integration of IoT devices with a work center:
Device: specifies the IoT device to be triggered
Key: the security key for the device
Action: the IoT device action triggered

Assigning equipment to work centers
The Maintenance app makes it possible to add specific equipment to a work center and individually track its costs and productivity. It also adds the Equipment and Maintenance tabs to the work center form, used to list equipment and schedule maintenance activities.
See also
Configure equipment
Using the Equipment tab, it is possible for specific pieces of equipment to be assigned to a work center. The following information is displayed for each piece of equipment added:
Equipment Name: the name of the piece of equipment
Technician: the technician responsible for servicing the equipment
Equipment Category: the category the equipment belongs to
MTBF: mean time between failures; the average time that the piece of equipment will operate before failing
MTTR: mean time to recovery; the average time it takes for the equipment to become fully operational again
Est. Next Failure: an estimate of when the next equipment failure will occur

Note
MTBF, MTTR, and Est. Next Failure are all calculated automatically based on past failure data, if any exists.
Work center planning
The currently scheduled work orders can be viewed by accessing .

Different views show how many individual work orders are scheduled, how many minutes of each hour the work center is in production, and the dates and times that are currently scheduled for work orders. Times and planned work centers can be changed by clicking to access the individual work order.
Work center performance
Performance for an individual work center can be viewed by selecting , and clicking on a work center. Metrics are displayed in smart buttons at the top of the form.

OEE: overall equipment effectiveness, the percentage of time that the work center has been productive out of its available work hours.
See also
Lost: the amount of time lost due to work stoppages
Load: the amount of time it will take to complete the current workload
Performance: the real duration of work time, shown as a percentage of the expected duration
Use case: measuring performance by shift using work centers
Work centers support defined working hours, enabling the tracking of production efficiency by shift. To configure shift-based tracking, create working hours for each of the shifts, then duplicate versions of each work center for each of the shifts. With this setup, comparing shift productivity can be done with any of the available reporting tools.
Working hours for multiple shifts
To create working hours for multiple shifts, open a work center form and in the Working Hours field click the (Internal link), and then click the New button to create a new set of hours for the second shift.
Example
A manufacturer has two shifts: a day shift from 5 AM to 1 PM and a night shift from 1 PM to 9 PM. Starting from any existing work center, edit the existing working hours to match the day shift.

Once the day shift is saved, click the (cog) icon and select
Duplicate. Rename this new schedule Night Shift and change each Work
from to 1 PM and Work from to 9 PM.

Work centers for multiple shifts
To create the duplicate work centers, return to the work center view by navigating to and duplicating each of the work centers that are used by both shifts, either on the individual work center forms, or directly from the list view.
Tip
To duplicate work centers directly from the list view, click the (checkbox) that appears above the list items to select all. Then, click the Actions button at the top of the list and select Duplicate.
Example
A manufacturer has two work centers,
Assembly Line 1andAssembly Line 2, and two working hours,Day ShiftandNight Shift.
To create versions of Assembly Line 1 and Assembly Line 2 for each shift, duplicate each of
the work centers. Select the first work center and add the shift name in that work center’s name
and assign it the appropriate working hours. Optionally, configure each work center to use its
opposite shift counterpart as an alternate work center to make sure that manufacturing orders get
assigned to both. Tags can also help make a visual distinction between each shift.
Tip
Use the (left arrow) and (right arrow) buttons in the top left corner to move on to the next form in the list without returning to the list view.
Reports comparing different shifts
With multiple work centers created to represent shifts, reports that sort by work center will now compare shifts. This can be used to compare the number of work orders that are being assigned each shift, the OEE, or actual time that each shift is taking to produce a product.
Example
A report has been created to compare the time efficiency of two shifts producing the same product in the same work center.

To create this report, go to and click to remove the Ready or Waiting or Pending or In Progress filter by clicking the Remove icon on its right side. Next, click the Measures button and select Duration Deviation (%)
In this case, the day shift has on average taken more than the expected time to produce products (-6.50%) while the night shift took less than the expected time (15.00%).
When manufacturing certain products, specific operations may need to be completed before others can begin. In order to ensure operations are carried out in the correct order, Axis Manufacturing features a work order dependencies setting. Enabling this setting allows for operations on a Bill of Materials (BoM) to be blocked by other operations that should occur first.
Configuration
The work order dependencies setting is not enabled by default. To enable it, begin by navigating to . Then, enable the Work Orders setting, if it is not already active.
After enabling the Work Orders setting, the Work Order Dependencies setting appears below it. Enable Work Order Dependencies, then click Save to confirm the changes.
Add dependencies to BoM
Work order dependencies are configured on a product’s BoM. To do so, navigate to , then select a BoM, or create a new one by clicking New.
Learn more
For a complete guide on how to properly configure a new BoM, see the documentation on creating a bill of materials.
On the BoM, click on the Miscellaneous tab, then enable the Operation Dependencies checkbox. This makes a new Blocked By option available in the settings of the Operations tab.
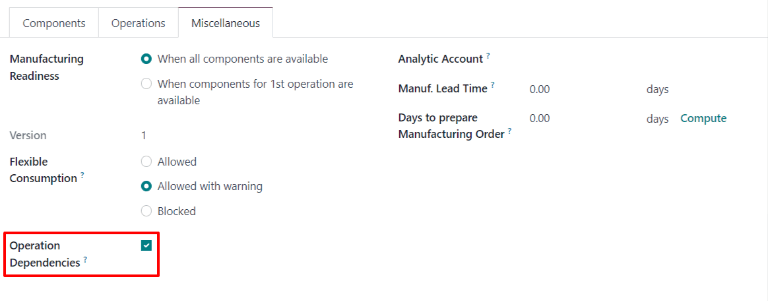
Next, click on the Operations tab. On the top-right of the tab, click on the tab’s settings button, then enable the Blocked By checkbox. This makes a Blocked By field appear for each operation on the Operations tab.
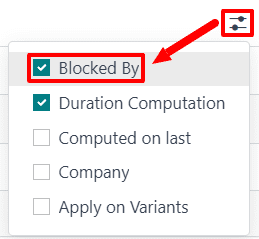
In the line of the operation that should be blocked by another operation, click the Blocked By field, and an Open: Operations pop-up window appears. In the Blocked By drop-down field on the pop-up window, select the blocking operation that must be completed before the operation that is blocked.
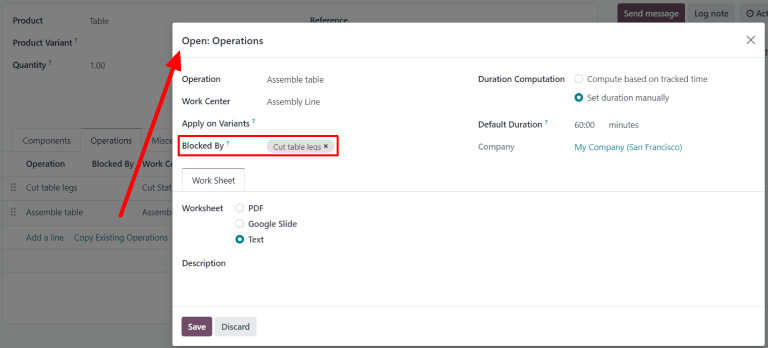
Finally, save the BoM by clicking Save.
Plan work orders using dependencies
Once work order dependencies have been configured on a BoM, Axis Manufacturing is able to plan when work orders are scheduled, based on their dependencies. To plan the work orders for a manufacturing order, begin by navigating to .
Next, select a manufacturing order for a product with work order dependencies set on its BoM, or create a new manufacturing order by clicking New. If a new manufacturing order is created, select a BoM configured with work order dependencies from the Bill of Material drop-down field, then click Confirm.
After confirming the manufacturing order, select the Work Orders tab to view the work
orders required to complete it. Any work orders that are not blocked by a different work order
display a Ready tag in the Status section.
Work orders that are blocked by one or more work orders display a Waiting for another WO tag
instead. Once the blocking work order(s) are completed, the tag updates to Ready.
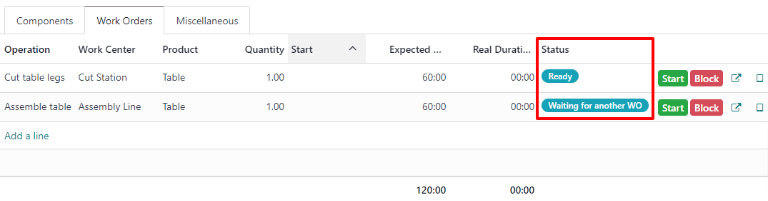
To schedule the manufacturing order’s work orders, click the Plan button at the top of the page. After doing so, the Scheduled Start Date field for each work order on the Work Orders tab auto-fills with the scheduled start date and time. A blocked work order is scheduled at the end of the time period specified in the Expected Duration field of the work order that precedes it.
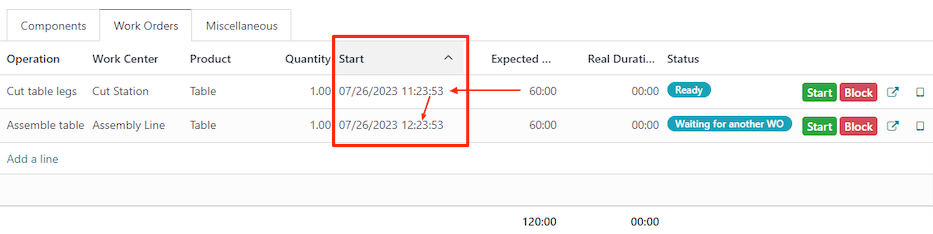
Example
A manufacturing order is created for Product A. The manufacturing order has two operations: Cut and Assemble. Each operation has an expected duration of 60 minutes, and the Assemble operation is blocked by the Cut operation.
The Plan button for the manufacturing order is clicked at 1:30 pm, and the Cut operation is scheduled to begin immediately. Since the Cut operation has an expected duration of 60 minutes, the Assemble operation is scheduled to begin at 2:30 pm.
Planning by workcenter
To see a visual representation of how work orders are planned, navigate to the Work Orders Planning page by going to . This page shows a timeline of all the work orders scheduled for each operation.
If one work order is blocked by the completion of another, the work order that is blocked is shown as scheduled to start after the work order blocking it. In addition, an arrow connects the two work orders, leading from the blocking operation to the blocked operation.
Axis allows one bill of materials (BoM) to be used for multiple variants of the same product. Having a consolidated BoM for a product with variants saves time by preventing the need to manage multiple BoMs.
Activate product variants
To activate the product variants feature, navigate to , and scroll down to the Products section. Then, click the checkbox to enable the Variants option. After that, click Save to apply the setting.
For more information on configuring product variants, refer to the product variants documentation.

Create custom product attributes
Once the product variants feature is activated, create and edit product attributes on the Attributes page.
The Attributes page is accessible either from by clicking the Attributes button, or by clicking .
Once on the Attributes page, either click into an existing attribute, or click Create to create a new one. Clicking Create reveals a new, blank form for customizing an attribute. For an existing attribute, click Edit on its form to make changes.
Assign an Attribute Name, and choose a category from the Category field’s drop-down menu. Then, select the desired options next to the Display Type and Variants Creation Mode fields. Once the desired options are selected, click Add a line under the Attribute Values tab to add a new value.
Tip
Included on the Value row is a Is custom value checkbox. If selected, this value will be recognized as a custom value, which allows customers to type special customization requests upon ordering a custom variant of a product.
Example

Once all desired Values have been added, click Save to save the new attribute.
Add product variants on the product form
Created attributes can be applied on specific variants for particular products. To add product variants to a product, navigate to the product form by going to . To make changes to the product, click Edit. Then, click the Variants tab.
Under the Attribute header, click Add a line to add a new attribute, and select one to add from the drop-down menu.
Then, under the Values header, click the drop-down menu to choose from the list of existing values. Click on each desired value to add them, and repeat this process for any additional attributes that should be added to the product.
Once finished, click Save to save changes.

Tip
BoM products with multiple variants that are manufactured in-house should either have a 0,0 reordering rule set up, or have their replenishment routes set to Replenish on Order (MTO).
Apply BoM components to product variants
Next, create a new BoM. Or, edit an existing one, by going to . Then, click Create to open a new Bills of Materials form to configure from scratch.
Add a product to the BoM by clicking the drop-down menu in the Product field and selecting the desired product.
Then, add components by clicking Add a line under the Component section of the Components tab, and choosing the desired components from the drop-down menu.
Choose the desired values in the Quantity and Product Unit of Measure columns. Then, choose the desired values in the Apply on Variants column.
Note
The Apply on Variants option to assign components to specific product variants on the BoM is available once the Variants setting is activated from the application. If the Apply on Variants field is not immediately visible, activate it from the additional options menu (three-dots icon, to the right of the header row).

Each component can be assigned to multiple variants. Components with no variants specified are used in every variant of the product. The same principle applies when configuring operations and by-products.
When defining variant BoMs by component assignment, the Product Variant field in the main section of the BoM should be left blank. This field is only used when creating a BoM specifically for one product variant.
When all desired configurations have been made to the BoM, click Save at the top of the form to save changes.
Tip
For components that only apply for specific variants, choose which operations the components should be consumed in. If the Consumed in Operation column is not immediately visible, activate it from the additional options menu (three-dots icon, to the right of the header row).
Sell and manufacture variants of BoM products
To sell and manufacture variants of BoM products to order, navigate to to create a new quotation.
Sell variant of BoM product
Once on the blank Quotation form, click the drop-down next to the Customer field to add a customer.
Then, under the Order Lines tab, click Add a product, and select the previously-created BoM product with variants from the drop-down menu. Doing so reveals a Configure a product pop-up.
From the pop-up window, click the desired attribute options to configure the correct variant of the
product to manufacture. Then, click the green + or - icons next to the 1
to change the quantity to sell and manufacture, if desired.

Once all the specifications have been chosen, click Add. This will change the pop-up to a second Configure pop-up, where available optional products will appear, if they have been created previously.
Once ready, click Confirm to close the pop-up.
Then, click Save to save all changes, and click Confirm at the top of the Quotation form to create and confirm a new sales order (SO).
Manufacture variant of BoM product
Once the SO is confirmed, a Manufacturing smart button appears at the top of the SO form. Click the Manufacturing smart button to open the Manufacturing Order form.
On this form, under the Components tab, the appropriate components for the chosen variant are listed. And, depending on the variant, different components will be listed. To see any mandatory or optional Operation steps, click the Work Orders tab.
To enter the tablet view work order screen, click the tablet icon to the right of the row for the desired operation to be completed.
From the tablet view, click Mark as Done as the operation progresses to complete the operation steps.
Alternatively, click the Mark as Done button at the top of the manufacturing order form to complete the order.

Then, navigate back to the SO via the breadcrumbs at the top of the page.
Now that the product has been manufactured, click the Delivery smart button to deliver the product to the customer. From the Delivery Order form, click Validate, then click Apply to deliver the product.
To finish the sale, click back to the SO via the breadcrumbs at the top of the page again. Then, click Create Invoice followed by Create Invoice again to invoice the customer for the order.
Use a multilevel bill of materials (BoM) when a manufactured product is part of another assembly. This method nests BoMs within other BoMs, organizing complex products while simplifying manufacturing by defining each procurement and production step separately.
Sublevel BoMs (subassemblies or semifinished products) streamline these production workflows, and are beneficial when the subassembly is used across multiple finished products (meaning they’d appear on multiple top-level BoMs). The more complicated a product is to build or procure, the more value a multilevel BoM can provide. Because of this, component and subassembly replenishment planning is vital to ensuring multilevel BoMs run smoothly.
Why replenishment planning is important
Replenishment is critical for multilevel BoMs to prevent bottlenecks, manage lead times, and optimize inventory. Without it, missing components can halt production, delay orders, and increase costs. A well-planned replenishment strategy ensures just-in-time availability, automates procurement, balances stock levels, and keeps supply chains efficient. This minimizes delays, reduces manual effort, and ensures smooth manufacturing.
Manufacturing orders (MO)s that come from a BoM require all components to be available before the MO can be completed. The Component Status for that MO provides this information. Learn how to check an MO’s component status.
Create a multilevel BoM
To set up a multilevel BoM, the top-level product and sublevel products’s BoMs must be created. If starting from scratch, build the BoMs from the bottom up. Start with the lowest-level product BoMs, then include those products as components in higher-level BoMs.
Example
A printed circuit board (PCB) for a custom keyboard is composed of hundreds of electronic
components, such as transistors, resistors, and capacitors. Instead of listing all of those
components out, a sublevel product and BoM for a PCB is created, to track the quantities of
transistors and other small components, without needing to overcrowd the top-level BoM for the
custom keyboard by listing them. Instead, the custom keyboard’s BoM consists of an assortment
of components and sublevel BoMs alike, like key caps, switches, the PCB, and keyboard plate.
Learn how to build a simple bill of materials. For the PCB, this would include the transistors, resistors, and other components.

After the sublevel products (like the PCB, key caps, and keyboard plate) are fully configured, create the top-level product by navigating to , and then selecting New. From here, configure the product’s specifications as needed.
Once the top-level product (the keyboard) is configured, click the Bill of Materials smart button on the product form, and then select New to make a BoM for the top-level product. Add the sublevel products to this BoM, along with any other necessary components.

Manage production planning
The two options below are two of the best ways to manage manufacturing order automation for products with multilevel BoMs.
Note
Complex BoMs are specifically used to manage products that require manufactured components. If a BoM is being created to organize components or bundle sellable products, use a kit instead.
To automatically trigger manufacturing orders for sublevel products after confirming a manufacturing order for the main product, there are two options:
Option 1 (recommended): Create Reordering Rules for the sublevel products and set both the minimum and maximum needed stock quantities to
0.Option 2: Activate the Replenish on Order (MTO) and Manufacture routes under the Inventory tab of the sublevel product’s product form.
See also
Option 1 is more flexible than Option 2 and is recommended. Reordering rules do not directly link demand to replenishment, allowing stock to be unreserved and reassigned as needed. The Replenish on Order (MTO) route, however, uniquely links sublevel and top-level products, reserving quantities for the confirmed top-level manufacturing order.
In both methods, sublevel products must be fully manufactured before starting the top-level product.
Multilevel BoM setup flow
The following section details how to set up multilevel BoMs, set the initial inventory, establish a 0/0/1 reordering rule (the recommended production plan), configure lead times, and set up production options.
Creating a 0/0/1 reordering rule for the sublevel products (minimum stock set at zero, maximum stock set at zero, reorder one automatically) regardless of whether they are a component or subassembly is the recommended approach for managing a multilevel BoM. This setup uses the Inventory, Manufacturing, and Purchase apps.
Important
This is only one example of how to set up a multilevel BoM in Axis. Consider any unique circumstances that need to be addressed during the configuration, and make sure they are included in the setup. If any specific help is needed during setup, consider purchasing a success pack.
Create the BoMs
Follow the steps in the Create a multilevel BoM section to build the BoMs.
Make sure to build the multilevel BoM from the bottom up. Start by creating the lowest-level component products in Axis, then the subassembly products that those are used for, then the BoM for that subassembly, and repeat until every level of the multilevel BoM is created.
Set the initial inventory
Note
If there’s no initial inventory to configure, then skip this section and begin configuring the procurement method for the multilevel BoM.
Update the quantity on hand for each of the products configured in the prior step (both components, subassemblies, and the final product). To do this, open the Inventory app, and then find the products with filters, the search bar, or scrolling, and then click on them to open their product form. From here, click the On Hand smart button, select the variant if that was configured, and then enter the quantity on hand.
See also
Configure the procurement method
Now it is time to pick the procurement method this multilevel BoM uses. The two options below are preferred, but unique circumstances may lead to another procurement method making more sense.
Option 1 (recommended): Create Reordering Rules for the sublevel products and set both the minimum and maximum needed stock quantities to
0.Option 2: Activate the Replenish on Order (MTO) and Manufacture routes under the Inventory tab of the sublevel product’s product form.
See also
Reordering rules are recommended because they do not tie the manufactured product to a specific sales order, allowing that manufactured product to fulfill a different sales order if the original gets cancelled.
Making the product to order is not recommended because the manufactured product cannot be used to fulfill another sales order. However, this could be helpful if strict tracking is necessary for the business.
Enter vendor and manufacturing lead times
Vendor and manufacturing lead times are used by Axis to coordinate production and procurement actions to fulfill orders on time. Set vendor lead times for components that are purchased. These can appear at any level in a multilevel BoM except the final product. Set manufacturing lead times for products that are built using a BoM. These can appear at any level in a multilevel BoM except the lowest level (when individual components are procured).
See also
Build out operations to handle the production flow
First, determine the current manufacturing flow for the business, then match the corresponding Axis setup. The list below are only some of the configuration pieces that could be involved in this step.
Manufacturing Steps: Consider how many manufacturing steps are taken (one-, two-, or three-step manufacturing).
Work Centers: Decide if any work centers need to be configured.
Master Production Schedule: If manually planned manufacturing orders are needed (e.g., to handle seasonal demand), make a master production schedule (MPS).
Tip
Manufacturing operations is an art and a science, so configuring an established flow into Axis is the recommended approach for this step. Read more about manufacturing in Axis
Configuration summary
At the end of this process, the multilevel BoM is configured, and the top-level product has its inventory counts, procurement method set, procurement lead times, and manufacturing operations configured. From here, sales orders can include the top-level product, automatic procurement through vendors or manufacturing can begin, the top-level product can be included in an eCommerce store.
See also
In Axis, a kit is a type of bill of materials (BoM) that can be manufactured and sold. Kits are sets of unassembled components sold to customers. They may be sold as standalone products, and are also useful tools for managing more complex bills of materials (BoMs).
Note
To use, manufacture, and sell kits, both the Manufacturing and Inventory apps need to be installed.
Create the kit as a product
To use a kit as a sellable product, or as a component organization tool, the kit should first be created as a product.
To create a kit product, go to , and then click New.
Then, assign a name to the new kit product. Next, set the kit’s product type depending on inventory tracking needs and accounting requirements. To do this, under the General Information tab, set the Product Type to Goods and either check the box next Track Inventory if inventory tracking is required, or leave it unchecked if inventory tracking for the kit is not necessary.
See also
Learn more about tracked versus untracked products.
The kit’s components must also be configured as products via . These components require no specific configuration.
Untracked kit inventory setup details
Consider leaving tracking for the kit’s inventory untracked when the kit is used in other manufacturing processes or when tracking inventory for the kit itself is not needed.
Recommended for Continental Accounting: If costs are expensed immediately upon purchase, then leaving the kit’s inventory as untracked is recommended.
Replenishment via Components: Inventory count is managed at the component level, so reordering rules must be set to individual components.
Selling & Stock Constraints: Kits cannot be sold if any required component is out of stock. Since availability depends on individual components, a sales order may appear valid, but delivery can be delayed if components are unavailable.
Tracked kit inventory setup details
Consider turning on tracking for the kit’s inventory when the kit is a tangible product or warehouse and inventory tracking is essential.
Recommended for Angle-Saxon Accounting: If the Cost of Goods Sold (COGS) needs to be recorded in journals, then tracking the kit’s inventory is recommended.
Component Purchase Constraints: Only the kit’s minimum required components can be added to an eCommerce cart unless the option to continue selling is disabled.
No Kit Serial Numbers: Serial number tracking does not track the kit, only its shipped components.
Reordering Rule Recommendation: Reordering rules should be set at the component-level.
Stock Replenishment Recommendation: Stock replenishment should also be done at the component-level.
Kit setup similarities
Regardless of which setup is used, there are some similarities between the two options.
No Kit-Level Stock Adjustments: Stock adjustments cannot be handled at the kit-level.
Kit Value Does Not Change: The stock’s value is the same whether the kit’s is tracked.
Kit Internal Transfers: An internal transfer for the kit breaks it into components.
Set up the kit BoM
After fully configuring the kit product and its components, a new BoM can be created for the kit product.
To do so, go to , and then click New. Next to the Product field, click the drop-down menu to reveal a list of products, and then select the previously configured kit product.
Then, for the BoM Type field, click the Kit option. Finally, under the Components tab, click Add a line, and add each desired component, and specify their quantities under the Quantity column.
Once ready, click Save to save the newly created BoM.

If the kit is solely being used as a sellable product, then only components need to be added under the Components tab, and configuring manufacturing operations is not necessary.
Note
When a kit is sold as a product, it appears as a single line item on the quotation and sales order. However, on delivery orders, each component of the kit is listed.
Use kits to manage complex BoMs
Kits can also be used for complex BoMs. This method nests BoMs within other BoMs, organizing complex products while simplifying manufacturing by defining each procurement and production step separately.
Sublevel BoMs (subassemblies or semi-finished products) streamline these workflows, helping with traceability efforts.
See also
In manufacturing, subcontracting is the process of a company engaging a third-party manufacturer, or subcontractor, to manufacture products that are then sold by the contracting company.
Subcontracting provides a variety of benefits for both the contracting company and the subcontractor.
For the contracting company, subcontracting allows them to sell a wide variety of manufactured products, without having to worry about investing in and maintaining the equipment and labor required to handle the manufacturing themselves.
This helps contracting companies stay flexible throughout economic cycles, as they can easily increase or decrease their engagements with subcontractors, as necessitated by the current moment. It also means they are able to focus on tasks they excel at, while delegating more specialized work to subcontractors.
On the other side of the relationship, subcontracting allows subcontractors to specialize in more niche areas of production, which might not be as profitable outside the bounds of a subcontracting engagement. In certain arrangements, it also provides them with the flexibility to choose which projects they accept or decline, and how many they work on at any given time.
In Axis, companies can configure their subcontracting workflows based on a variety of different factors, including how components are sourced, and what happens to finished products once they are manufactured.
Basic subcontracting
Subcontract products without supplying the subcontractor with components.
Resupply subcontractor
Ship components to a subcontractor each time a PO for a subcontracted product is confirmed.
Dropship to subcontractor
Dropship components to a subcontractor each time a PO for a subcontracted product is confirmed.
Configuration
To enable subcontracting in Axis, navigate to , and tick the checkbox next to the Subcontracting setting, under the Operations heading. Then, click Save.

With subcontracting enabled, a few different features become available in Axis:
On bills of materials (BoMs), the BoM Type field now includes a Subcontracting option. Enabling the Subcontracting BoM type designates the BoM’s product as a subcontracted product, which means Axis knows that it is produced by a subcontractor, and not by the company that owns the Axis database.
Two subcontracting routes become available in the Inventory app, and can be assigned to specific products, on the Inventory tab of their product pages:
Resupply Subcontractor on Order
Dropship Subcontractor on Order
Subcontracting workflows
In Axis, there are three subcontracting workflows, the main difference between them being how the subcontractor obtains the necessary components:
In the basic subcontracting workflow, the subcontractor is fully responsible for obtaining the components. This workflow is outlined in the Basic subcontracting documentation.
In the Resupply Subcontractor on Order workflow, the contracting company sends the components from their warehouse to the subcontractor. This workflow is outlined in the Resupply subcontractor documentation.
In the Dropship Subcontractor on Order workflow, the contracting company purchases the components from a vendor, and has them delivered directly to the subcontractor. This workflow is outlined in the Dropship to subcontractor documentation.
In addition to how a subcontractor obtains components, it is also necessary to consider why a product is being subcontracted, as well as what happens to products once they are manufactured by the subcontractor.
In terms of why a product is being subcontracted, the two main reasons are to fulfill a customer order, or to replenish the quantity of stock on-hand.
In terms of what happens to products once they are manufactured, they can either be shipped to the contracting company, or dropshipped directly to an end customer.
Each of the three subcontracting workflows described above can be configured to facilitate any of these possibilities, and the methods for doing so are outlined in their respective documentation.
Subcontracted product valuation
The valuation of a subcontracted product depends upon a few different variables:
The cost of the required components, if provided by the contracting company; from here on referred to as
C.The price paid to the subcontractor for the service of manufacturing the subcontracted product; from here on referred to as
M.The cost of shipping components to the subcontractor, and having them shipped back to the contracting company; from here on referred to as
S.The cost of dropshipping, if the components are shipped by the subcontractor to the end customer; from here on referred to as
D.Any other associated costs, like import taxes, etc.; from here on referred to as
x.
Therefore, the total valuation of a subcontracted product (P) can be represented by the following
equation:
It is important to note that not every subcontracted product valuation will include all of these variables. For example, if the product is not dropshipped to the end customer, then there is no need to factor in the cost of dropshipping.
In manufacturing, subcontracting is the process of a company engaging a third-party manufacturer, or subcontractor, to manufacture products that are then sold by the contracting company.
In basic subcontracting, the subcontractor is responsible for acquiring the necessary components. This means that the contracting company only has to worry about what happens to subcontracted products once they are produced.
The workflow for purchasing a product manufactured using basic subcontracting is similar to the one used when purchasing a non-subcontracted product from a vendor. The main differences are the way that subcontracted products are configured, and the fact that subcontracted products take longer to be sent from the vendor, since they must first be manufactured by them.
Configuration
To use subcontracting in Axis, navigate to , and tick the checkbox next to the Subcontracting setting, under the Operations heading. Then, click Save.
Once the Subcontracting setting is enabled, it is also necessary to properly configure the subcontracted product, and the product’s BoM.
Configure product
To configure a product for basic subcontracting, navigate to , and select a product, or create a new one by clicking New.
On the product form, select the Purchase tab, and add the product’s subcontractor as a vendor by clicking Add a line, selecting the subcontractor in the Vendor drop-down menu, and entering a price in the Price field.
Then, click on the Inventory tab, and use the Routes field to configure a route that determines what happens to the finished product once it has been manufactured by the subcontractor.
If the finished product is shipped back to the contracting company, make sure the Buy route is selected. In addition, select the Replenish on Order (MTO) route to automatically create a PO for the product upon confirmation of a sales order (SO), unless there is enough stock on-hand to fulfill the SO.
If the finished product is shipped directly to the customer by the subcontractor, make sure that only the Dropship route is selected.
Configure BoM
To configure a BoM for basic subcontracting, click the Bill of Materials smart button on the product form, and select the desired BoM.
Alternatively, navigate to , and select the BoM for the subcontracted product.
See also
For a full overview of BoM configuration, see the Bill of materials documentation.
In the BoM Type field, select the Subcontracting option. Then, add one or more subcontractors in the Subcontractors field that appears below.

Finally, click on the Miscellaneous tab. In the Manuf. Lead Time field, enter the number of days it takes the subcontractor to manufacture the product. This number is factored in when calculating the product’s expected arrival date.
Note
When using basic subcontracting, there is no need to list components in the Components tab of the BoM, since the components required for manufacturing, and the means by which they are acquired, are handled by the subcontractor.
Basic subcontracting workflow
The basic subcontracting workflow consists of up to four steps:
Create a sales order (SO) for the subcontracted product; doing so creates a PO to purchase the product from the subcontractor.
Confirm the PO created in the previous step, or create a new PO; doing so creates a receipt order or a dropship order.
Process the receipt once the subcontractor has finished manufacturing the subcontracted product, and shipped it back to the contracting company, OR process the dropship order to ship the product directly to the customer.
If the workflow was started by creating an SO, and the finished product is not dropshipped to the end customer, process the delivery order once the product is shipped to the customer.
The specific number of steps depends on the reason that the subcontracted product is being purchased from the subcontractor.
If the reason is to fulfill a specific customer order, the process starts with creating an SO, and ends with delivering the product to the customer, or having the subcontractor dropship it to them.
If the reason is to increase the quantity of stock on-hand, the process starts with creating a PO, and ends with receiving the product into inventory.
Create SO
It is only necessary to complete this step if the product is being purchased from the subcontractor to fulfill a customer need. If the product is being purchased to increase the quantity of stock on-hand, move on to the next step.
To create a new SO, navigate to , and click New.
Select the customer in the Customer drop-down menu. Then, click Add a product on the Order Lines tab, select a subcontracted product in the Product drop-down menu, and enter a quantity in the Quantity field.
Click Confirm to confirm the SO, at which point a Purchase smart button appears at the top of the page. This opens the PO created to purchase the subcontracted product from the subcontractor.
Note
An SO for the product only creates a PO if the Replenish on Order (MTO) route is enabled on the product’s form, and there is not enough stock of the product on-hand to fulfill the SO.
If there is enough stock on-hand, confirming an SO for the product creates a delivery order instead, because Axis assumes that the SO is fulfilled using the stock in the warehouse.
This is not the case for subcontracted products that are dropshipped to the end customer. In that case, a PO is always created, even if there is enough stock on-hand.
Process PO
If a PO was created in the previous step, navigate to it by clicking the Purchase smart button at the top of the SO, or by going to Purchase app –> Orders –> Purchase Orders, and selecting the PO. Then, click Confirm Order to confirm it, and move on to the next step.
If a PO was not created in the previous step, do so now by navigating to , and clicking New.
Begin filling out the PO by selecting a subcontractor from the Vendor drop-down menu. In the Products tab, click Add a product to create a new product line. Select a subcontracted product in the Product field, and enter the quantity in the Quantity field. Finally, click Confirm Order to confirm the PO.
When a PO is confirmed for a product manufactured using basic subcontracting, a receipt or dropship order is automatically created, and can be accessed from the corresponding Receipt or Dropship smart button that appears at the top of the PO.

PO for a basic subcontracting product, with a Receipt smart button at the top of the page.
Process receipt or dropship order
Once the subcontractor has finished manufacturing the product, they either ship it to the contracting company, or dropship it to the end customer, depending on how the product was configured.
Process receipt
If the subcontractor ships the finished product to the contracting company, once it has been received, navigate to , and select the PO.
Click the Receive Products button at the top of the PO, or the Receipt smart button at the top of the page, to open the receipt. Then, click Validate at the top of the receipt to enter the product into inventory.
Process dropship order
If the subcontractor dropships the product, once they have sent it, navigate to , and select the PO.
Select the Dropship smart button at the top of the page to open the dropship order, and click Validate at the top of the order to confirm that the product has been sent to the customer.
Process delivery order
If the subcontracting workflow was started by a customer SO, and the finished product was not dropshipped to the customer, but rather delivered to the contracting company, it is necessary to ship the product to the customer, and process the delivery order.
Once the product has been shipped to the customer, navigate to the app, and select the SO. Select the Delivery smart button at the top of the page to open the delivery order, and click Validate on the order to confirm that the product has been shipped.
In manufacturing, subcontracting is the process of a company engaging a third-party manufacturer, or subcontractor, to manufacture products that are then sold by the contracting company.
In Axis, the Resupply Subcontractor on Order route is used to deliver the necessary components for a subcontracted product to the subcontractor, each time a purchase order (PO) for that product is confirmed.
The subcontractor then uses the components to manufacture the desired product, before shipping it back to the contracting company, or dropshipping it to the end customer.
Important
It is necessary to understand the differences between the Resupply Subcontractor on Order and the Dropship Subcontractor on Order routes.
While both routes are used to supply a subcontractor with the components required for manufacturing a product, they differ in how the components are sourced.
When using Resupply Subcontractor on Order, components are shipped from the warehouse of the contracting company.
When using Dropship Subcontractor on Order, components are purchased from a vendor and shipped directly to the subcontractor.
The choice of which route to use depends upon the specific requirements of the subcontracting company and their subcontractors.
See the Dropship to subcontractor documentation for a full overview of the Dropship Subcontractor on Order route.
Configuration
To use the Resupply Subcontractor on Order route, navigate to , and enable the checkbox next to Subcontracting, under the Operations heading.
Once the Subcontracting setting is enabled, it is also necessary to properly configure the subcontracted product, the product’s bill of materials (BoM), and the components listed on the BoM.
Configure product
To configure a product for the Resupply Subcontractor on Order route, navigate to , and select a product, or create a new one by clicking New.
Select the Purchase tab, and add the product’s subcontractor as a vendor by clicking Add a line, selecting the subcontractor in the Vendor drop-down menu, and entering a price in the Price field.
Note
The value entered in the Price field on the Purchase tab of the of the subcontracted product’s page is the amount paid to the subcontractor for the manufacturing of the product.
This does not represent the total cost of the product, which includes other elements, like the cost of the product’s components.
Then, click on the Inventory tab to configure a route that determines what happens to the finished product, once it has been manufactured by the subcontractor.
If the finished product is shipped back to the contracting company, make sure that the Buy route is selected. In addition, select the Replenish on Order (MTO) route to automatically create a PO for the product upon confirmation of a sales order (SO), unless there is enough stock on-hand to fulfill the SO.
If the finished product is shipped directly to the customer by the subcontractor, make sure that only the Dropship route is selected.
Configure BoM
To configure a BoM for the Resupply Subcontractor on Order route, click the Bill of Materials smart button on the product’s page, and select the BoM.
Alternatively, navigate to , and select the BoM for the subcontracted product.
See also
For a full overview of BoM configuration, see the Bill of materials documentation.
In the BoM Type field, select the Subcontracting option. Then, add one or more subcontractors in the Subcontractors field that appears below.

Finally, make sure that all necessary components are specified on the Components tab. To add a new component, click Add a line, select the component in the Component drop-down menu, and specify the required quantity in the Quantity field.
Configure components
To configure components for the Resupply Subcontractor on Order route, navigate to each component from the BoM by selecting the component’s name in the Components tab, and clicking the ➡️ (right arrow) button to the right of the name.
Alternatively, navigate to each component by going to , and selecting the component.
On the component product form, click on the Inventory tab and select the Resupply Subcontractor on Order route in the Routes section.
Repeat the process for every component that must be sent to the subcontractor.
Resupply subcontractor on order workflow
The resupply subcontractor on order workflow consists of up to five steps:
Create an SO for the subcontracted product; doing so creates a PO to purchase the product from the subcontractor.
Confirm the PO created in the previous step, or create a new PO; doing so creates a Resupply Subcontractor order, as well as a receipt order or a dropship order.
Process the Resupply Subcontractor order once components for the subcontracted product have been sent to the subcontractor.
Process the receipt once the subcontractor has finished manufacturing the subcontracted product, and shipped it back to the contracting company OR process the dropship order to ship the product directly to the customer.
If the workflow was started by creating an SO, and the finished product is not dropshipped to the end customer, process the delivery order once the product is shipped to the customer.
The specific number of steps depends on the reason that the subcontracted product is being purchased from the subcontractor.
If the reason is to fulfill a specific customer order, the process starts with creating an SO, and ends with delivering the product to the customer, or having the subcontractor dropship it to them.
If the reason is to increase the quantity of stock on-hand, the process starts with creating a PO, and ends with receiving the product into inventory.
Important
While the Resupply Subcontractor on Order route can be used to automatically resupply a subcontractor upon confirmation of a PO, it is also possible to create a resupply order manually. This workflow is useful when it is necessary to resupply the subcontractor without creating a PO.
To resupply a subcontractor manually, navigate to the app, and click on the Resupply Subcontractor card. Create a new Resupply Subcontractor order by clicking New.
In the Delivery Address field, select the subcontractor to whom the components should be sent.
Then, add each component to the Operations tab by clicking Add a line, selecting the component in the Product drop-down field, and specifying a quantity in the Demand field.
Finally, click Mark as Todo to register the order. Once the components have been sent to the subcontractor, click Validate to confirm that the order has been sent.
Create SO
It is only necessary to complete this step if the product is being purchased from the subcontractor to fulfill a customer need. If the product is being purchased to increase the quantity of stock on-hand, move on to the next step.
To create a new SO, navigate to , and click New.
Select the customer in the Customer drop-down menu. Then, click Add a product on the Order Lines tab, select a subcontracted product in the Product drop-down menu, and enter a quantity in the Quantity field.
Click Confirm to confirm the SO, at which point a Purchase smart button appears at the top of the page. This opens the PO created to purchase the subcontracted product from the subcontractor.
Note
An SO for the product only creates a PO if the Replenish on Order (MTO) route is enabled on the product’s page, and there is not enough stock of the product on-hand to fulfill the SO.
If there is enough stock on-hand, confirming an SO for the product instead creates a delivery order, because Axis assumes that the SO is fulfilled using the stock in the warehouse.
This is not the case for subcontracted products that are dropshipped to the end customer. In that case, a PO is always created, even if there is enough stock on-hand.
Process PO
If a PO was created in the previous step, navigate to Purchase app –> Orders –> Purchase Orders, and select the PO. Then, click Confirm Order to confirm it.
If a PO was not created in the previous step, do so now by navigating to , and clicking New.
Begin filling out the PO by selecting a subcontractor from the Vendor drop-down menu. In the Products tab, click Add a product to create a new product line. Select a subcontracted product in the Product field, and enter the quantity in the Quantity field. Finally, click Confirm Order to confirm the PO.
When a PO is confirmed for a product that requires resupplying a subcontractor with components, a receipt or dropship order is automatically created, and can be accessed from the corresponding Receipt or Dropship smart button that appears at the top of the PO.
In addition, a Resupply Subcontractor order is created to ship the required components to the subcontractor. This order can also be accessed from the PO, by clicking the Resupply smart button at the top of the page.

A PO for a Resupply Subcontractor on Order product, with Resupply and Receipt smart buttons at the top of the page.
Process Resupply Subcontractor order
Once the subcontracted product’s components have been sent to the subcontractor, navigate to , and select the PO.
Click the Resupply smart button at the top of the screen to open the Resupply Subcontractor order, and click Validate to confirm that the components have been sent to the subcontractor.
Alternatively, navigate to the app, click the # To Process button on the Resupply Subcontractor card, and select the Resupply Subcontractor order. Then, click Validate to confirm that the components have been sent to the subcontractor.
Process receipt or dropship order
Once the subcontractor has finished manufacturing the product, they either ship it to the contracting company, or dropship it to the end customer, depending on how the product was configured.
Process receipt
If the subcontractor ships the finished product to the contracting company, once it has been received, navigate to , and select the PO.
Click the Receive Products button at the top of the PO, or the Receipt smart button at the top of the page, to open the receipt. Then, click Validate at the top of the receipt to enter the product into inventory.
Process dropship order
If the subcontractor dropships the product, once they have sent it, navigate to , and select the PO.
Select the Dropship smart button at the top of the page to open the dropship order, and click Validate at the top of the order to confirm that the product has been sent to the customer.
Process delivery order
If the subcontracting workflow was started by a customer SO, and the finished product was NOT dropshipped to the customer, but rather delivered to the contracting company, it is necessary to ship the product to the customer, and process the delivery order.
Once the product has been shipped to the customer, navigate to the app, and select the SO. Select the Delivery smart button at the top of the page to open the delivery order, and click Validate on the order to confirm that the product has been shipped to the customer.
In manufacturing, subcontracting is the process of a company engaging a third-party manufacturer, or subcontractor, to manufacture products that are then sold by the contracting company.
In Axis, the Dropship Subcontractor on Order route is used to purchase the necessary components for a subcontracted product from the vendor, and have them delivered directly to the subcontractor, each time a purchase order (PO) for that product is confirmed.
The subcontractor then uses the components to manufacture the desired product, before shipping it back to the contracting company.
Important
It is necessary to understand the differences between the Dropship and Dropship Subcontractor on Order routes. While both routes involve dropshipping, they are used for different purposes.
The Dropship route is used to purchase products from a vendor, and have them shipped directly to the end customer.
The Dropship Subcontractor on Order route is used to purchase components from a vendor, and have them shipped directly to a subcontractor. By default, finished products are then sent from the subcontractor back to the contracting company.
However, it is possible to combine both the Dropship and Dropship Subcontractor on Order routes so they are used for the same product. In this workflow, components are dropshipped to the subcontractor, who then ships the finished product directly to the end customer.
This can be achieved by following steps one through five in the workflow section of this doc.
Configuration
To use the Dropship Subcontractor on Order route, navigate to , and enable the checkbox next to Subcontracting, under the Operations heading.
Once the Subcontracting setting is enabled, it is also necessary to properly configure the subcontracted product, the product’s BoM, and the components listed on the BoM.
Configure product
To configure a product for the Dropship Subcontractor on Order route, navigate to , and select a product, or create a new one by clicking New.
Select the Purchase tab, and add the product’s subcontractor as a vendor by clicking Add a line, selecting the subcontractor in the Vendor drop-down menu, and entering a price in the Price field.
Then, click on the Inventory tab to configure a route that determines what happens to the finished product, once it has been manufactured by the subcontractor.
If the finished product is shipped back to the contracting company, make sure that the Buy route is selected. In addition, select the Replenish on Order (MTO) route to automatically create a PO for the product upon confirmation of a SO, unless there is enough stock on-hand to fulfill the SO.
If the finished product is shipped directly to the customer by the subcontractor, make sure that only the Dropship route is selected.
Configure bill of materials
To configure a BoM for the Dropship Subcontractor on Order route, click the Bill of Materials smart button on the product’s page, and select the BoM.
Alternatively, navigate to , and select the BoM for the subcontracted product.
See also
For a full overview of BoM configuration, see the Bill of materials documentation.
In the BoM Type field, select the Subcontracting option. Then, add one or more subcontractors in the Subcontractors field that appears below.

Finally, make sure that all necessary components are specified on the Components tab. To add a new component, click Add a line, select the component in the Component drop-down menu, and specify the required quantity in the Quantity field.
Configure Components
To configure components for the Dropship Subcontractor on Order route, navigate to each component from the BoM by selecting the component’s name in the Components tab, and clicking the ➡️ (right arrow) button to the right of the name.
Alternatively, navigate to each component by going to , and selecting the component.
On the component product form, select the Purchase tab, and add a vendor by clicking Add a line, selecting the vendor in the Vendor field, and adding the price they sell the product for in the Price field. This is the vendor that sends components to the subcontractor, once they are purchased.
Then, click on the Inventory tab and select the Dropship Subcontractor on Order route in the Routes section.
Repeat the process for every component that must be dropshipped to the subcontractor.
Dropship subcontractor on order workflow
The dropship subcontractor on order workflow consists of up to six steps:
Create a sales order (SO) for the subcontracted product; doing so creates a subcontractor PO to purchase the product from the subcontractor.
Confirm the PO created in the previous step, or create a new PO; doing so creates a request for quotation (RfQ) to purchase the components from the vendor, as well as a receipt order or a dropship order.
Confirm the RfQ to turn it into a second PO (vendor PO); doing so creates a Dropship Subcontractor order.
Process the Dropship Subcontractor order once the vendor has sent the components to the subcontractor.
Process the receipt once the subcontractor has finished manufacturing the subcontracted product, and shipped it back to the contracting company OR process the dropship order to ship the product directly to the end customer.
If the workflow was started by creating an SO, and the finished product is not dropshipped to the end customer, process the delivery order once the product has been shipped to the customer.
The specific number of steps depends on the reason that the subcontracted product is being purchased from the subcontractor.
If the reason is to fulfill a specific customer order, the process starts with creating an SO, and ends with delivering the product to the customer, or having the subcontractor dropship it to them.
If the reason is to increase quantity of stock on-hand, the process starts with creating a PO, and ends with receiving the product into inventory.
Create an SO
It is only necessary to complete this step if the product is being purchased from the subcontractor to fulfill a customer need. If the product is being purchased to increase the quantity of stock on-hand, move on to the next step.
To create a new SO, navigate to , and click New.
Select the customer in the Customer drop-down menu. Then, click Add a product on the Order Lines tab, select the product in the Product drop-down menu, and enter a quantity in the Quantity field.
Click Confirm to confirm the SO, at which point a Purchase smart button appears at the top of the page. This is the subcontractor PO, or the PO created to purchase the subcontracted product from the subcontractor.
Note
An SO for the product only creates a subcontractor PO if the Replenish on Order (MTO) route is enabled on the product’s page, and there is no stock of the product on-hand.
If there is stock on-hand, confirming an SO for the product will instead create a delivery order, because Axis assumes that the SO is fulfilled using the stock in the warehouse.
This is not the case for subcontracted products that are dropshipped to the end customer. In that case, a subcontractor PO is always created, even if there is stock on-hand.
Process subcontractor PO
If a subcontractor PO was not created in the previous step, do so now by navigating to , and clicking New.
Begin filling out the PO by selecting a subcontractor from the Vendor drop-down menu.
In the Products tab, click Add a product to create a new product line. Select a product produced by the subcontractor in the Product field, and enter the quantity in the Quantity field.
Finally, click Confirm Order to confirm the subcontractor PO.
When a PO is confirmed for a product that requires dropshipping components to a subcontractor, a receipt or dropship order is automatically created, and can be accessed from the corresponding Receipt or Dropship smart button that appears at the top of the PO.

In addition, an RfQ is created for the components that are purchased from the vendor and sent to the subcontractor. However, the RfQ IS NOT automatically linked to the subcontractor PO.
Once the RfQ is confirmed and becomes a vendor PO, a Dropship Subcontractor order is created. This order is linked to both the vendor PO and the subcontractor PO.
Confirm vendor RfQ
To access the RfQ created by confirming the subcontractor PO, navigate to . Select the RfQ that lists the correct vendor in the Vendor field, and the reference number of the receipt that was created after confirming subcontractor PO, in the Source Document field.
On the RfQ, the Deliver To field reads Dropship Subcontractor, and the Dropship Address field shows the name of the subcontractor to whom components are being dropshipped.
Click Confirm Order to turn the RfQ into a vendor PO, and confirm the purchase of components from the vendor. After doing so, a Dropship smart button appears at the top of the vendor PO, and a Resupply smart button appears at the top of the subcontractor PO.

Process Dropship Subcontractor order
Once the components have been delivered to the subcontractor, navigate to , and select the vendor PO or the subcontractor PO. Then, click the Dropship smart button or the Resupply smart button, respectively.
Clicking either button opens the Dropship Subcontractor order. Click the Validate button at the top of the order to confirm that the subcontractor has received the components.
Process receipt or dropship order
Once the subcontractor has manufactured the finished product, navigate to , and select the subcontractor PO.
If the subcontracted product should be received into inventory, once the product arrives, click the Receive Products button at the top of the subcontractor PO to open the receipt. Then, click Validate at the top of the receipt to register the product into inventory.
Alternatively, select the Receipt smart button at the top of the subcontractor PO, and click Validate at the top of the receipt.
If the subcontracted product should be dropshipped, select the Dropship button at the top of the page to open the dropship order, and click Validate once the subcontractor has sent the product to the customer.
Process delivery order
If the subcontracting workflow was started by a customer SO, and the finished product was not dropshipped to the customer, but rather delivered to the contracting company, it is necessary to ship the product to the customer, and process the delivery order.
Once the product has been shipped to the customer, navigate to the app, and select the SO. Select the Delivery smart button at the top of the page to open the delivery order, and click Validate to confirm that the product has been shipped to the customer.
The Production Analysis report provides statistics about products manufactured using Axis’s Manufacturing app. The report is useful when trying to understand production costs, manufacturing durations, and other important statistics about manufactured products.
To open the Production Analysis report, navigate to .
Important
The Production Analysis report is one of many reports available across the Axis app suite. This documentation only covers the measures specific to the Production Analysis report, along with a few use case examples.
For a full overview of the basic features available in most Axis reports, see the documentation on reporting essentials.
Measures
Measures are the datasets that can be selected in the Production Analysis report. Each dataset represents a specific statistic about MOs in the database. Choose a measure by clicking the Measures button, and selecting one of the options from the drop-down menu:
The options displayed in the Measures drop-down menu, and the order they appear in, differ depending on the filters, groupings, and comparisons enabled in the Search… bar. By default, the available measures appear as follows:
Average Employee Cost/Unit: the average cost paid to employees to produce one unit of the product.
By-Products Total Cost: the total value of all by-products created by manufacturing the product.
Component Cost/Unit: the average cost of the components required to produce one unit of the product.
Cost/Unit: the average cost of producing one unit of the product, including component, employee, operation, and subcontracting costs.
Duration of Operations/Unit: the average total duration of operations required to produce one unit of the product.
Quantity Demanded: the total number of units of the product included in MOs.
Quantity Produced: the total number of units of the product that have actually been produced.
Total Component Cost: the total amount spent on the product’s components, across every MO for the product.
Total Cost: the total amount spent manufacturing every unit of the product produced so far.
Total Duration of Operations: the cumulative duration of every operation completed while manufacturing the product.
Total Employee Cost: the cumulative amount paid to employees to manufacture the product.
Total Operation Cost: the cumulative amount spent on operations required to produce the product.
Total Operation Cost/Unit: the average cost of the operations required to produce one unit of the product.
Total Subcontracting Cost: the cumulative amount paid to subcontractors to produce the product.
Total Subcontracting Cost/Unit: the average cost of engaging a subcontractor to produce one unit of the product.
Yield Percentage (%): the total quantity of the product produced versus the total quantity demanded, represented as a percentage.
Count: the total count of MOs created for the product.
Tip
Only one measure can be selected at a time when one of the (graph view) options is enabled. However, multiple measures, and varying group-by criteria (on the x and y axes), can be selected when using the (pivot table).
Use case: compare products
One of the best uses for the Production Analysis report is comparing statistics about two or more products. This is accomplished by entering the products into the Search… bar, then selecting the necessary measure, filter, and grouping, to see the desired data.
Example
Toy manufacturer Tommy’s Toys is trying to reduce their manufacturing operation costs. To accomplish this, they have decided to identify redundant products and cease manufacturing the ones with higher operational costs.
Two of the toys that have been singled out for analysis are the pogo stick and moon shoes. Tommy’s Toys believes these two toys are so similar that they can stop manufacturing one, without significantly impacting their product offering.
To compare operation costs for the toys, business analyst Mike opens the app, and navigates to the Production Analysis page. In the Search… bar, he enters the names of both products. Then, he opens the Search… bar drop-down menu, and clicks Product in the Group By section.
Below the Search… bar, Mike clicks on the Measures drop-down menu, and selects the Total Operation Cost/Unit option. Finally, he selects the (bar chart) graph type.
With these options selected, the Production Analysis report shows a bar chart for the current year, with one bar for each product, signifying the average operation cost for one unit of the product.
With this data, Mike is able to see that the average operation cost for the moon shoes is almost twice the cost of the pogo stick. Using this insight, Tommy’s Toys decides to cease production of moon shoes, thus lowering their average cost of manufacturing operations.

Use case: compare time periods
The Production Analysis report can also be used to compare data for two different time periods. This is accomplished using the options in the Comparison section of the Search… bar.
Example
Furniture company Fanny’s Furnishings wants to compare their production costs for the first and second quarters of 2024, to see which products they spent the most money producing in each quarter.
To compare the two time periods, shop floor supervisor Adam opens the app, and navigates to the Production Analysis page. He begins by selecting the (pie chart) graph type option at the top of the page.
Important
The Comparison feature is meant to be used with the (pie chart) graph type, or the (pivot) view.
A Comparison option can still be selected with the other view types enabled, but doing so does not change the way data is displayed on the report.
Next, Adam selects the Total Cost option from the Measures drop-down menu. This option displays the total amount spent producing each product.
In the Search… bar drop-down menu, he leaves the 2024 filter enabled in the End Date section, and enables the Q2 filter as well. With both of these time periods selected, the pie chart shows data for the second quarter of 2024.
Finally, Adam selects the End Date: Previous Period option in the Comparison section of the Search… bar. Doing so causes the pie chart to be split into an inner circle, and an outer ring.
The outer ring shows data for the selected time period, quarter two of 2024. The inner circle shows data for the previous time period, quarter one of 2024.
Note
If End Date: Previous Year is selected instead of End Date: Previous Period, the inner circle shows data for the selected time period, one year previous.
In the case of this example, it would show data for quarter two of 2023.
Using this report, Adam can see that the products with the highest total cost for quarter two are the bicycle and tricycle. On the other hand, in quarter one, the roller skates had the highest total cost.

In Axis’s Manufacturing app, overall equipment effectiveness (OEE) represents the amount of time a work center is fully productive. OEE is displayed as a percentage of the total time a work center is active.
Fully productive time is considered to be time when the work center is operational and processing work orders that have not exceeded their expected duration.
OEE helps manufacturing teams understand the efficiency of work centers, and the causes of manufacturing downtime.
Important
Since OEE tracks work center productivity, using it requires enabling the work centers feature in the settings of the Manufacturing app.
To do so, navigate to , and tick the checkbox next to Work Orders, under the Operations heading. Then, click Save.
Efficiency standards
For OEE to accurately reflect the percentage of fully productive time for a work center, the work center must be properly configured with the correct productivity metrics. These include the work center’s time efficiency, capacity, and OEE target.
Time efficiency
Time efficiency represents the efficiency of a work center when processing work orders, and is represented as a percentage. A time efficiency value of 100% signifies that the work center processes work orders at the speed of the expected duration, as listed on a product’s BoM. A value less than or greater than 100% signifies that the work center processes work orders slower or faster than an operation’s expected duration, respectively.
To set the time efficiency for a work center, navigate to , and select a work center. On the General Information tab, enter a numerical value in the Time Efficiency field.
Example
Manufacturing a chair product requires two operations: cut and assemble. The product’s BoM lists an expected duration of 30 minutes for each operation.
The cut operation is carried out at the cut station work center, which has a time efficiency value of 50%. This means it takes twice as long to complete the operation, for a total time of one hour.
The assemble operation is carried out at the assembly line work center, which has a time efficiency value of 200%. This means it takes half as long to complete the operation, for a total time of 15 minutes.
Capacity
Capacity represents how many units of a product can be produced in parallel at a work center. The duration of work orders for multiple units increases or decreases, based on how many units the work center can handle.
To set the capacity for a work center, navigate to , and select a work center. On the General Information tab, enter a numerical value in the Capacity field.
Example
A drill station work center has a capacity of one unit. An MO is confirmed for 10 units of a chair, a product manufactured using the drill station.
Since there are ten times as many units to produce than the work center can handle at once, the operation time is ten times the duration listed on the product’s BoM.
OEE target
The OEE target is the goal for how much of a work center’s operating time should be fully
productive time. It is displayed as a percentage, and should only be set as high as 100%.
To set the OEE target for a work center, navigate to , and select a work center. On the General
Information tab, enter a numerical value of 100.00 or less in the OEE Target field.
Calculating OEE
OEE is represented as a percentage value between zero and 100. The value signifies the amount of time that a work center was fully productive. The remainder signifies the amount of time that the work center was operating at less than full efficiency. This can occur for a number of reasons, including reduced speed, material availability, and equipment failure.
Fully productive time
For a work center to be considered fully productive, it must be able to receive work orders, have the components necessary to process work orders, and be operating within the expected duration of the work order it is processing.
Example
An assembly line work center is not blocked, and receives a work order to assemble a bicycle. The required components are available, so production begins as soon as they are picked and delivered to the work center. The work order has an expected duration of 30 minutes, and is completed in 27 minutes. All of this time is considered fully productive time.
Reduced speed
When a work center is operating at reduced speed, it means that it is processing a work order that has exceeded its expected duration. While the work center may be operational, this is not considered fully productive time.
Example
A cutting station work center receives a work order to cut boards for a table. The expected duration of the work order is 15 minutes. The work order ends up taking 18 minutes to complete. The work center is considered to have been operating at reduced speed during the three minutes that exceeded the expected duration.
Material availability
Material availability refers to situations where a work center is able to accept a work order, but the required components are not available. This can occur because the components are not in stock, or are reserved for a different order.
Example
Manufacturing of a bench requires 20 units of wood. A manufacturing order (MO) is confirmed for 10 units of the bench, but there is not enough wood in stock to begin manufacturing. The time it takes to acquire the wood is recorded as material availability downtime.
Equipment failure
Equipment failure signifies any period of time when a work center is unusable due to maintenance issues with its equipment. This can be due to equipment breaking down, or when a work center is shut down for scheduled maintenance. In these cases, a work center can be blocked using a maintenance request.
Example
The drill at a drill station work center breaks down, causing the work center to be unusable. A maintenance request is created to fix the drill, and the work center is blocked from receiving work orders. It takes two hours to fix the drill, and make the work center available again. This two-hour period is recorded as equipment failure downtime.
OEE reporting
To view OEE reporting metrics for every work center, navigate to . This page shows the metrics for each work center with OEE data.
Alternatively, to see OEE reporting metrics for a single work center, navigate to , and select a work center. At the top of the work center’s form, click the OEE smart button.
By default, the main OEE reporting page shows data in a bar chart, while the page for a specific work center shows it in a pie chart. To select a different chart type on either page, click the (bar chart), (line chart), or (pie chart) button above the displayed chart.
It is also possible to see OEE data in a pivot view, or a list displaying each time entry, by clicking the (pivot view) or (list view) buttons at the top-right corner of the page.

When fulfilling sales orders (SOs), or sourcing components for manufacturing orders (MOs), it is sometimes necessary to prioritize one SO or MO over another. In situations where there is insufficient stock on-hand to fulfill every SO or MO, ensuring that products and components are reserved for priority orders is essential.
In Axis Manufacturing, allocation reports are used on MOs to assign products to specific sales orders SOs, or components to specific MOs. This ensures the products or components are available for those orders, and are not used by mistake.
Configuration
To use allocation reports, the Allocation Report for Manufacturing Orders feature must be enabled. To do so, navigate to , and tick the checkbox next to Allocation Report for Manufacturing Orders. Then, click Save.
For products that are sold, it is also necessary to configure them so they can be included in SOs. To do so, begin by navigating to , and select a product. Under the Product Name field on the product form, make sure that the Can Be Sold checkbox is ticked.
Allocate products
To allocate products or components from an MO to an SO, or to a different MO, begin by navigating to . Click New to create a new MO.
On the MO form, select a product in the Product field, and specify the quantity to be produced in the Quantity field. Finally, click Confirm to confirm the MO.
The rest of the allocation workflow depends on the current on-hand quantity of the product being manufactured, and whether or not there are any SOs or MOs which require the product, but have not already been allocated units.
If there are existing SOs and MOs that require the product, and there are too few units of the product on-hand to fulfill those orders, then an Allocation smart button appears at the top of the page as soon as the MO is confirmed.
If there are existing SOs and MOs that require the product, and there are enough units of the product on-hand to fulfill those orders, then the Allocation smart button only appears at the top of the page once the MO has been marked as done, by clicking Produce All.

Note
If there are not any existing SOs and MOs that require the product, the Allocation smart button does not appear, even when the MO has been marked as done.
Click the Allocation smart button to open the MRP Reception Report for the MO. This report lists open delivery orders or MOs, depending on the type of product produced in the original MO.
Allocate to delivery order
If the MO contains a finished product, the report lists any open delivery orders for which quantities of the product have yet to be reserved.
Example
An MO is created to produce three units of a rocking chair. Clicking the Allocation smart button on the MO opens an allocation report that lists open delivery orders that require one or more rocking chairs.
Click the Assign All button to the right of a specific order to assign products for each quantity required to fulfill that order.
Example
If an order requires one quantity of four units of the product, and one quantity of one unit of the product, clicking Assign All assigns five units of the product to fulfill both quantities.
Alternatively, click Assign next to a specific quantity to only assign products to that quantity, and not any others in the order.
Example
If an order requires one quantity of four units of the product, and one quantity of one unit of the product, clicking Assign next to the quantity of one unit assigns a product to that quantity, but leaves the quantity of four units without any products assigned.

Allocate to MO
If the MO contains a component, the report lists any open MOs for which quantities of the component have yet to be reserved.
Example
An MO is created to produce three units of wood, which is used as a component for the rocking chair product. Clicking the Allocation smart button on the MO opens an allocation report that lists open rocking chair MOs that require one or more pieces of wood.
Click the Assign All or Assign button to the right of a specific MO to assign components to that MO.

Unassign products
After assigning products to a quantity within a delivery order, or components to an MO, the Assign button turns into an Unassign button. Click Unassign to unreserve the assigned products from that quantity, making them available for other quantities.
Print labels
After clicking Assign All or Assign, the Print Labels or Print Label button to the right of either button becomes selectable. Selecting either button generates and downloads a PDF document with one label for each product that was assigned. These labels are used to designate each product as being reserved for that specific order.

The Shop Floor module is a companion module to the Manufacturing app. Shop Floor provides a visual interface for processing manufacturing orders (MOs) and work orders. It also allows manufacturing employees to track the amount of time spent working on manufacturing and work orders.
The Shop Floor module is installed alongside the Manufacturing app. It cannot be installed by
itself. To install the Manufacturing app, navigate to , search for
manufacturing in the Search… bar, and then click Install on the
Manufacturing app card.
Important
The Shop Floor module replaces the tablet view functionality of the Manufacturing app, and is only available in Axis versions 16.4 and later.
To check the version number of an Axis database, navigate to and scroll down to the About section at the bottom of the page. The version number is displayed there.
To switch to a newer version of Axis, see the documentation on upgrading a database.
Navigation
Shop Floor is broken down into three main views, which can be selected from the navigation bar at the top of the module:
The All page serves as the main dashboard for the module, and displays information cards for MOs.
Each work center also has a dedicated page, which shows information cards for work orders assigned to that work center. Work center pages can be toggled on or off by clicking the + (plus) button in the navigation bar, selecting or deselecting them on the pop-up window that appears, and then clicking Confirm.
The My page shows information cards for all work orders assigned to the employee whose profile is currently active in the operator panel on the left side of the module. Other than only showing work orders assigned to the active employee, this page functions the same as the pages for each work center.
Tip
To isolate an MO or work order, so that no other orders appear, simply search the reference number of the MO in the Search… bar at the top of the module. This search filter remains active while switching between the different module views.
On the left side of the module is the operator panel, which shows all of the employees currently signed in to Shop Floor, and allows new employees to sign in. The operator panel is always available in the module, regardless of which view is selected. It can be toggled on or off by clicking the sidebar button at the extreme left of the navigation bar.
All page
By default, the All page shows an information card for every MO that is ready to start. An MO is considered ready to start once it has been confirmed, and all required components are available.
To view every confirmed MO regardless of readiness, click the x button on the Ready to Start filter to remove it from the Search… bar.
MO information card
An MO information card on the All page shows all of the relevant details of the associated MO, and also provides employees with options for processing the MO.
The header for an MO card shows the MO number, the product and number of units being produced, and the status of the MO. If work has not yet begun on the MO, the status appears as Confirmed. Once work has begun, the status updates to In Progress. If all work orders for an MO have been completed and the MO is ready to close, the status updates to To Close.
The main body of an MO card shows a line for each completed work order, if any, followed by the current work order that needs to be completed. Completed work orders are indicated by a green check mark to the right of title of the work order. The current work order is indicated by a button that opens the page for the work center to which the order is assigned.
Below the current work order is a line titled Register Production, which is used to record the number of product units produced. To manually enter the number of units produced, click on the Register Production line, enter a value in the Units field of the resulting pop-up window, then click Validate.
Alternatively, click the # Units button on the right side of the line, which automatically records the number of units the MO was created for as the number of units produced. For example, if an MO is created for 10 units of a dining table, clicking the 10 units button records that 10 units were produced.
The footer of the MO card displays a Close Production button. This is used to close the MO once production is completed. However, if there are any quality checks required for the MO as a whole (not the work orders within it), a Quality Checks button appears instead. Clicking Quality Checks opens a pop-up window, from which any required quality checks can be completed.
After clicking Close Production, the MO card begins to fade away, and an Undo button appears on the footer. Clicking Undo causes the MO to remain open. Once the MO card disappears completely, the work order is closed.
On the right side of the footer is an ⋮ (options) button, which opens a pop-up window with additional options for the MO:
Scrap is used to send components to a scrap location when they are found to be defective.
Add Work Order is used to add an additional work order to the MO.
Add Component is used to add an additional component to the MO.
Open Backend MO opens the MO in the Manufacturing app.
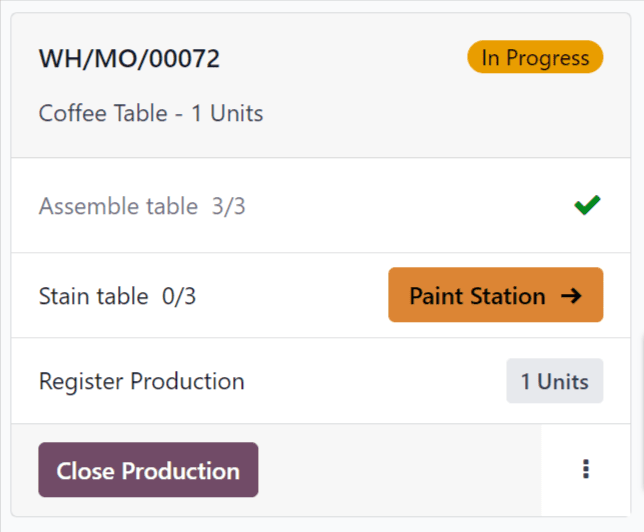
Work center pages
By default, the page for each work center shows an information card for every work order assigned to it that is ready to start. A work order is considered ready to start once the MO it is a part of is ready to start, and any preceding work orders have been completed.
To view every confirmed work order assigned to a work center regardless of readiness, click the x button on the Ready to Start filter to remove it from the Search… bar.
Work order information card
A work order information card on a work center’s page shows all of the relevant details of the associated work order, and also provides employees with options for processing the work order.
The header for a work order card shows the reference number of the MO that the work order is a part of, the product and number of units being produced, and the status of the work order. If work has not yet begun on the work order, the status appears as To Do. Once work has begun, the status updates to display a timer showing the total time the work order has been worked on.
The main body of a work order card shows a line for each step required to complete the work order. Work order steps can be completed by clicking on the line, then following the instructions on the pop-up window that appears. Alternatively, clicking the checkbox on the right side of each line automatically marks the step as completed.
Below the final step of the work order is a line titled Register Production, which functions the same as the Register Production line on an MO card. Registering the number of units produced using the Register Production line on a work order card also completes the step for the associated MO card.
If the work order being processed is the final work order for the MO, a Close Production button appears on the footer of the work order card. Clicking Close Production closes both the work order and the MO, unless a quality check is required for the MO. In this case, the quality check must be completed from the MO card before the MO can be closed.
Alternatively, if the MO requires the completion of additional work orders, a Mark as Done button appears instead. Clicking Mark as Done marks the current work order as completed, and causes the next work order to appear on the page for the work center it is assigned to.
After clicking Close Production or Mark as Done, the work order card begins to fade away, and an Undo button appears on the footer. Clicking Undo causes the work order to remain open. Once the work order card disappears completely, the work order is marked as Finished on the MO.
On the right side of the footer is an ⋮ (options) button, which opens a pop-up window with additional options for the work order:
Scrap is used to send components to a scrap location when they are found to be defective.
Add Component is used to add an additional component to the MO.
Move to work center is used to transfer the work order to a different work center.
Suggest a Worksheet improvement allows the user to propose a change to the work order’s instructions or steps.
Create a Quality Alert opens a quality alert form that can be filled out to alert a quality team about a potential issue.

Operator panel
The operator panel is used to manage the employees that are signed in to the Shop Floor module. The panel shows the name and profile picture of every employee that is currently signed in across all instances of the database.
To interact with Shop Floor as a specific employee, click the employee’s name to activate their profile. Profiles that are not active appear with their names and profile pictures greyed-out.
When an employee is selected in the operator panel, they can begin working on a work order by clicking the work order’s heading. If an employee is working on one or more work orders, the work order title(s) appear under their name, along with a timer showing how long they’ve been working on each order.
To add a new employee to the operator panel, click the + Add Operator button at the bottom of the panel. Then, select an employee from the Select Employee pop-up window.
To remove an employee from the operator panel, simply click the x button next to their name in the panel.
MO/WO prioritization
The Shop Floor module uses the scheduled date entered on MOs to prioritize the MOs and work orders that appear on the module’s dashboard and work center pages. MOs and work orders scheduled sooner are more highly prioritized, and appear before orders which are scheduled further out.
To specify the scheduled date on an MO, begin by navigating to , and click New to create a new MO.
Click on the Scheduled Date field to open a calendar popover window. By default, the Scheduled Date field, and its corresponding pop-up window, show the current date and time.
Use the calendar to select the date on which processing should begin for the MO. In the two fields at the bottom of the popover window, enter the hour and minute at which processing should begin, using the 24-hour clock format.
Finally, click Apply at the bottom of the popover window to set the date and time for the Scheduled Date field. Then, click the Confirm button at the top of the MO to confirm it.
Once the MO is confirmed, it appears in the Shop Floor module, as long is it has the Ready status, which means all components are available.
On the Axis dashboard, click on the module to open it. The All MO # page of the dashboard displays Ready MOs, organized in order of their scheduled dates.
At the top of the module, select a work center to see the work orders assigned to it. The page for each work center organizes work orders, based on the scheduled dates of their corresponding MOs.
Example
Three MOs are confirmed for a Bookcase product:
WH/MO/00411 has a Scheduled Date of August 16th.
WH/MO/00412 has a Scheduled Date of August 20th.
WH/MO/00413 has a Scheduled Date of August 18th.
On the All MO # page of the Shop Floor module, the cards for each MO appear in this order: WH/MO/00411, WH/MO/00413, WH/MO/00412.
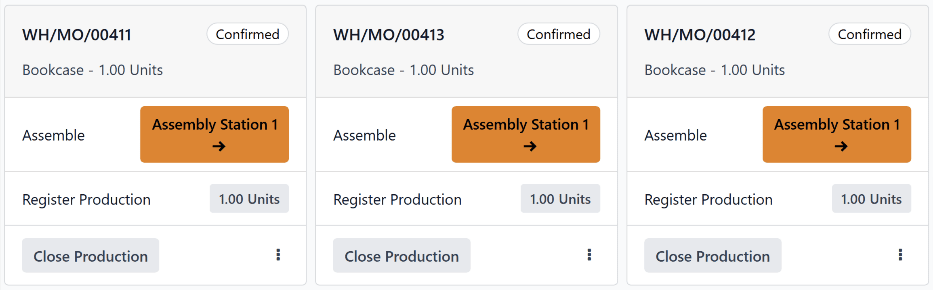
Each MO requires one work order, carried out at Assembly Station 1. Clicking on the Assembly Station 1 button at the top of the screen opens the page for the work center, which displays one card for each work order, appearing in the same order as their corresponding MOs.
By signing in to the Axis Shop Floor module as operators, employees are able to track the amount of time they spend working on each work order.
Axis tracks the time it takes to complete each work order, as well as the time each operator spends on each work order.
Operator sign in
To sign in to the Shop Floor module as an operator, sign in to the Axis database, and open the module. The employee profile that is signed in to the database is automatically signed in as an operator.
All active operators are listed in the operator panel on the left side of the module. The panel can be opened or collapsed by clicking the show/hide panel (white square with black column on left side) button, located in the top-left corner of the module.

To sign in to Shop Floor as a different employee, click the + Add Operator button at the bottom of the panel. Doing so opens the Select Employee pop-up window, which lists every employee that is able to sign in to the module.
Click on a specific employee to sign in using their profile. If no PIN code is required to sign in as that employee, the profile will be signed in automatically.
If a PIN code is required, a Password? pop-up window appears, showing a number pad, from which the code can be entered. Enter the code using the number pad, and click Confirm to sign in to the Shop Floor module.
Note
A PIN code can be set for each employee, which must be entered each time they sign in to the Shop Floor module, check in or out in the Kiosk Mode of the Attendances application, or sign in as a cashier in the Point of Sale application.
To set an employee PIN, navigate to the app, and select a specific employee. At the bottom of the employee’s form, click on the HR Settings tab, and enter a numerical code in the PIN Code field.
Once an employee is signed in to the module, their name appears in the operator panel, along with every other employee that has signed in. While the panel can list multiple employees, only one employee can be active at any given time, on a single instance of the Shop Floor module.
Click on an employee’s name to make their profile active. The active employee appears highlighted in blue, while employees that are signed in, but not active, have their names faded out.
To sign out a specific employee from the module, click the X (remove) button next to their name, in the operator panel.
Track work order duration
To track time spent working on a work order, begin by selecting the employee working on it from the operator panel.
Next, navigate to the page for the work center where the work order is scheduled to be carried out. This can be done by selecting the work center from the top navigation in the Shop Floor module, or by clicking the name of the work center on the card for the manufacturing order (MO) that the work order is a part of.
On the page for the work center, find the card for the work order. Once work begins, click the header of the work order card to start timing the duration it takes to complete. This duration is displayed by a timer on the header of the work order card, which tracks the collective time spent working on the work order, by all employees.

In addition, the reference number of the work order appears in the operator panel, under the name of the employee working on it, along with a second timer, which tracks the amount of time the employee has spent on the work order individually. This timer only reflects work done during the current session, even if the employee has previously worked on the work order.
Employees are able to work on multiple work orders simultaneously, and track their time for each. The reference number for each work order being worked on appears below the employee’s name, along with a timer.
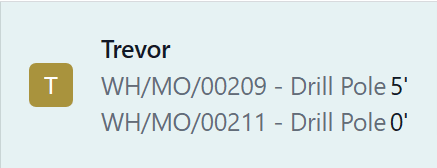
To pause the timer on the work order card, and remove the work order from below the employee’s name on the operator panel, click the header a second time.
Once the work order is completed, click the Mark as Done button at the bottom of the work order card, which causes the card to fade away. If the timer is still active, it stops once the card disappears completely.
View work order duration
To view the duration of a work order, navigate to , and select an MO.
To view and select MOs that have been completed and marked as Done, remove the To Do filter from the Search… bar, by clicking on the X (close) button on the right side of the filter.
On the page for the MO, click on the Work Orders tab to see a list of all work orders included in the MO. The time it took to complete each work order is displayed in the Real Duration column of the tab.
The Real Duration represents the total time spent working on the work order by all workers who worked on it. It includes time tracked in the Shop Floor module, as well as time tracked on the Work Orders tab of the MO itself.